The USP Helper plugin makes it easy to display Custom Fields in submitted posts. Works to display custom fields on the frontend, backend, or both. The USP Helper plugin is available as a FREE download for all owners of USP Pro. This post explains how to use the Helper plugin and provides additional information, tips and tricks.
Contents
- Overview
- Add Custom Fields
- Configure Plugin Settings
- Important Notes
- Tips & Tricks
- Plugin Hooks
- Download
- Related Posts
Overview
To get started with USP Helper, follow these steps:
- Download, install, and activate USP Helper addon
- Visit the plugin settings to add your custom fields and configure your options
Done! USP Helper will display the specified custom fields automatically. The USP Helper plugin supports the following types of custom fields: text/markup, images, audio, video, array values, and just about anything else you can throw at it :)
Add Custom Fields
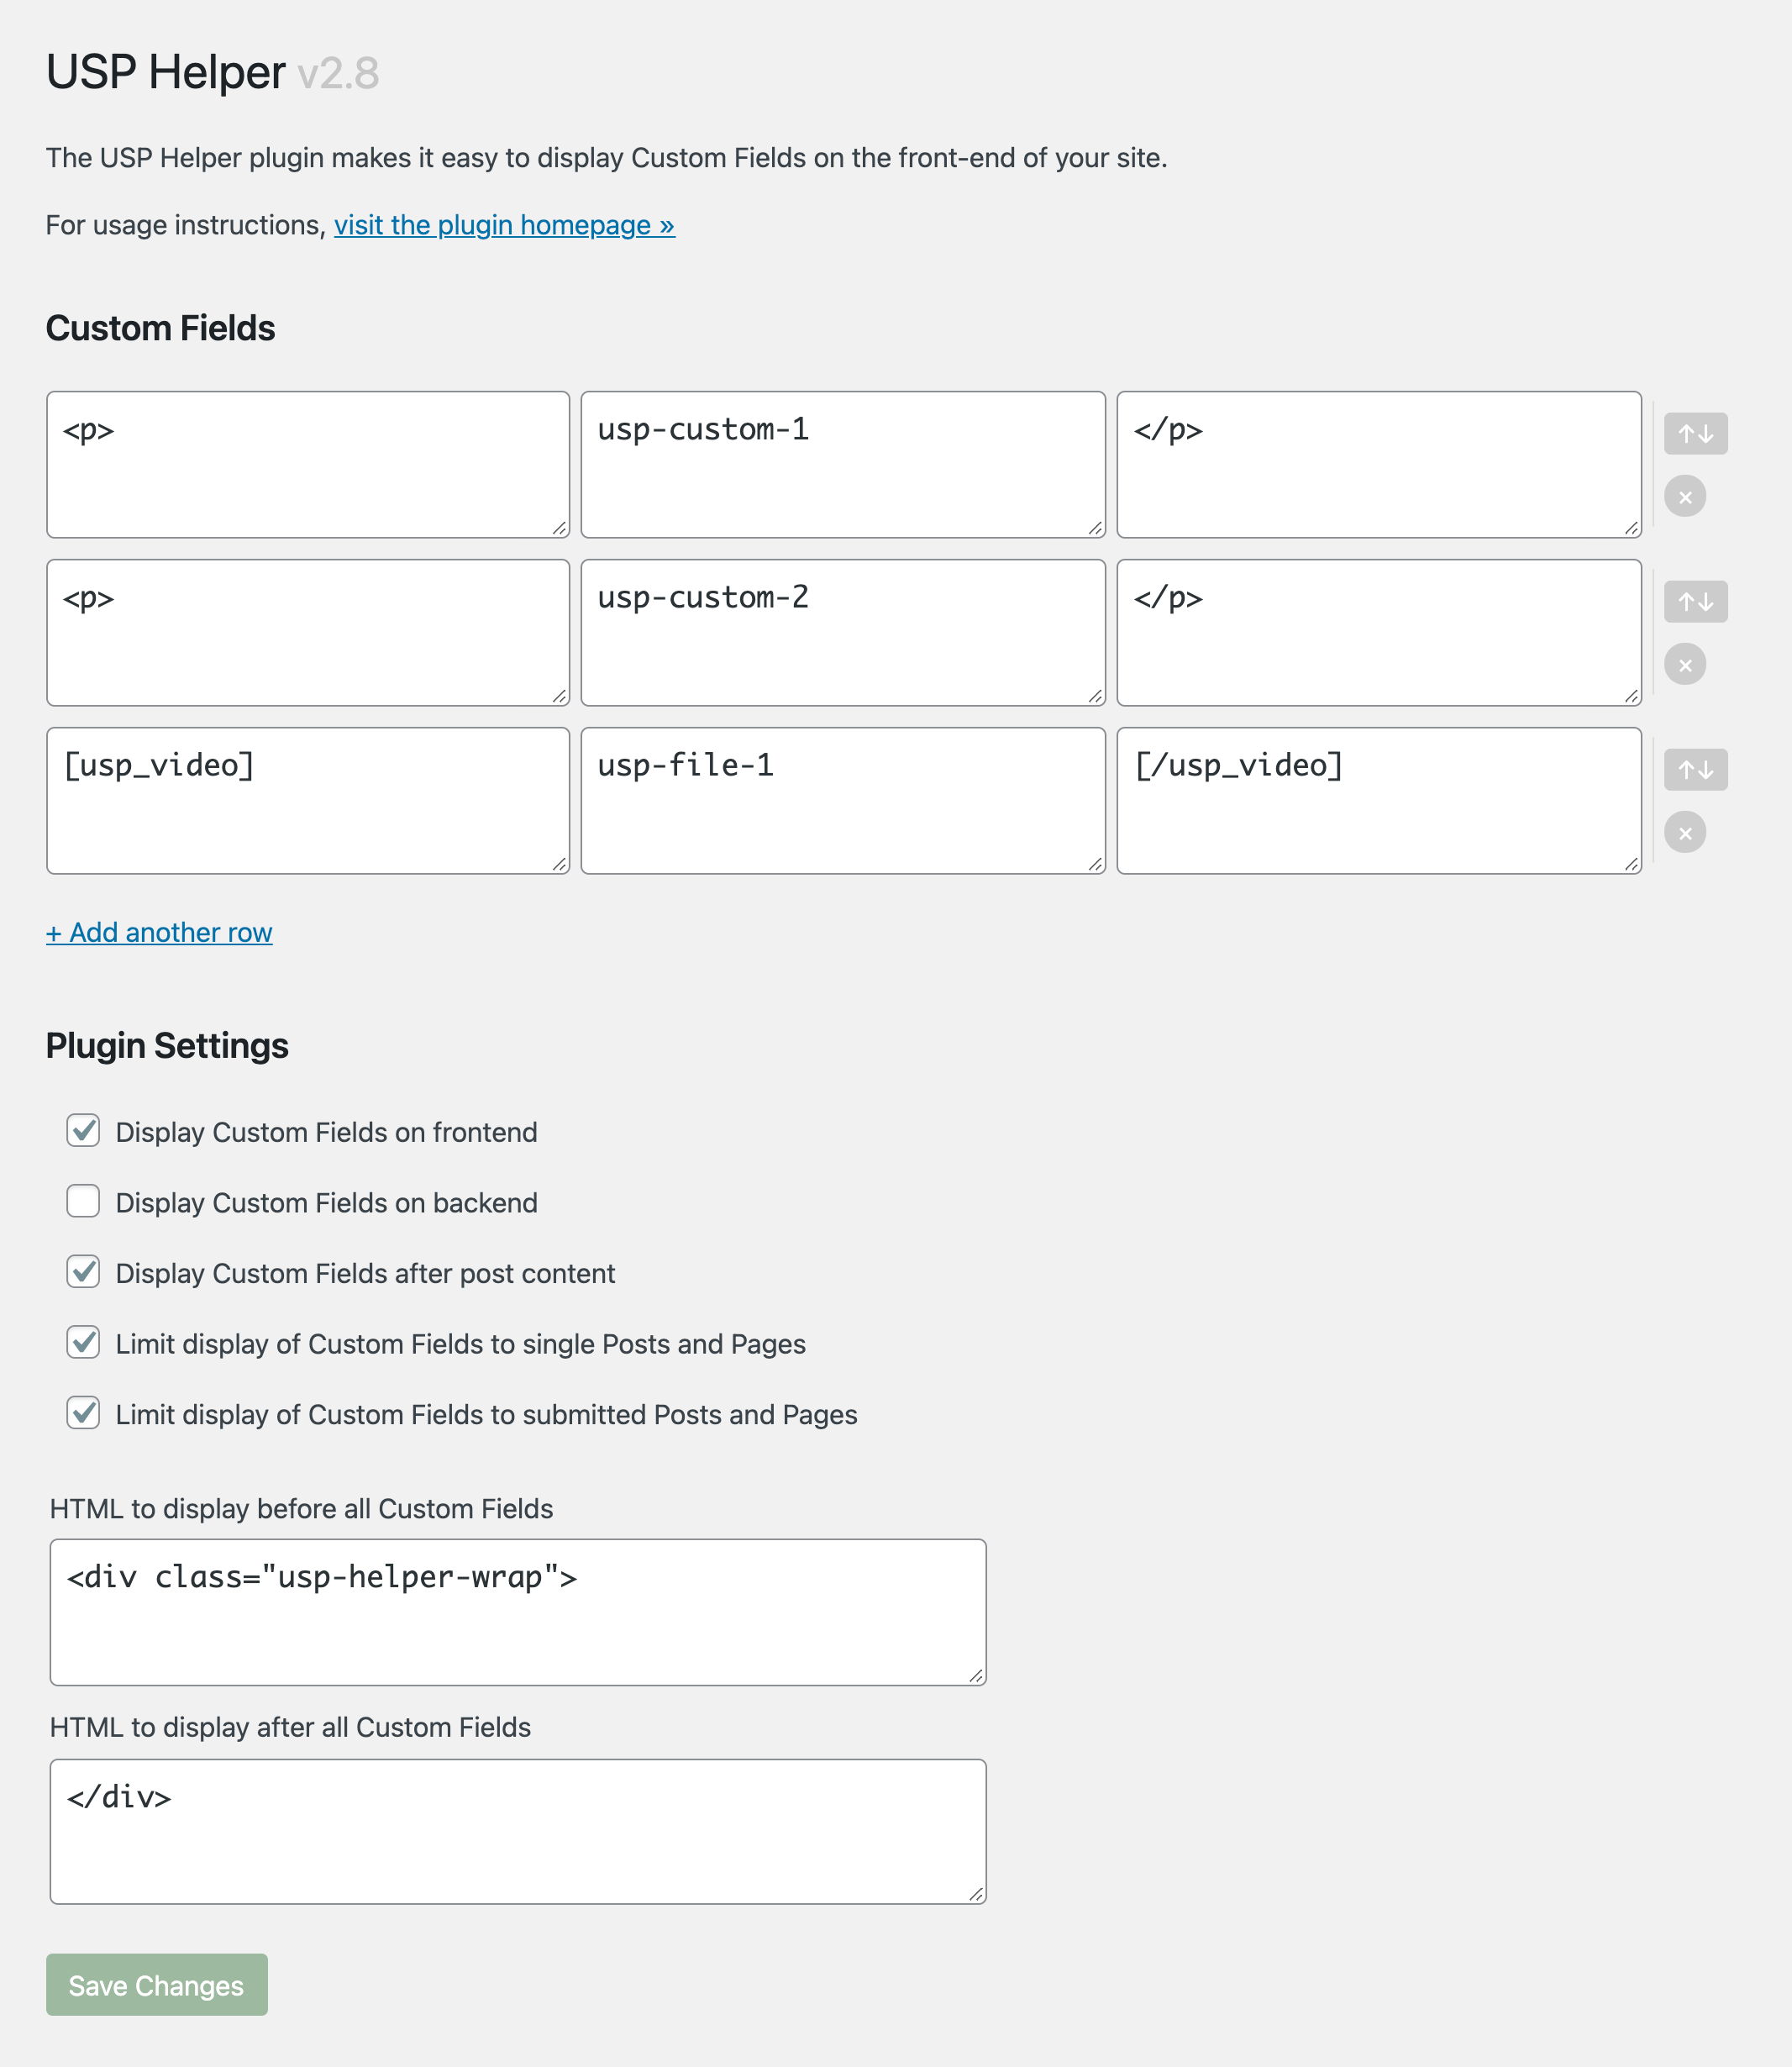
Right up front, the plugin provides a place to define any custom fields that you want to display on the front-end (and/or back-end) of your site. Each field may be customized with text/markup that should be included before and/or after the contents of the custom field. For example, here is a screenshot showing configuration to display three custom fields: usp-custom-1, usp-custom-2, and usp-file-1.
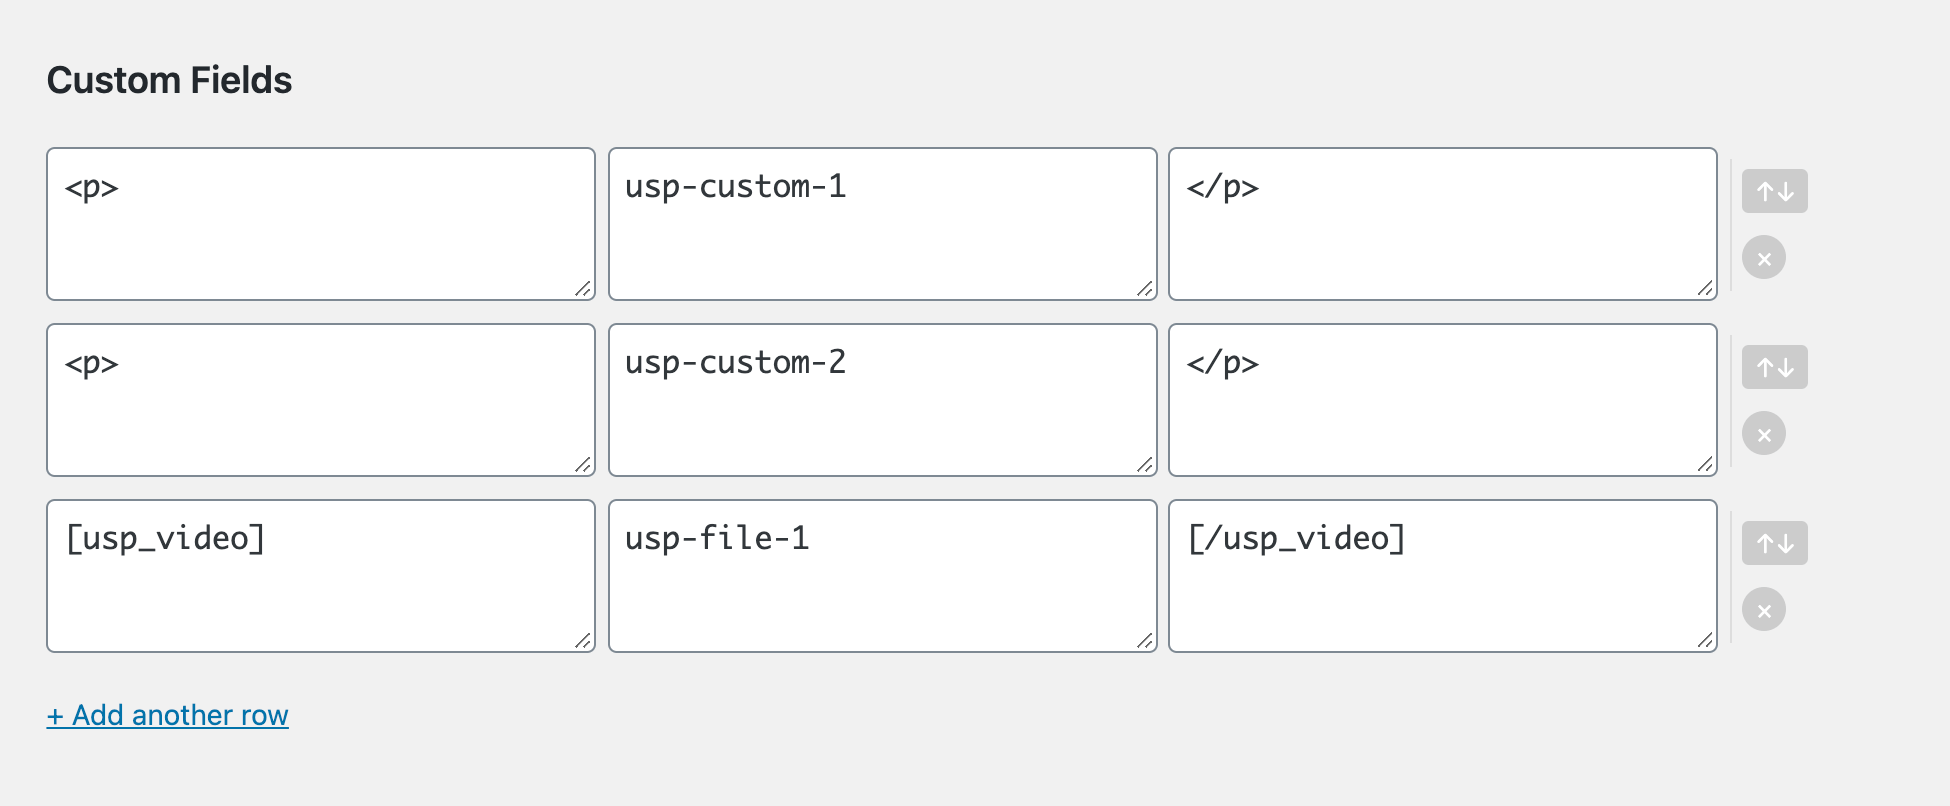
- The first column is for any text/markup that should be included before the custom field
- The middle column is for the name of the custom field
- The third column is for any text/markup that should be included after the custom field
In the example above, the first two rows display text-based custom fields. The third row displays a custom field that contains a video URL.
To add more custom fields, click the “Add another row” link. Or to remove any custom field, click its adjacent “x” button. To move any row to another location, grab the adjacent [↑↓] (up-down arrow) button and drag/drop the row into position.
Configure Plugin Settings
Next, the Helper plugin provides some general settings:
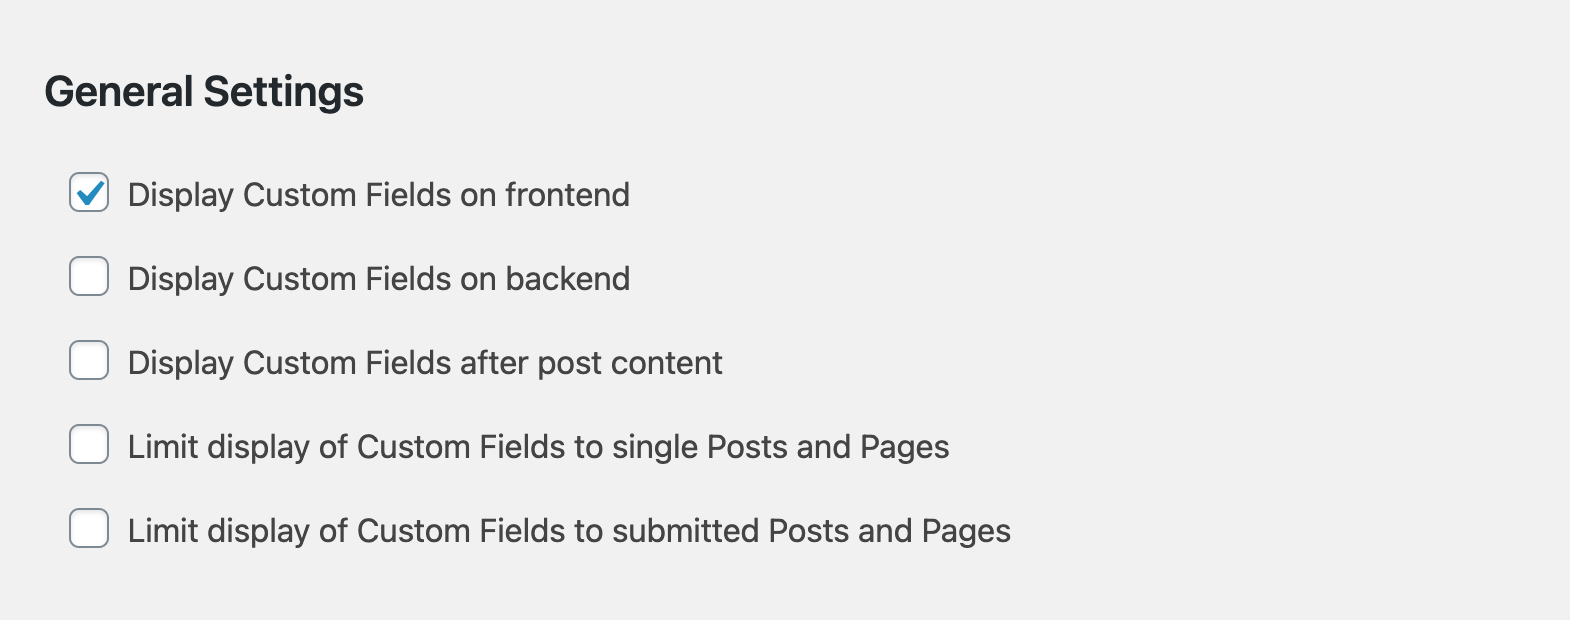
These settings enable you to customize when and where your custom fields are displayed.
- Display Custom Fields on frontend — check to enable display of custom fields on the frontend of your site
- Display Custom Fields on backend — check to enable display of custom fields on the backend of your site
- Display Custom Fields after post content — check the box to display the custom fields after post content; or leave the box unchecked to display the custom fields before post content
- Limit display of Custom Fields to single Posts and Pages — check this box to display the custom fields only on single Posts and Pages; or leave this box unchecked to display the custom fields everywhere (e.g., homepage, archives, etc.)
- Limit display of Custom Fields to submitted Posts and Pages — check this box to display the custom fields only on submitted Posts and Pages; or leave the box unchecked to display the custom fields on all Posts and Pages
The plugin also provides two settings where you can define any text/markup that should be displayed before and/or after all custom fields. Here is a screenshot to give you a better idea:
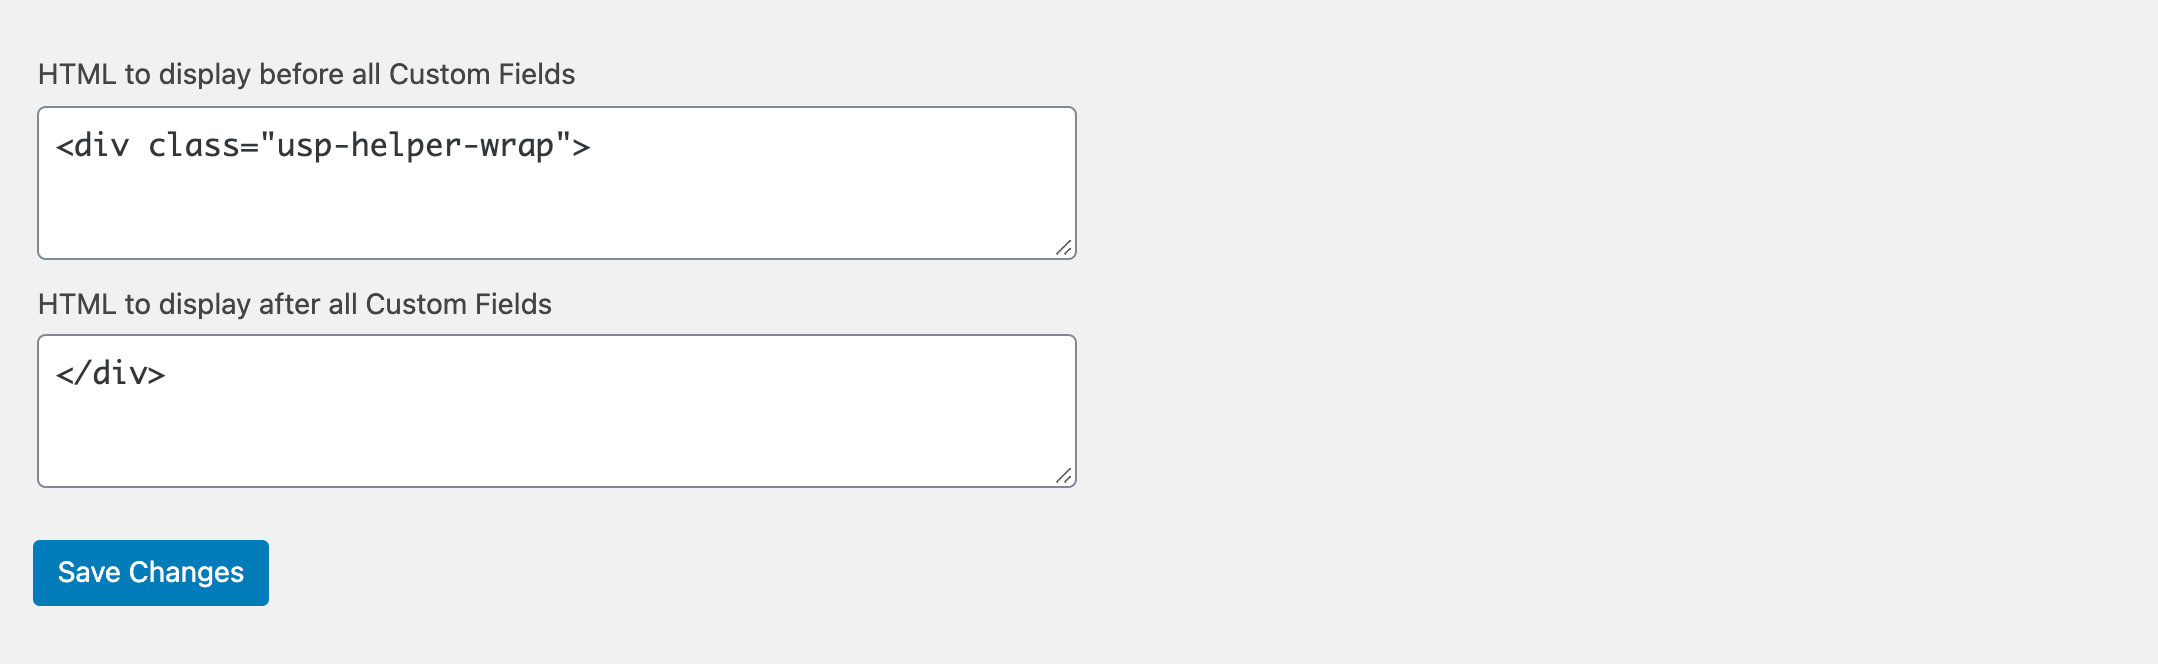
So for example, if you have configured 12 custom fields to be displayed, any text/markup entered in either of these settings will be included before/after the entire set of 12 custom fields. Something like this:
HTML to display before

12 custom fields

HTML to display after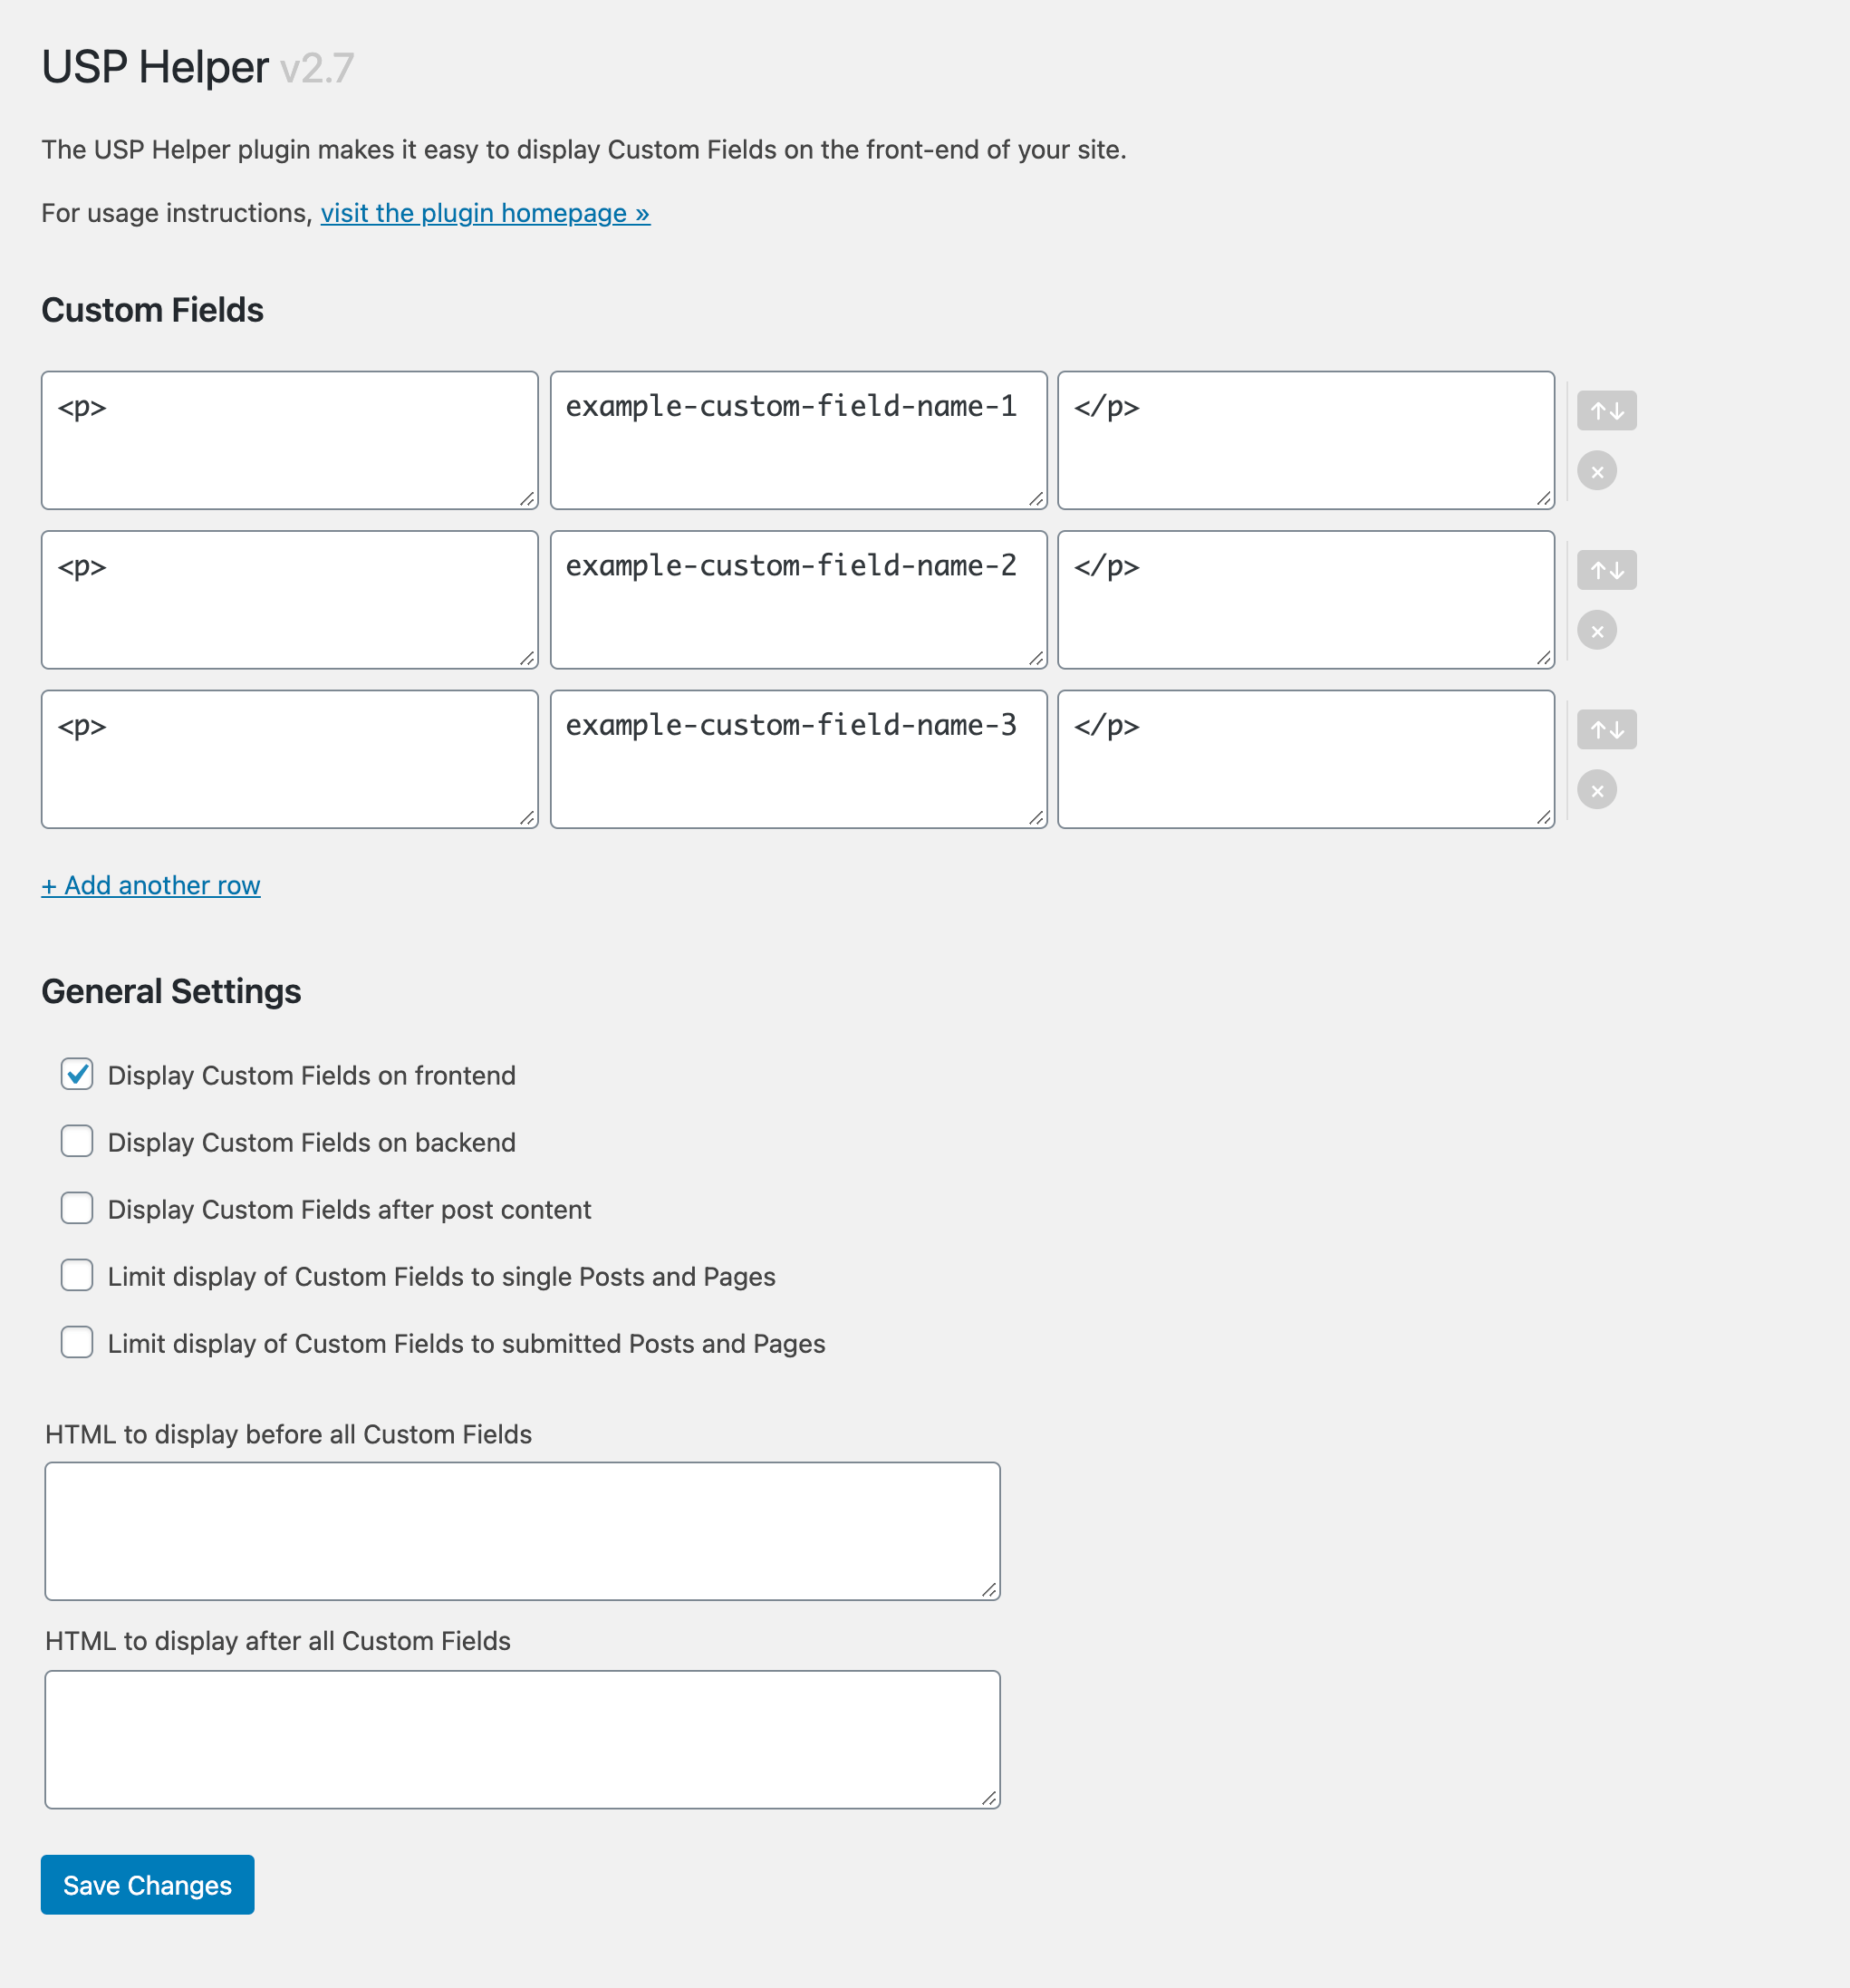
Important Notes
Here are some important things to be aware of when using USP Helper.
- The plugin setting “Limit to submitted posts” checks for a custom field named
is_submission. - USP Helper displays custom fields from any posts submitted via USP Pro or the free version of USP.
- To reset plugin settings to their default values, deactivate and uninstall (delete) the plugin, then re-install and reactivate.
- When the setting “Display on backend” is enabled, the plugin will attach a custom field named
usp-added-to-contentto each submitted post. So if you removeusp-added-to-contentfrom a post, any attached custom fields will be re-inserted/re-added to the post content. - When both settings “Display on frontend” and “Display on backend” are enabled, the custom fields will be displayed twice on the frontend. To prevent this, you can do one of two things:
- Disable the setting “Display on frontend” (automatic method, recommended)
- OR enable the setting, “Limit display of Custom Fields to submitted Posts and Pages”, and then delete the
is_submissioncustom field from each post (manual method, just FYI)
If you have any questions about USP Helper, you can post in the Support forum or send via our contact form.
Tips & Tricks
Here are some tricks and tips to help you get the most from the USP Helper plugin.
Displaying Video
If your USP Form includes a field where users can upload video files, you can use the Helper plugin to display the video on the front-end post. Simply wrap your custom-field name with [usp_video] shortcode, as shown in this screenshot:
Notice the third row. We add [usp_video] to the “before” field (left column), and [/usp_video] to the “after” field (right column). Then in the middle column, we specify the name of the custom field, usp-file-1, that contains the URL of the video file. So make sure to replace the name (middle column) with the actual name of your video custom field. Check out Getting Custom Field Names to learn more.
That’s all there is to it. Once configured, Helper plugin will output all the necessary HTML to display the uploaded video automatically on the front-end of your site.
usp-no-video with a value of true.Get Custom Field Names
Wondering where to get the names of your custom fields? Here is a screenshot that shows where to find them:
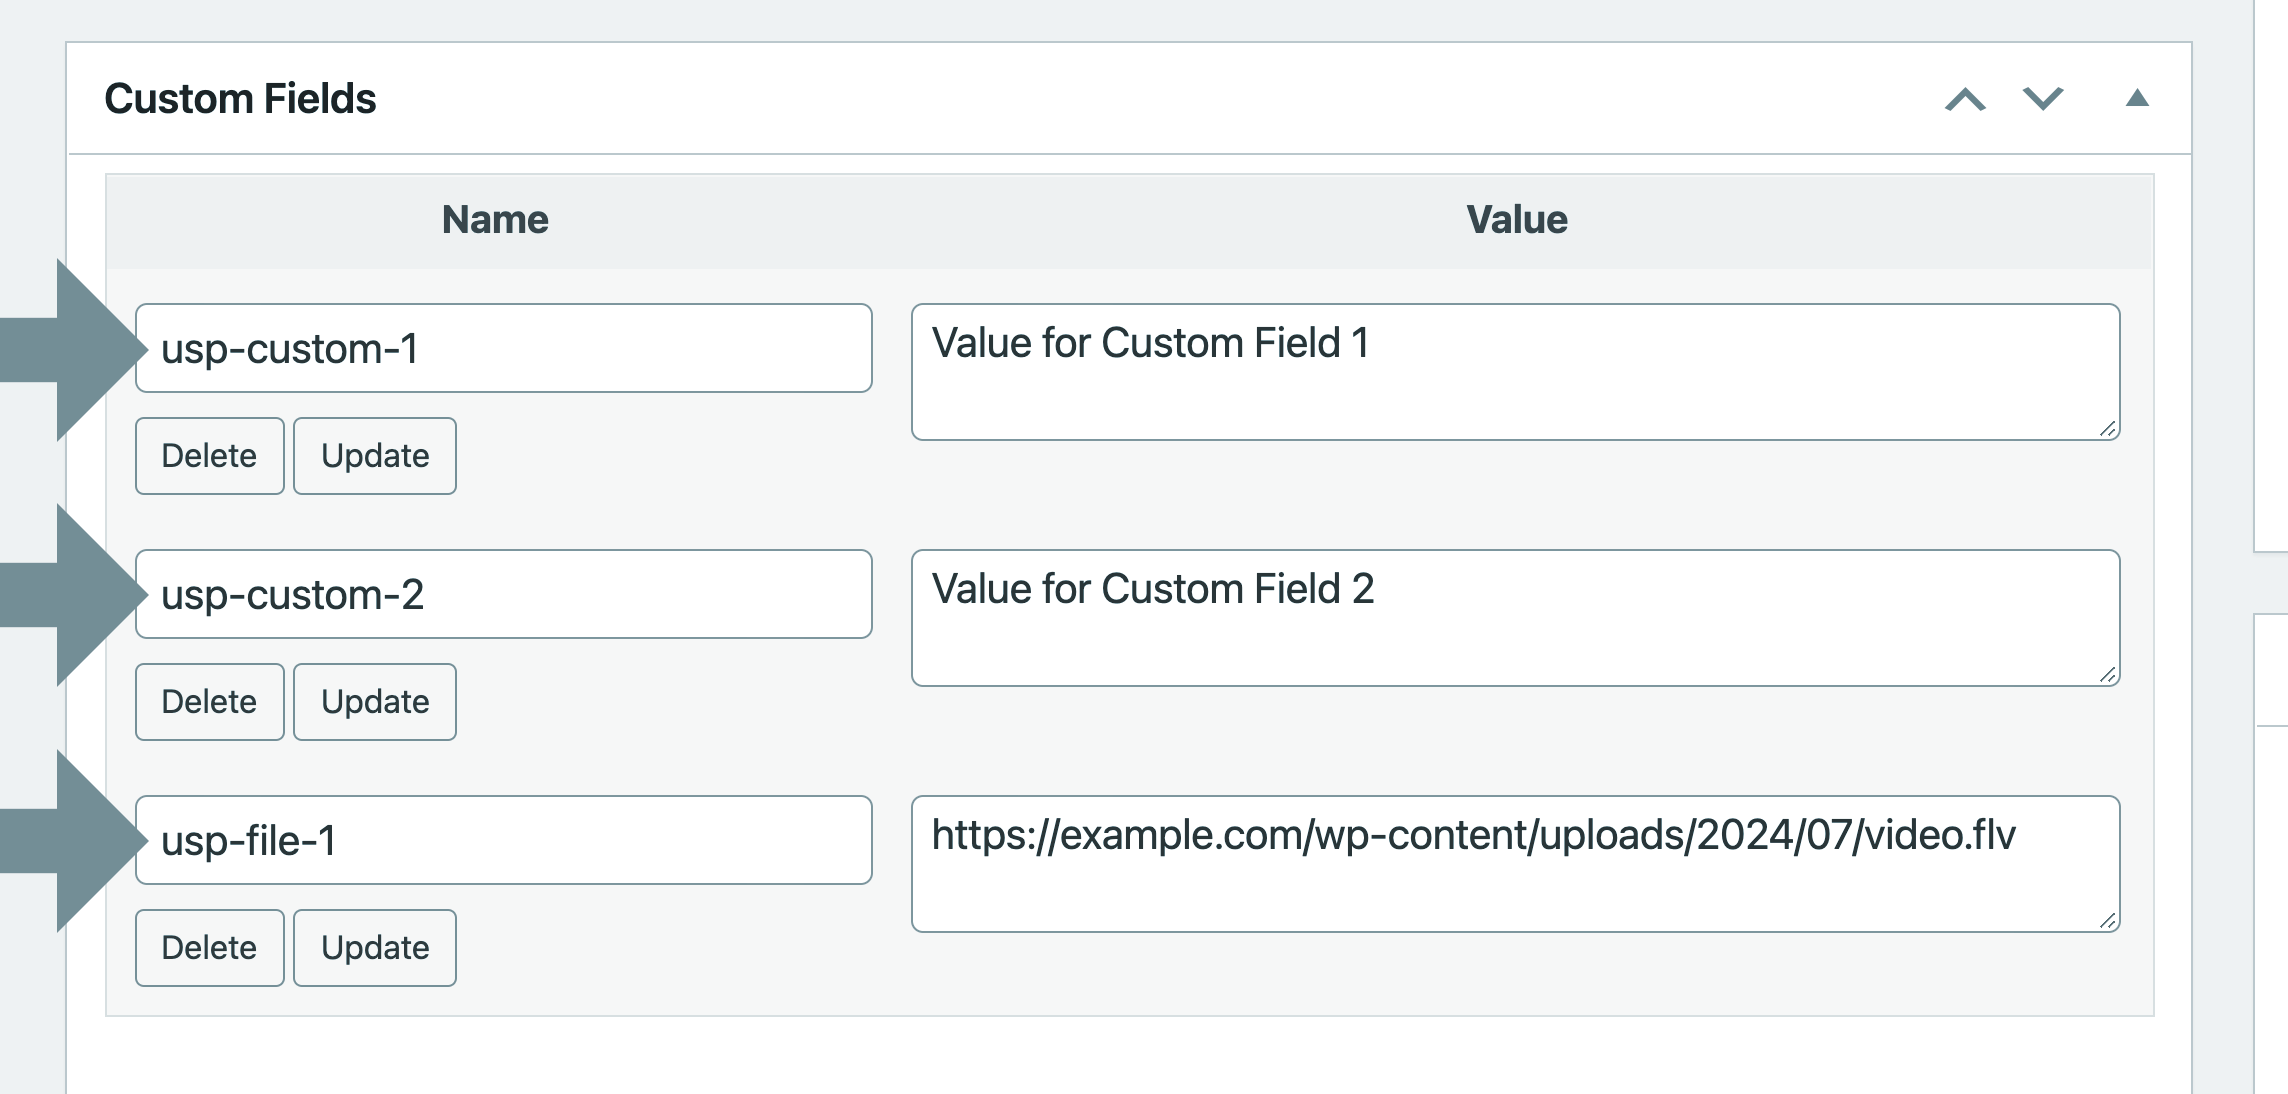
Shown here is the Custom Fields meta box, which is available beneath the Post Content field on the “Edit Post” screen of any WP Post. So to get the names of your custom fields, submit a test post and then view it on the Edit Post screen. There you can enable display of the “Custom Fields” meta box by clicking the Screen Options tab, located in the upper-right corner of the screen.
Custom Fields with Multiple Values
For custom fields with multiple values (i.e., arrays), add %%n in the plugin settings after the custom field name. For example, if our custom field is from a checkbox field that enables users to select up to four items, we can display the multiple values by configuring the fields like so:
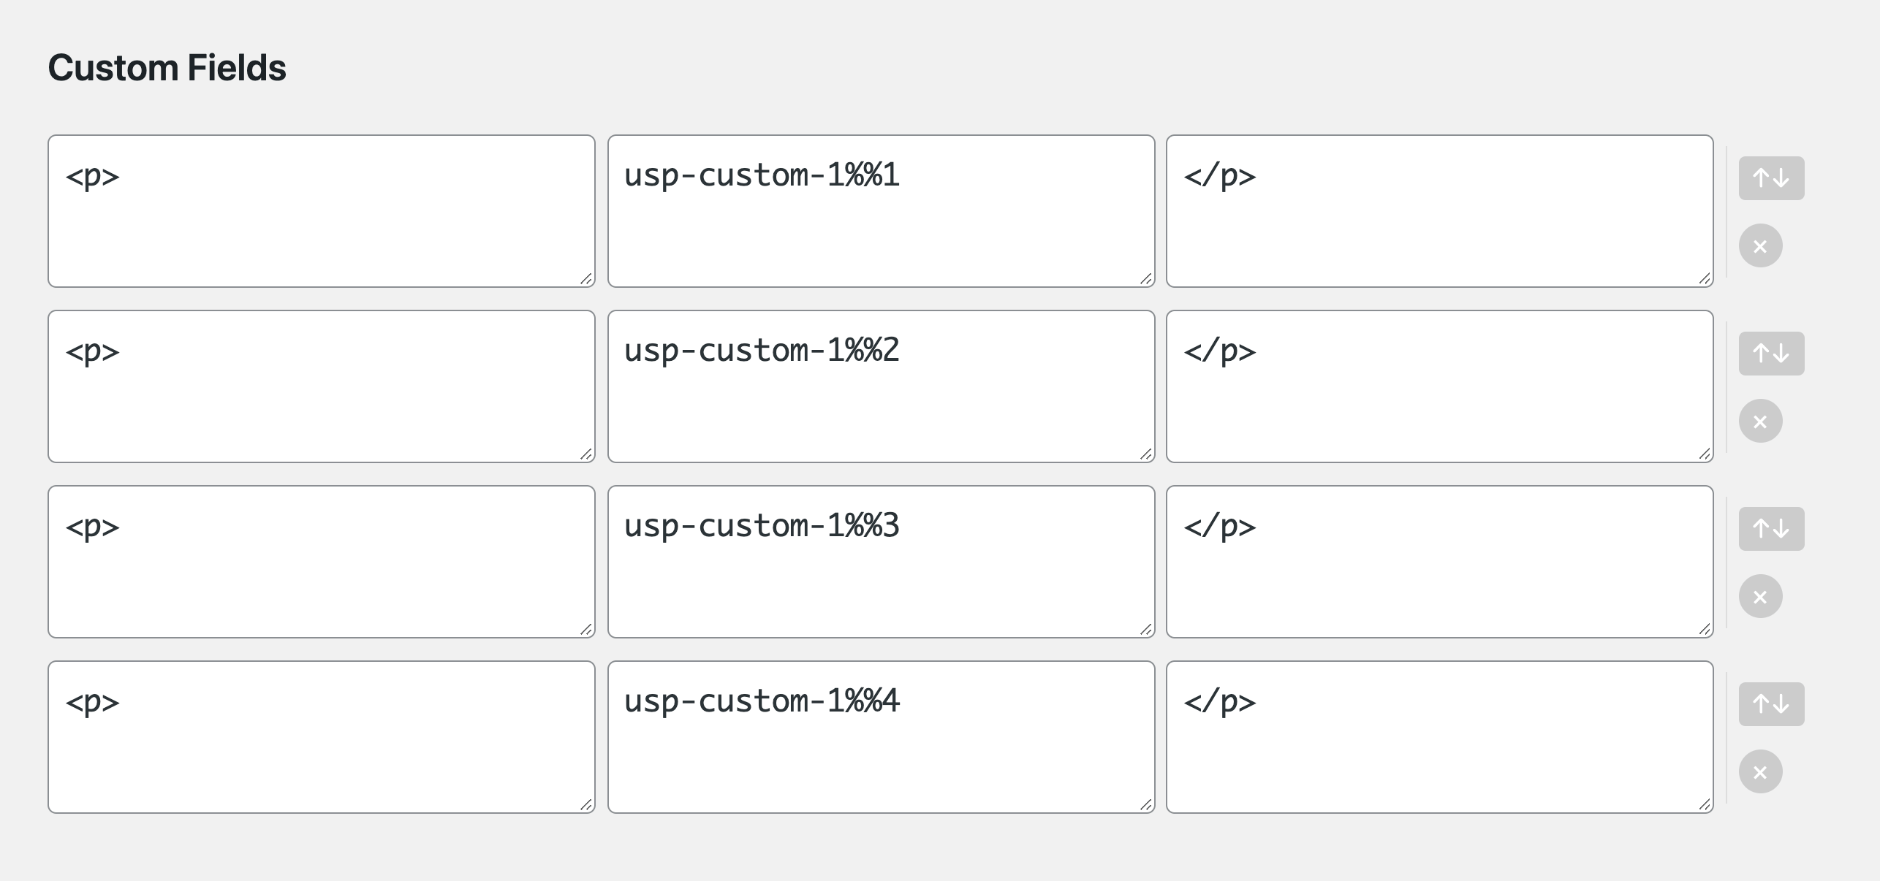
When using this method, be sure to define fields for the total number of possible values. So if your field lets the user pick up to seven items, then you should define seven custom fields using the %%n syntax (i.e., define fields from %%1 to %%7).
Nested Shortcodes
The Helper plugin supports nested shortcodes. So for example if you want to use WordPress’ audio shortcode, [audio], you can “nest” it in the Helper plugin, like so:
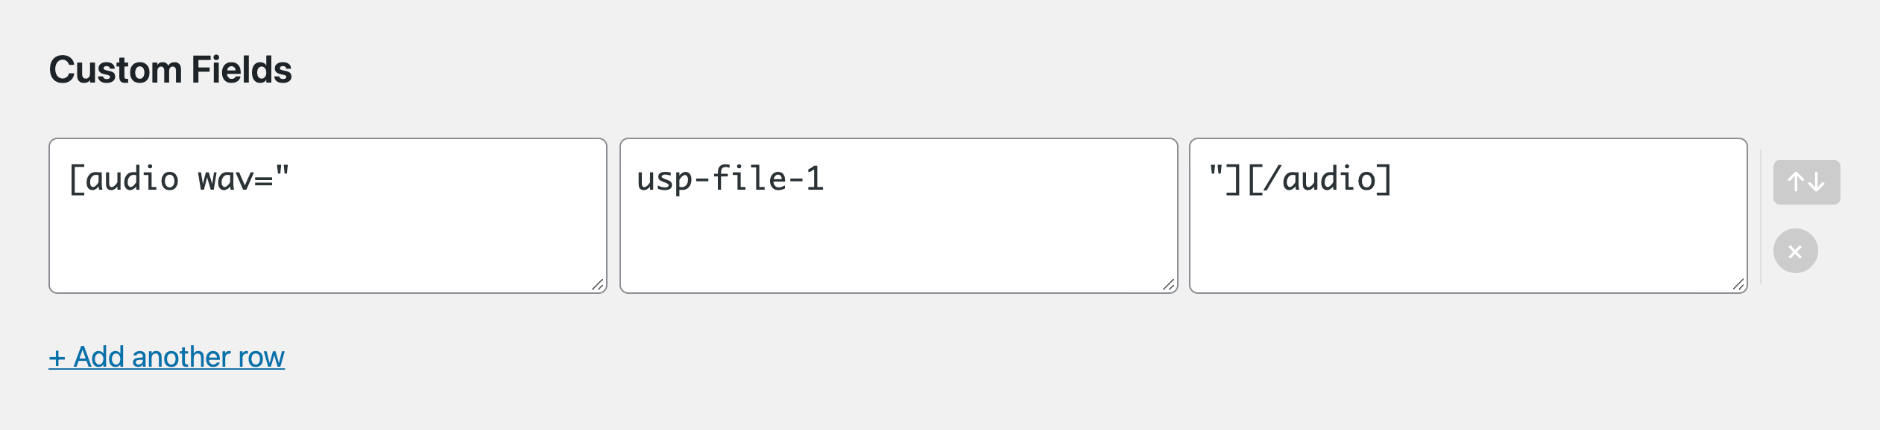
And the audio will be played automatically on the frontend. Remember to change the usp-file-1 to match the name of the custom field that is used for the uploaded audio file.
How does it work?
This configuration is the same as adding this shortcode:
[audio wav="usp-file-1"][/audio]
Normally WordPress would not understand usp-file-1, but the Helper plugin translates it, so what WordPress “sees” is this:
[audio wav="https://example.com/wp-content/uploads/example.wav"][/audio]
And that is something that WordPress understands. So the end result is that the submitted audio file will be displayed in the post content. Bada boom.
Nested Custom Fields
The Helper Plugin also enables nested custom fields. A good example of this would be a linked image. Say you have two custom fields on your form. The first custom field collects a link to something, like a website. The second custom field collects a URL for an image. These two custom fields can be used together to create a linked image, for example the output might look like this:
<p><a href="http://example.com/"><img src="http://example.com/images/whatever.jpg" alt=""></a></p>To achieve this using the Helper plugin, you can use the [usp_meta] shortcode. Here are the steps:
- Each row in the Helper Plugin has three input boxes. In the first box, add this:
<p><a href="[usp_meta meta='usp-file-1']"><img src=" - Then in the middle helper box, add this:
usp-file-1 - Lastly, in the third helper box, add:
" alt=""></a></p>
Note that single quotes must be used for the meta attribute on the [usp_meta] shortcode. Also, you will need to edit the usp-file-1 to match the name of the actual custom field being used.
More Tricks & Examples
Before wrapping up, here are a couple more examples to help you set things up.
Multiple custom fields
You can use multiple rows in the Helper plugin to create advanced custom field display. Here is an example:
<p><a href="        usp-custom-1           ">
                    usp-custom-2          </a></p>
In the above example, each line of code represents a row in the Helper plugin. Each row is divided into three sections, representing each of the three boxes in each row. Notice how we are using two different custom fields to display a single link. You can use as many rows as you want, so long as the middle box in each row includes the name of a custom field.
Link to file using filename
Another example, if you have a form that enables users to submit files, images, or whatever. You can use the Helper plugin to display a link to download the file, using the name of the custom field and a shortcode to display the filename.
<a href=" usp-file-1 ">[usp_filename file="1"]</a>The above code represents a row in the Helper plugin. The first box contains markup that opens a hyperlink. The second box is the name of the custom field that includes the URL of the file, and the third box uses a shortcode to display the name of the file.
Plugin Hooks
USP Helper includes the following filter hooks for advanced customization:
usp_helper_settings_default
usp_helper_display_frontend
usp_helper_display_backend
usp_helper_video_attributes
usp_helper_video_markup
usp_helper_allow_empty
usp_helper_video_src
usp_helper_video_types
usp_helper_video_support
Example usage
Say you want to allow empty/zero values for custom fields (by default they are not allowed). To do this, we can use the filter hook usp_helper_allow_empty like so:
function usp_helper_allow_empty($allow_empty) { return true; }
add_filter('usp_helper_allow_empty', 'usp_helper_allow_empty');
You can add that code to your theme’s (or child theme’s) functions.php file. Or you can make a simple custom plugin and add the code that way. Other hooks enable similar modifications. Refer to the main plugin file, usp-helper.php, to view these hooks in their native context.
Download
The Helper plugin is FREE for all owners of USP Pro. To download the latest version:
- Log in to your account
- Visit your Purchase History
- Click on “View Details and Downloads”
- There you will find links to download the Helper plugin
Here are complete steps to download your purchased plugins.
Questions & comments welcome :)
Related Posts
For advanced control over the display of your Custom Fields, check out these tutorials: