BBQ Pro is equipped with robust inline documentation that is available via the “Help” tab on any BBQ admin screen. The Help tab is your shortcut to complete information on BBQ Settings, Firewall, Tools, License, and more. The information provided below covers the settings and features that are included with BBQ Pro, but it doesn’t go into as much depth as the inline documentation.
Settings
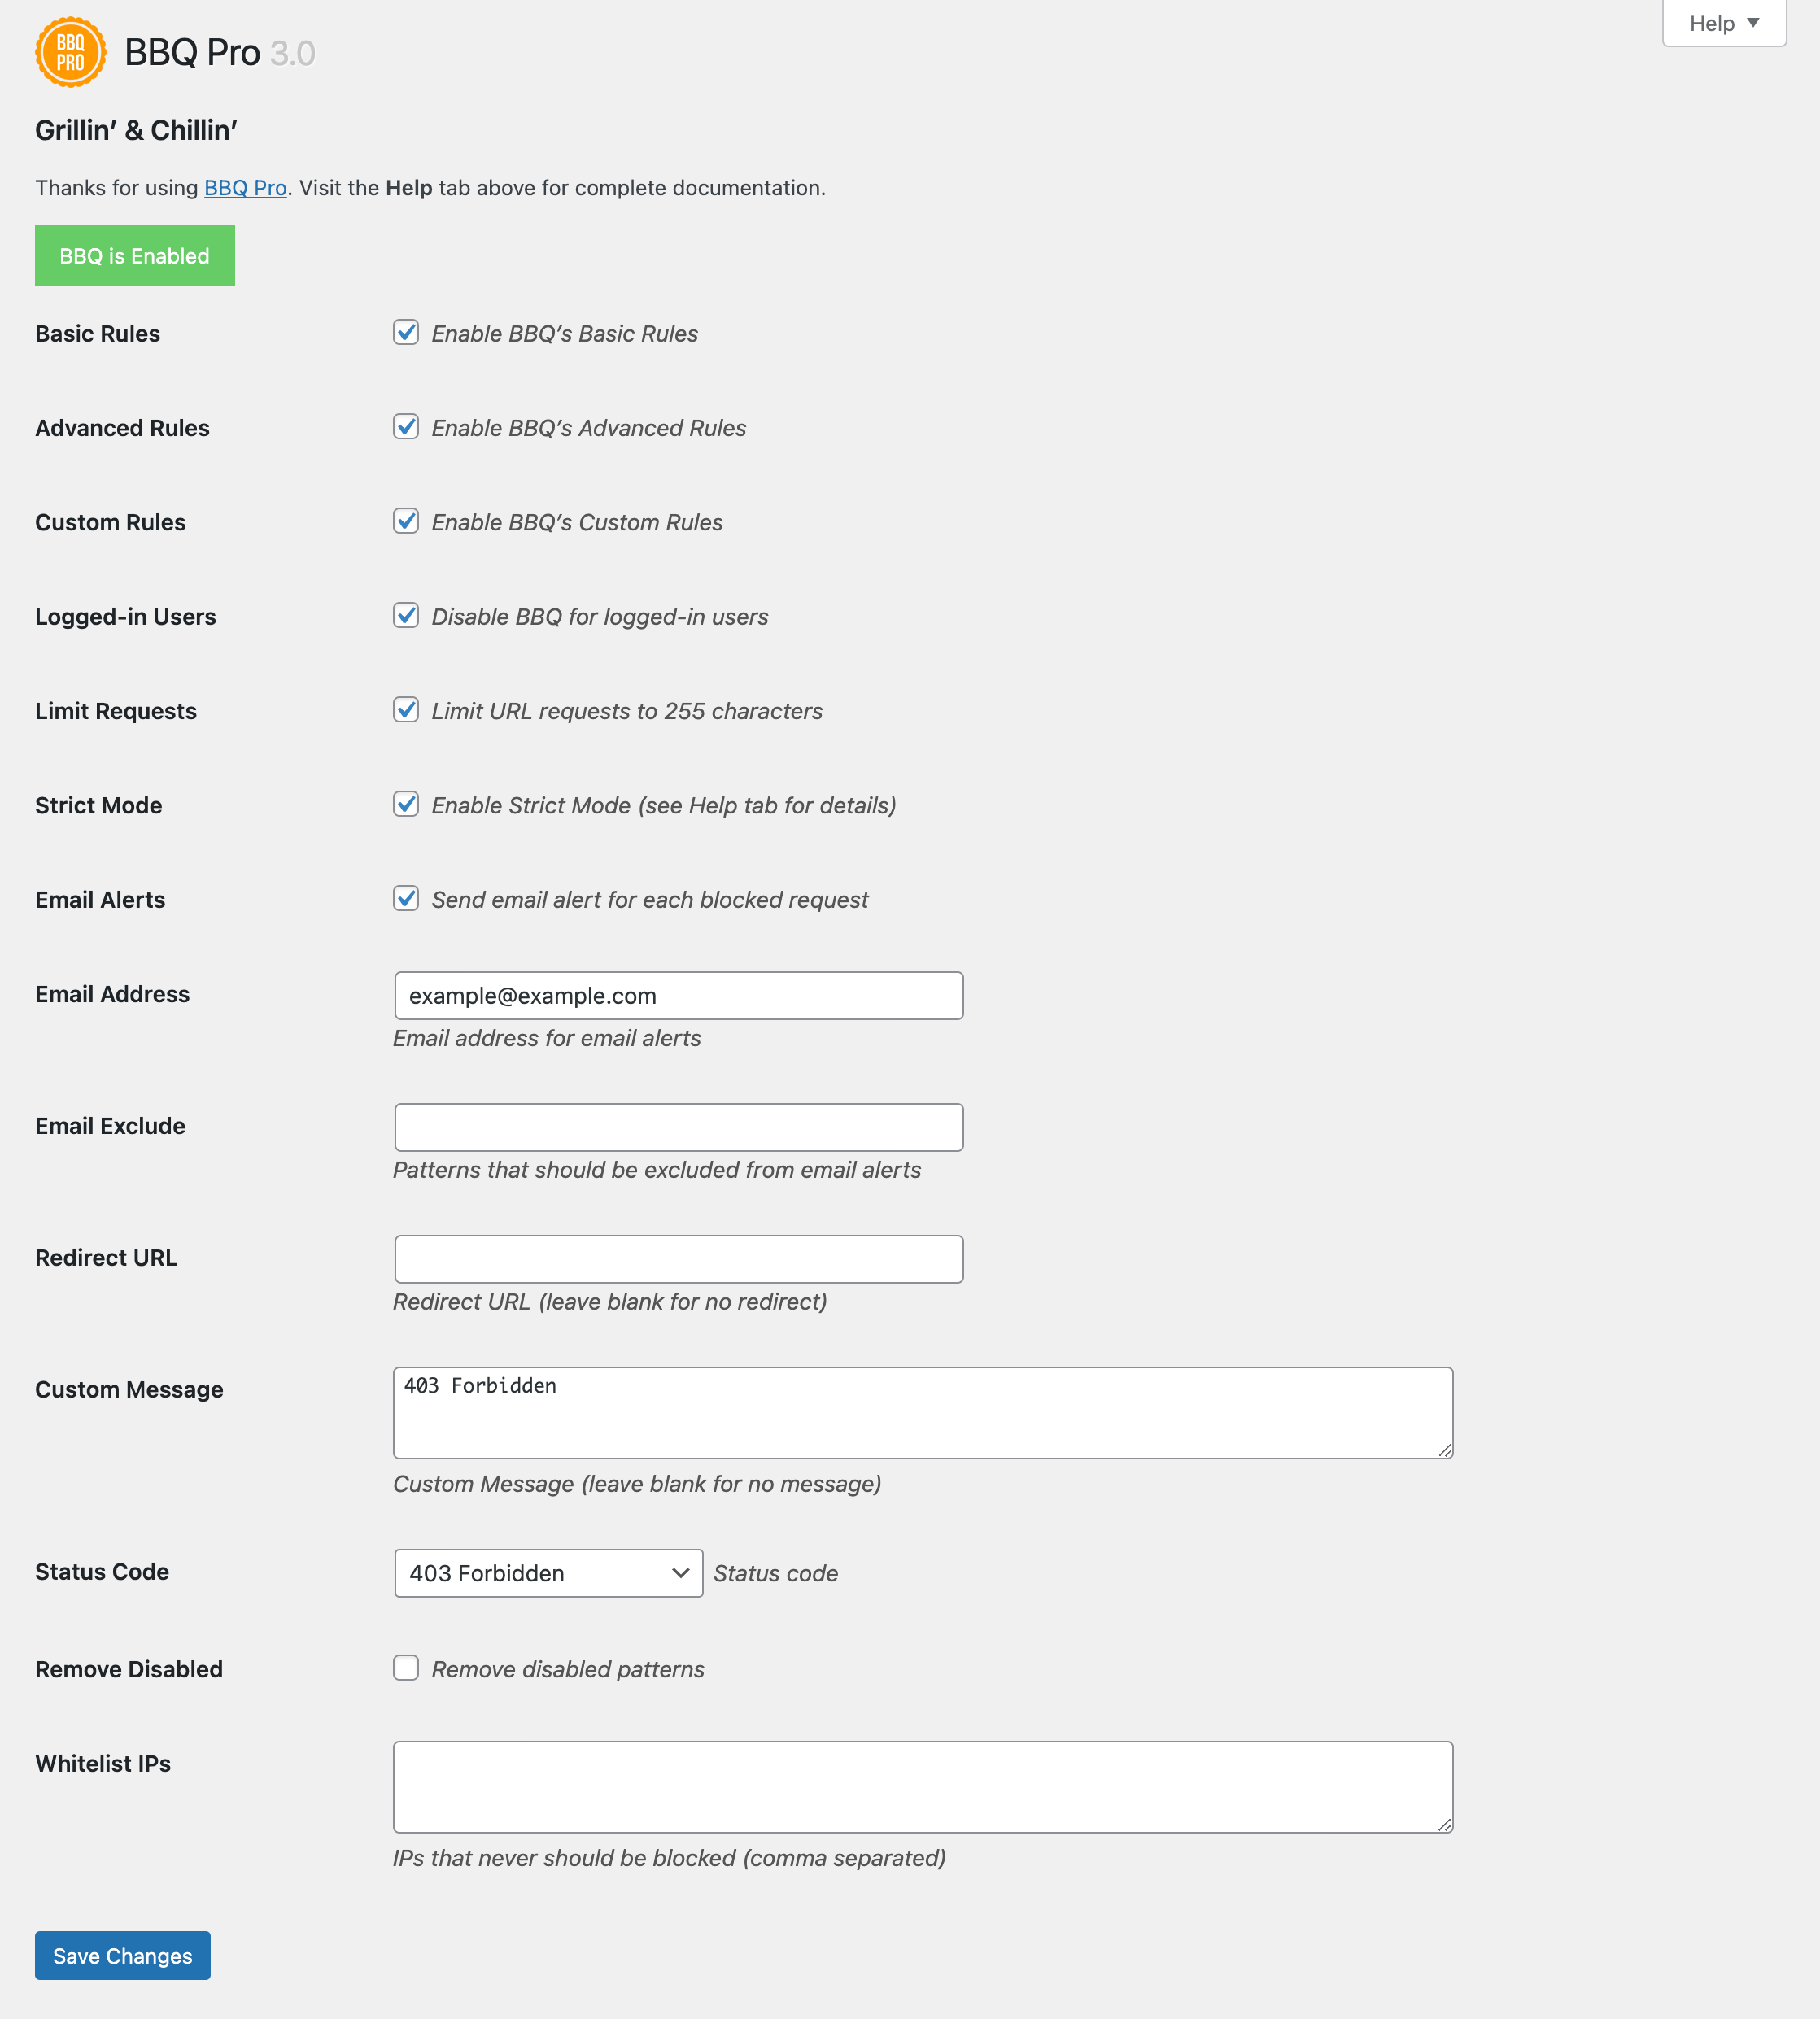
BBQ Pro settings include options for enabling/disabling rulesets, disabling BBQ for logged-in users, enabling protection against excessively long queries, and customizing how BBQ responds to blocked requests. View BBQ Settings »
Basic Rules
This setting enables BBQ Pro’s Basic Rules.
This setting enables BBQ’s basic security rules. The Basic Rules are virtually identical to those provided in the free version of BBQ. They are well-tested with WordPress and will protect your site against some of the most common types of malicious attacks and exploits. You can fine-tune the Basic Rules by visiting the “Basic” tab on the Firewall screen.
Default: enabled
Advanced Rules
This setting enables BBQ Pro’s Advanced Rules.
This setting enables BBQ’s Advanced Rules. This includes further protection against a variety of malicious attacks. The Advanced Rules primarily are derived from the 6G Firewall, 7G Firewall, and other security techniques.
The Advanced Rules are disabled by default because they are not as widely tested as BBQ’s Basic Rules. If you enable the Advanced Rules, it is recommended that you test your pages thoroughly. If you discover any issue, you can fine-tune specific patterns by visiting the “Advanced” tab on the Firewall screen, or you can disable the Advanced Rules altogether via this setting.
Default: disabled
Custom Rules
This setting enables BBQ Pro’s Custom Rules.
This setting enables BBQ’s Custom Rules. This enables you to add your own custom rules to BBQ. To do so, visit the “Custom” tab on the Firewall screen. If you enable any Custom Rules, it is recommended that you test your pages thoroughly.
Default: disabled
Logged-in Users
This setting disables BBQ for logged-in users.
This setting disables all BBQ protection for any URL requests that are made by logged-in users. The assumption here is that users who have successfully logged in to your site will not be making malicious URL requests. While this may be true for individual admins and trusted teams, it may not be true for sites with many registered users.
Default: disabled
Limit Requests
This setting blocks requests that are longer than 255 characters in length.
Malicious URL requests often exceed 255 characters, however some services require long URLs in order to function. Enable this setting to block requests that exceed 255 characters in length. Advisable if you are sure that your site does not use any long URLs. If you are unsure, leave this setting disabled.
Default: disabled
Strict Mode
This setting enables Strict Mode.
By default, BBQ Pro checks each request “as-is”, without decoding any encoded characters. For example, if a request contains unencoded square brackets, [ and ], BBQ will block the request because unencoded square brackets are considered unsafe. On the other hand, if the request contains encoded square brackets, %5B and %5D, BBQ will not block the request because encoded characters are considered safe.
When enabled, Strict Mode instructs BBQ to block both unencoded and encoded variations of all active patterns. So in our example, requests containing square brackets will be blocked, regardless of whether or not the brackets are encoded. Likewise for every active pattern, when Strict Mode is enabled, active patterns will be blocked even if they are encoded.
If in doubt, leave Strict Mode disabled. Strict Mode exists for advanced users who want to customize their firewall for maximum protection.
Default: disabled
Email Alerts
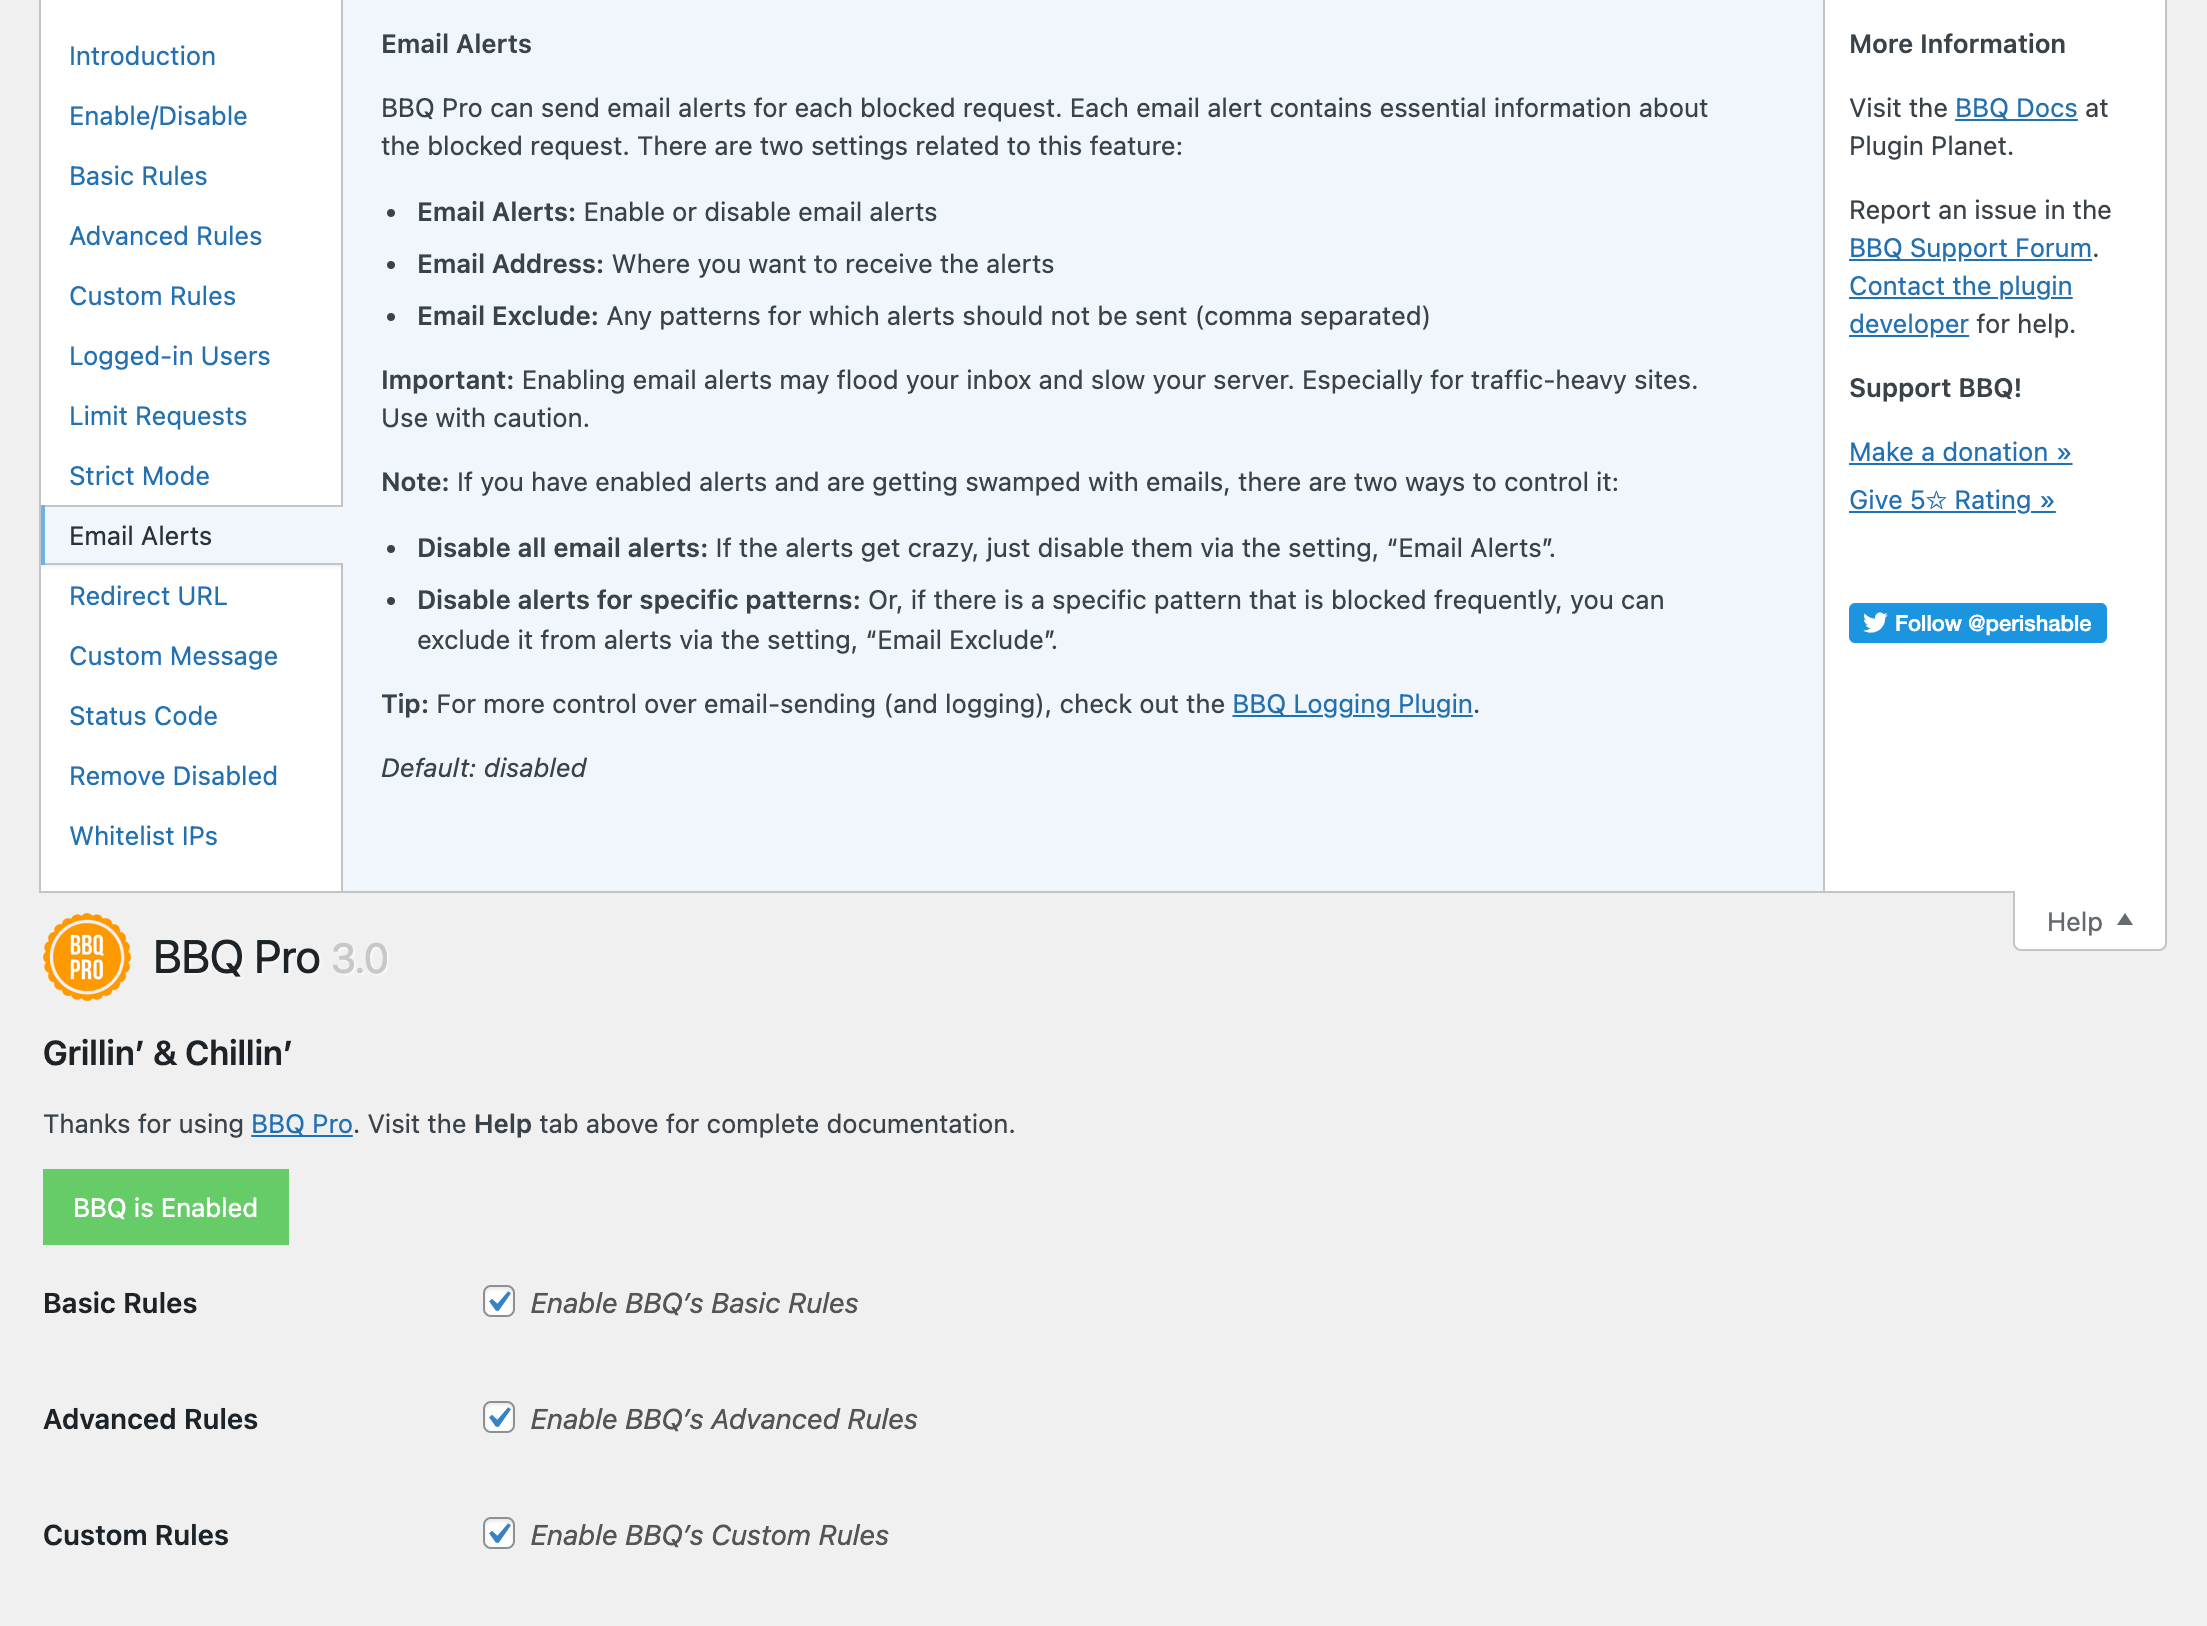
BBQ Pro can send email alerts for each blocked request. Each email alert contains essential information about the blocked request. There are two settings related to this feature:
- Email Alerts: Enable or disable email alerts
- Email Address: Where you want to receive the alerts
Important: If your site gets a lot of traffic, enabling the email alerts may flood your inbox and slow your server. Use with caution. For more control over email-sending (and logging), check out the BBQ Logging Plugin.
Default: disabled
Redirect URL
This setting specifies the URL to which blocked requests should be sent.
By default, when BBQ blocks a bad request, it exits and returns a “403 Forbidden” status code. If you would rather redirect the bad request to a specific location, you may enter the URL here. See also the setting, “Status Code” to choose an appropriate status code.
When using this option to redirect blocked requests, a 301 (permanent redirect) or 302 (temporary/found) status code is required. If a code other than 301 or 302 is specified, a 302 code will be used. Leave blank for no redirect.
Default: blank (no redirect)
Custom Message
This setting specifies a custom message to be displayed for blocked requests.
By default, when BBQ blocks a bad request, it exits and returns a “403 Forbidden” status code. If you would like to display a custom message, you may enter it here (you may use text and/or markup). You may use %s to display the matching pattern. See also the setting, “Status Code” to choose an appropriate status code.
Note: If enabled, the setting “Redirect URL” overrides any custom message.
Default: blank (no custom message)
Status Code
This setting specifies the HTTP status code that is sent for blocked requests.
This setting determines how BBQ responds to blocked requests. By default, BBQ responds to blocked requests with a “403 – Forbidden” status code, which is recommended. You are free to change the default 403 response to whatever makes sense for your site.
Note: If you are redirecting blocked requests, you must use a 301 or 302 status code (see the setting “Redirect URL”). It is important to understand that status codes may impact SEO. If in doubt, use the default setting (recommended).
Learn more about HTTP status codes »
Default: 403 Forbidden
Remove Disabled
This settings specifies whether disabled patterns should be removed.
Enable this setting to remove any disabled (unselected) BBQ Patterns. If you are unsure, leave this setting disabled.
Note: To restore default settings and patterns, either visit the Tools screen or uninstall and reinstall the plugin.
Default: disabled
Whitelist IPs
This setting enables you to whitelist (always allow) access from a list of IP addresses. This is useful if your site uses a forward/reverse proxy, load balancer, etc. If you are unsure, leave this setting blank.
Important: IPs added to this section are matched against the IP that is reported with each request. IPs defined here should contain only numbers and dots, for example: 123.456.789. Note that these IPs are treated as regular expressions, such that a pattern of 123. will match every IP that begins with 123.. So exercise caution for best results.
Default: Automatically adds IP address(es) of your server and local machine
Firewall
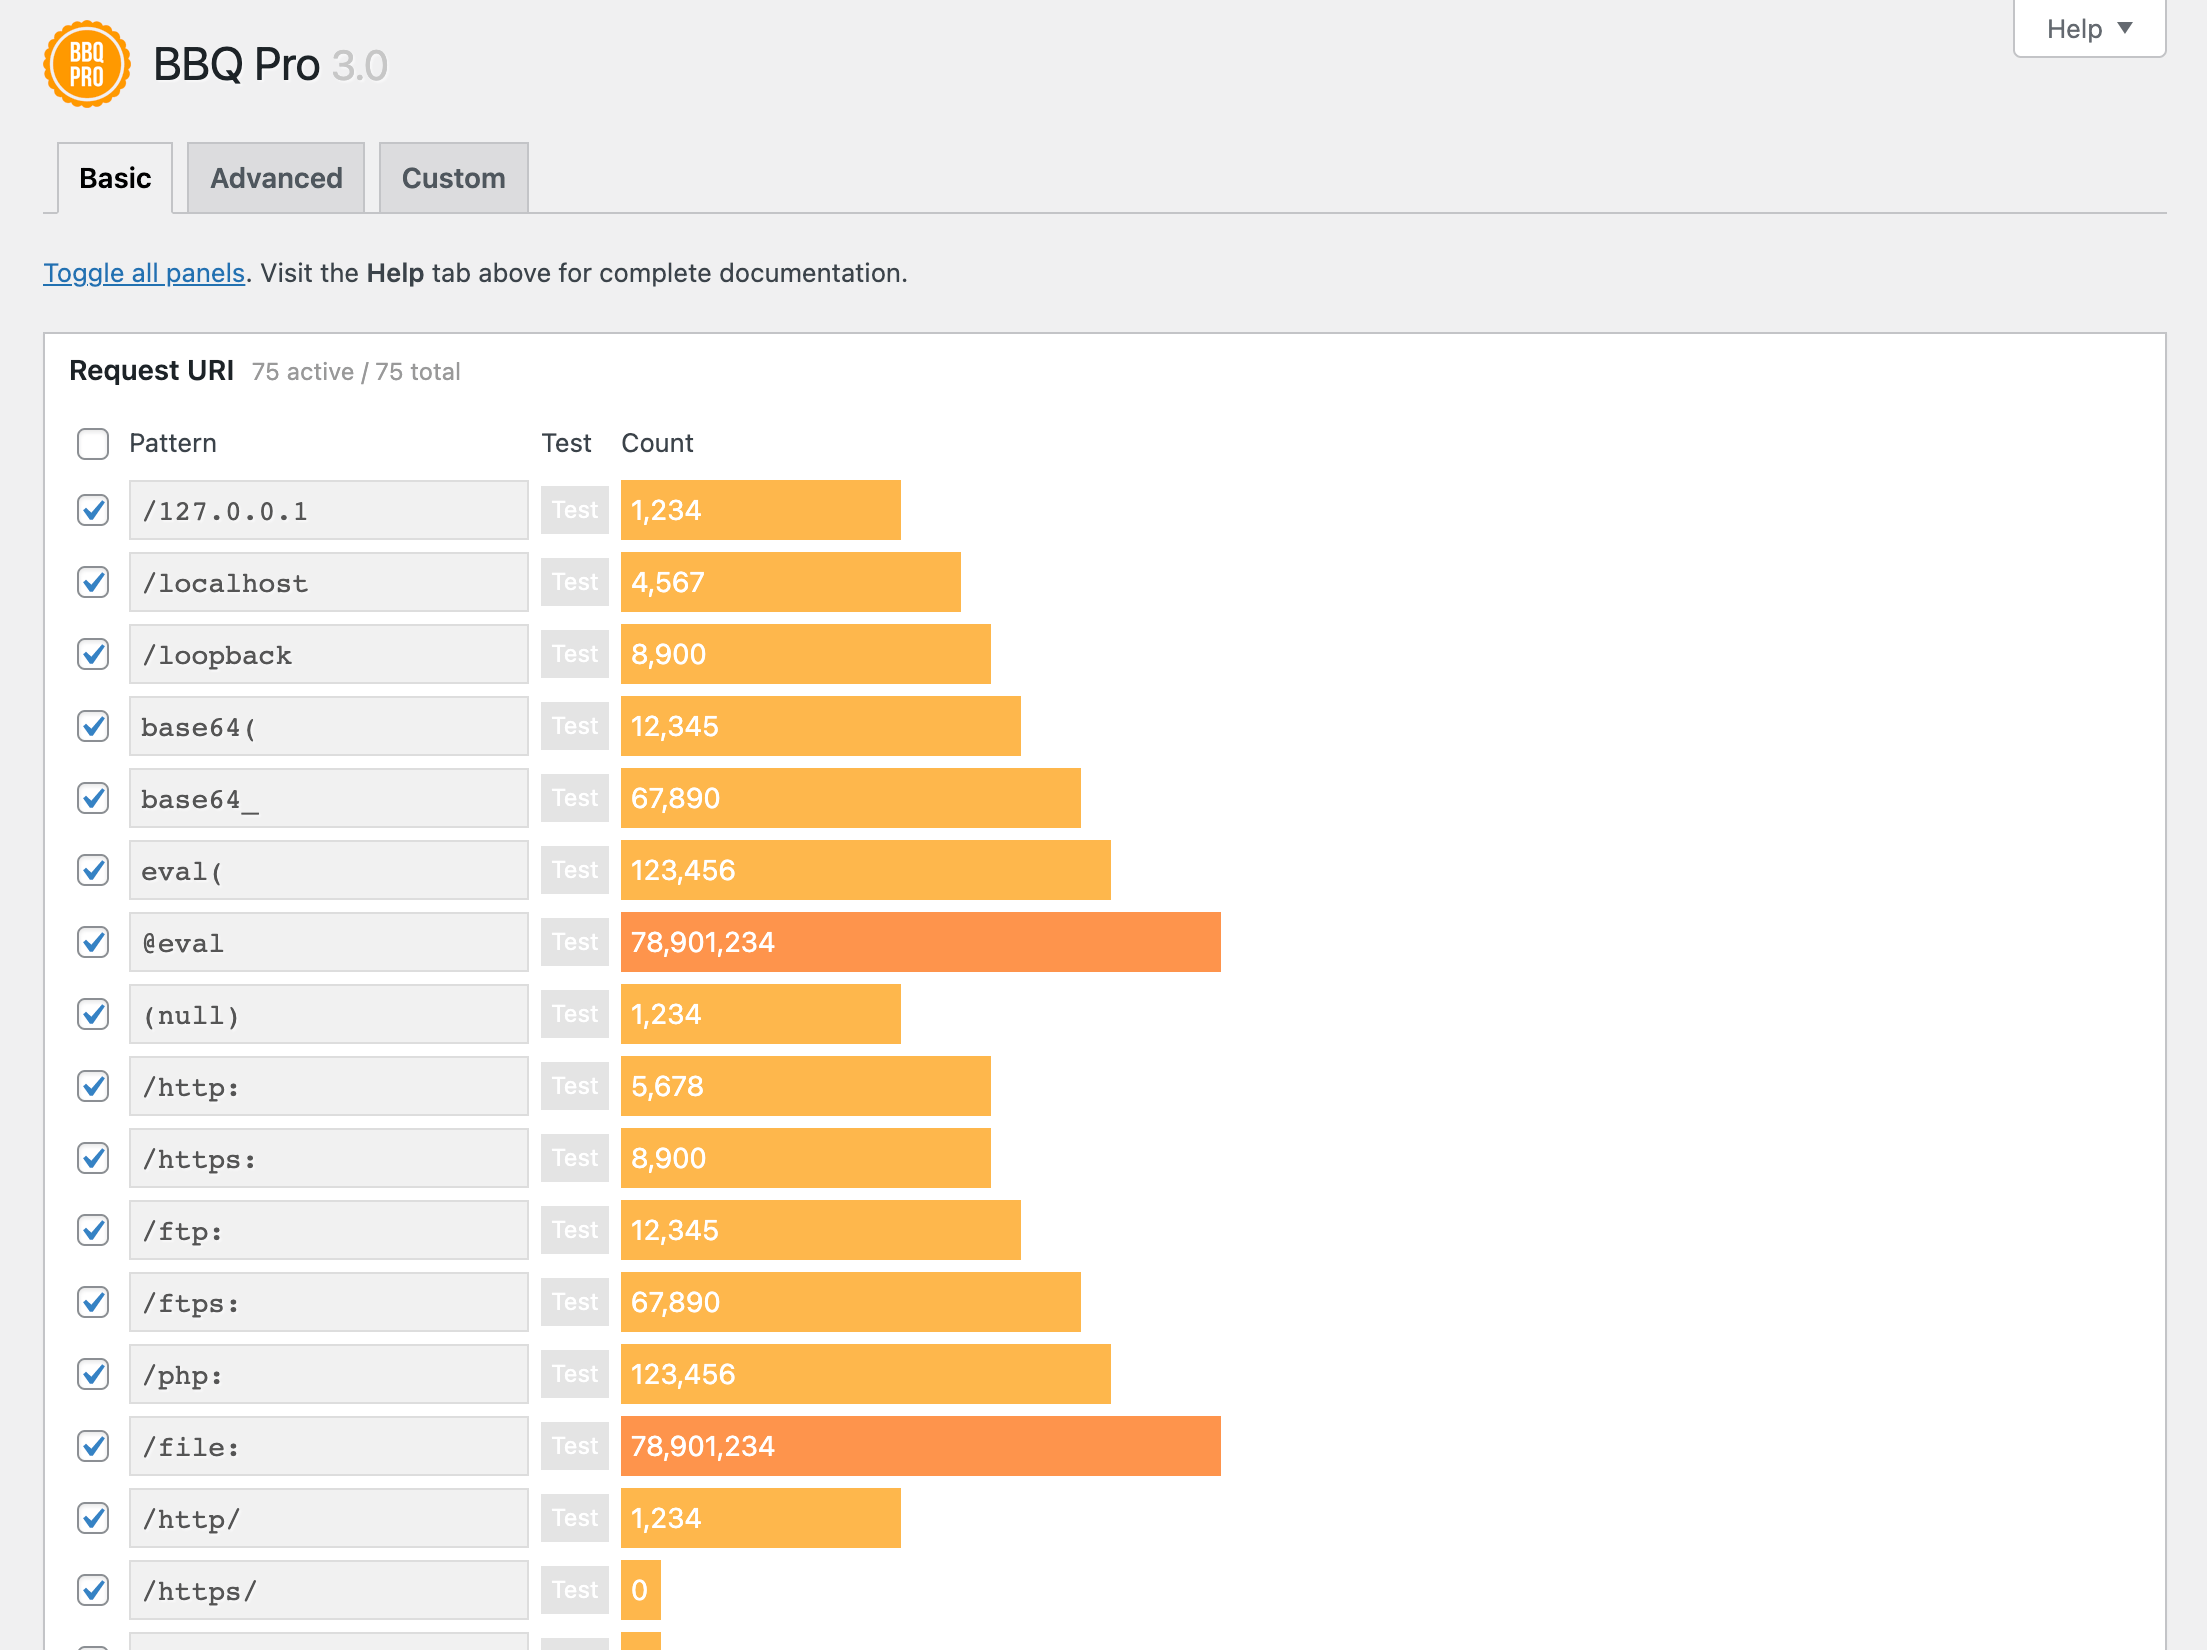
The Firewall screen provides three sets of BBQ Patterns: Basic, Advanced, and Custom. Each set of patterns is available under its own tab. Here is an overview:
- Basic Patterns – Basically the same patterns that are used in the free version of the plugin. They are well-tested and recommended for all sites.
- Advanced Patterns – Protect against a wide variety of malicious requests and exploits. They primarily are derived from the 6G and 7G Firewall.
- Custom Patterns – Enable you to add your own custom rules to BBQ Pro.
All BBQ patterns may be enabled, disabled, or customized as follows:
- Modify a pattern – To modify a pattern, make any desired changes and click “Save Changes”.
- Add a pattern – To add your own pattern, visit the “Custom” tab and click “Add Pattern”.
- Remove a pattern – To remove a pattern, first enable the setting “Remove Disabled”. Then deselect any unwanted patterns and click “Save Changes” to remove them.
Tip: visit the plugin settings to enable or disable each of the three types of patterns.
To get a better idea of how the Firewall screen works, check out the following screenshots (click images for full-size view):
For more information on BBQ patterns, check the BBQ Pro Docs and BBQ Pro Tutorials.
tools
BBQ Pro is equipped with some tools that enable you to reset settings, patterns, and stats back to their default values. This is useful when customizing and fine-tuning your firewall.
Reset Settings
Check the box and click the “Reset” button to reset all settings back to their default values.
Reset Patterns
Check any of the following boxes and click the “Reset” button to reset the associated set of patterns back to their default values:
- Basic Patterns
- Advanced Patterns
- Custom Patterns
Reset Counts
Check the box and click the “Reset” button to reset all pattern counts (stats).
License
Your purchase of BBQ Pro entitles you to free automatic updates according to the license terms. To enable this feature, visit the BBQ “License” screen to enter your License Key and enable the plugin.
Note: to view your License Key at any time, log in to your account at Plugin Planet. To enable BBQ Pro, enter your License Key, click “Save Changes”, and then click “Activate License”. Learn more about managing your license.
License Status
Indicates whether or not the plugin is enabled.
License Key
Specifies the License Key for the site.
Activate License
This button appears after entering your license in the “License Key” field and clicking the “Save Changes” button. Once your license is entered, click the “Activate License” button to activate your license and enable the plugin.