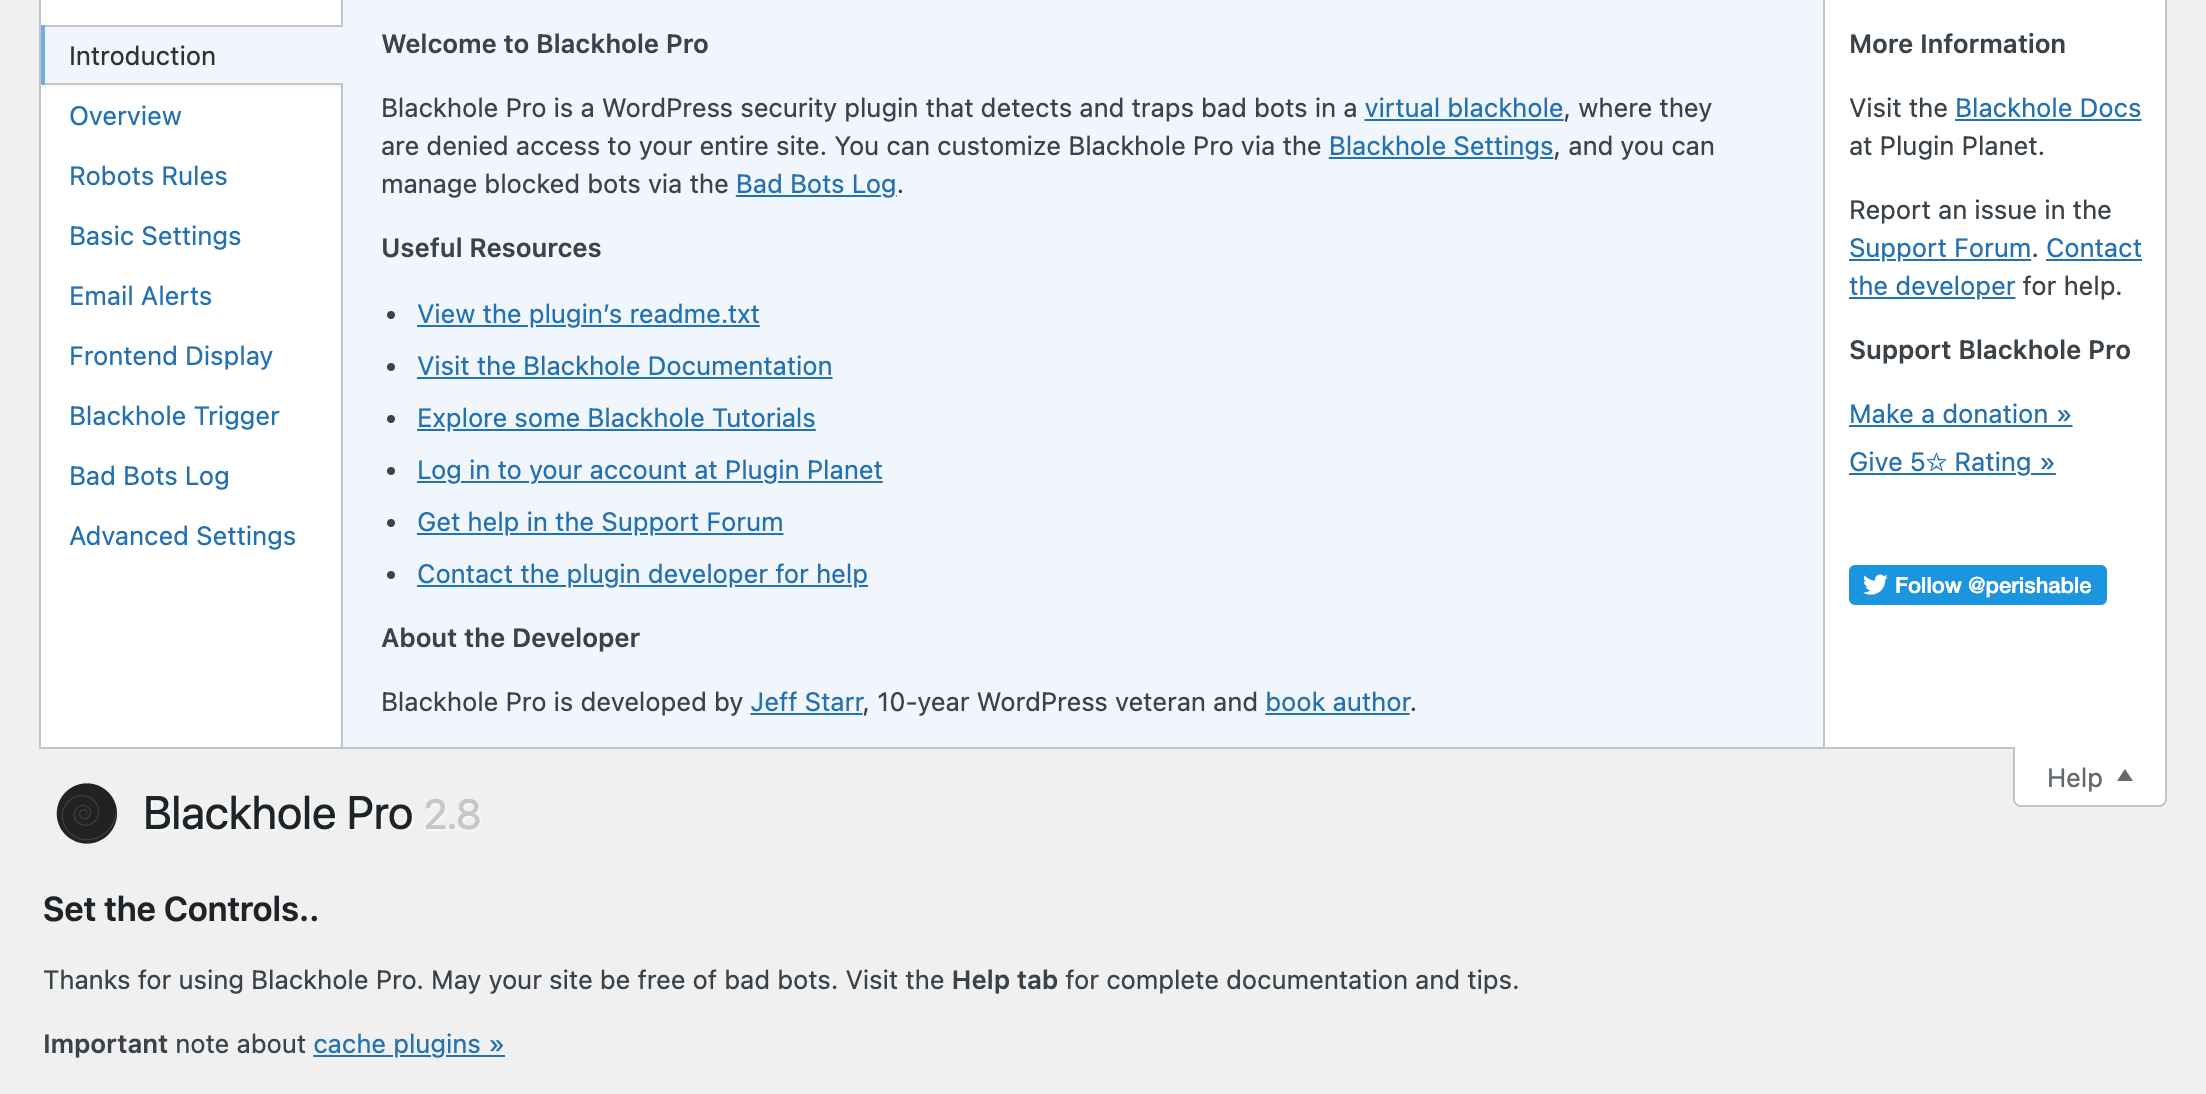
Blackhole Pro is equipped with robust inline documentation that is available via the “Help” tab on any Blackhole settings screen. The Help tab is your shortcut to complete information on each of the Blackhole plugin screens. The information provided below covers the settings and features that are included with Blackhole Pro, but it doesn’t go into as much depth as the inline documentation.
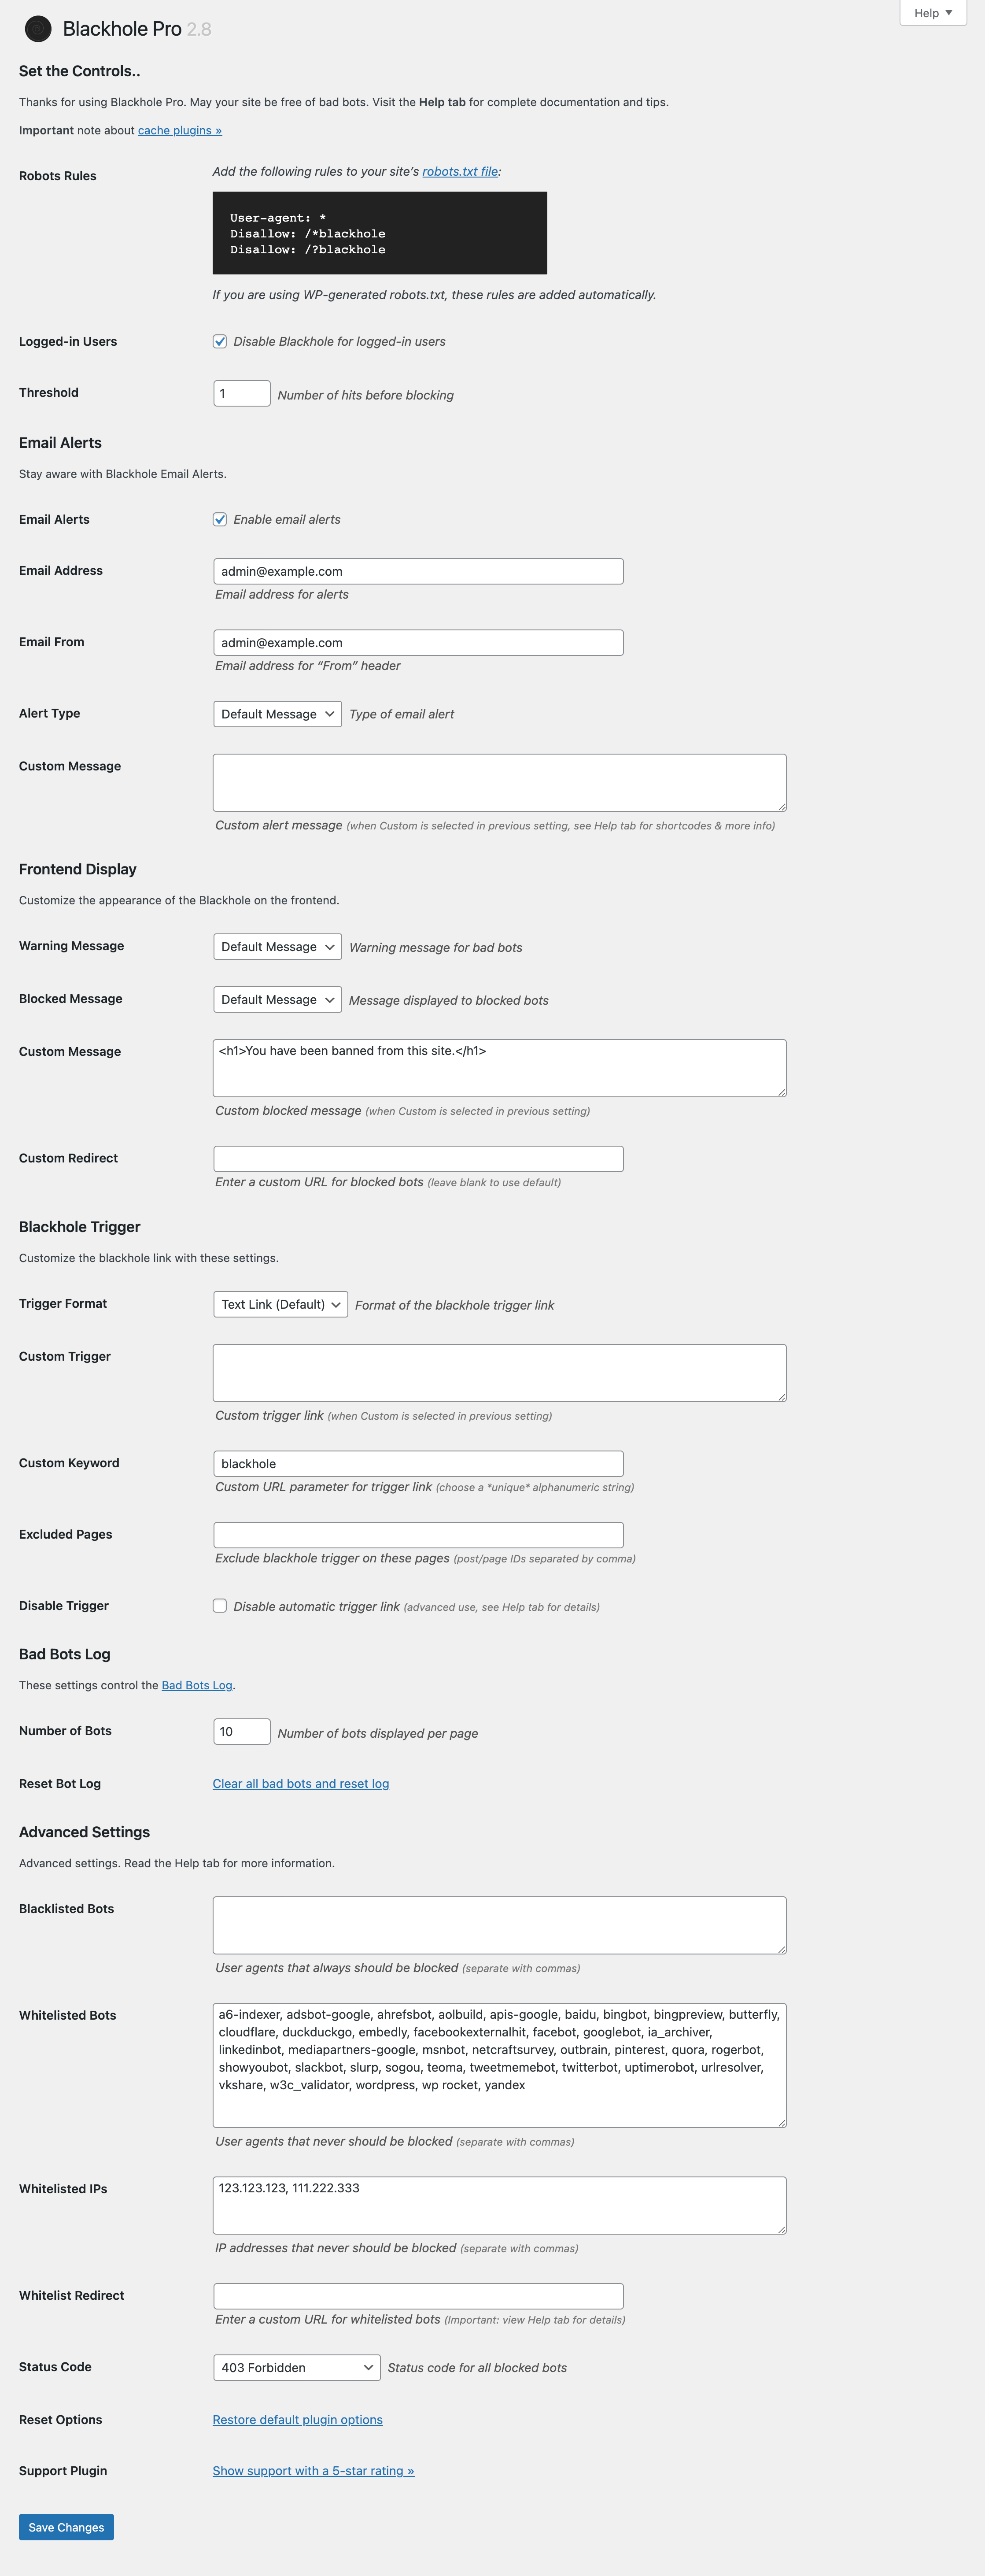
Settings
Available in the WP Admin Menu ▸ Blackhole Pro ▸ Settings.
Robots Rules
These are the rules that should be added to your site’s robots.txt file. They will look something like this:
User-agent: *
Disallow: /*blackhole
Disallow: /?blackhole
This is just an example, please visit the plugin settings to get the correct rules for your site. Learn more about the blackhole robots.txt rules.
Logged-in Users
Enable this setting to disable the Blackhole for logged-in users. This setting applies only to the front-end of your site. By default, the Admin Area never will be blocked. And that’s a good thing.
Default: Enabled
Threshold
This setting determines how many times a bot can follow the blackhole link before getting banned. For example, if you set Threshold to 5, a bot will be allowed to follow the blackhole link 5 times before being banned. Until a bot reaches the threshold level, they will be able to access your entire site (unless otherwise restricted).
Default: 1
Email Alerts
Enable this setting if you want to receive an email alert each time a bot visits the blackhole link (aka, “trigger”).
Default: Enabled
Email Address
The email address to which email alerts should be sent.
Default: Admin email
Email From
The address to be used in the “From” header for email alerts. If your email address is a domain-based address, then this setting should be the same as the previous Email setting. Otherwise, if you are using a 3rd-party email service, this setting should be a local, domain-based address. If you find that the email alerts are getting sent to the spam bin, this setting may help.
Default: Admin email
Alert Type
Determines the type of email alert. Default alert includes basic bot info plus a whois lookup. Simple alert includes only basic info. Custom alert includes whatever is specified in the next setting. All alerts sent in plain text.
Default: Default alert
Custom Message
Here you can create a custom email alert using plain text and any of the following shortcodes:
[ip_address][request_uri][remote_host][user_agent][referrer][protocol][method][date][whois][user][code][country][region][city][zip][hits][latest]
Default: Blank/empty
Warning Message
This setting determines the type of warning message displayed to bad bots (when they visit the blackhole link). Default message displays some basic info and a whois lookup on a red background. Simple message displays basic info on a light background. Basic message displays some basic info and a whois lookup with minimal styles. Custom message may be set up as follows:
- Select “Custom” for the “Warning Message” setting
- Copy
warning-custom.phpfrom the plugin’s/templates/directory - Paste into your theme, for example:
/wp-content/my-theme/warning-custom.php - Customize any of the markup between “BEGIN TEMPLATE” and “END TEMPLATE”
- Upload to the server and done
Default: Default message
Blocked Message
This setting determines the type of message displayed to all blocked bots. Default message displays a simple message. Custom message is defined in the next setting. Into the Void displays a black screen. Red Giant displays a large message on a red background.
Default: Default message
Custom Message
Defines a custom message to display to blocked bots. You can use any text/markup. Note: for this to work, “Custom” must be selected in the previous setting.
Default: <h1>You have been banned from this site.</h1>
Custom Redirect
Defines a redirect URL for all blocked bots. Leave blank for no redirect.
Default: Blank (no redirect)
Trigger Format
Defines the format for the blackhole trigger/link. Text displays the default link. Image displays the link using a 1×1 transparent GIF image. Custom trigger may be defined in the next setting.
Default: Default trigger
Trigger Location
Defines the location of the trigger link in the source code of your pages. Currently there are two options, the footer or after the opening body tag. Note that the open-body-tag option requires theme support. If in doubt, go with the default option.
Default: Footer
Custom Trigger
Defines a custom link to use for the blackhole trigger. “Custom” must be selected in the previous setting. Can use text/markup plus any of these shortcodes:
[text]= Default link text[href]= Blackhole URL (includes trigger and nonce)[image]= Transparent pixel image (includes markup)[nonce]= Nonce string
Important: don’t forget to update your robots.txt rules if you change the trigger/URL. Also, make sure to include these attributes if defining a custom link:
rel="nofollow" style="display:none;"
Default: Blank
Custom Keyword
By default the blackhole trigger uses ?blackhole as a query-string parameter in the trigger URL. This setting enables you to change it. Important: do not include the question mark “?” in the custom keyword. Also: don’t forget to update your robots.txt rules if you change the trigger/URL.
Default: blackhole
Excluded Pages
Here you can specify any posts or pages that should NOT include the blackhole link. Use post/page IDs, separated by comma. Note: this applies to the blackhole link only; any currently blocked bots will continue to be denied access.
Default: Blank
Number of Bots
Defines the number of bots that should be displayed per page in the Bad Bots Log.
Default: 10
Reset Bot Log
Clears all items from the Bad Bots Log and restores the default/example bot.
Default: none (it’s just a link)
Whitelisted Bots
Blackhole Pro blocks bad bots via their reported IP address. This setting enables you to whitelist bots based on their reported user agent. That way you will never block important things like Google, et al. Note: any strings entered here will be matched against the user agent via regular expression. Separate multiple strings with commas.
Note that the default whitelisted agents are subject to change. Check the Help tab on the settings screen for current defaults.
Default: a6-indexer, adsbot-google, ahrefsbot, aolbuild, apis-google, baidu, bingbot, bingpreview, butterfly, chrome, cloudflare, duckduckgo, embedly, facebookexternalhit, facebot, googlebot, google page speed, ia_archiver, linkedinbot, mediapartners-google, msnbot, netcraftsurvey, outbrain, pinterest, quora, rogerbot, showyoubot, slackbot, slurp, sogou, teoma, tweetmemebot, twitterbot, uptimerobot, urlresolver, vkshare, w3c_validator, wordpress, wp rocket, yandex
Whitelisted IPs
Here you can whitelist bots based on their IP address. Any IPs entered here will be matched against the reported IP address via regular expression. So you can block entire ranges of IPs by adding something like 173.203.204. Separate multiple IP/strings with commas.
Default: Your server IP address, your local IP address
Whitelist Redirect
Normally whitelisted bots can access and surf around your site just like any other visitor. This setting enables you to redirect all bots in your user-agent or IP-address whitelists. Important: recommended to leave this setting blank unless you know what you are doing.
Default: Blank/none
Status Code
Defines the HTTP Status Code that is returned with your server’s response for all blocked bots. There are different schools of thought regarding which status code is best for blocking requests. Recommended to leave at the default setting unless you know what you are doing.
Default: 403 Forbidden
Reset Options
Enables you to restore the default plugin settings. Does not affect the Bad Bots Log.
Default: none (it’s just a link)
Bad Bots
Available in the WP Admin Menu ▸ Blackhole Pro ▸ Bad Bots.
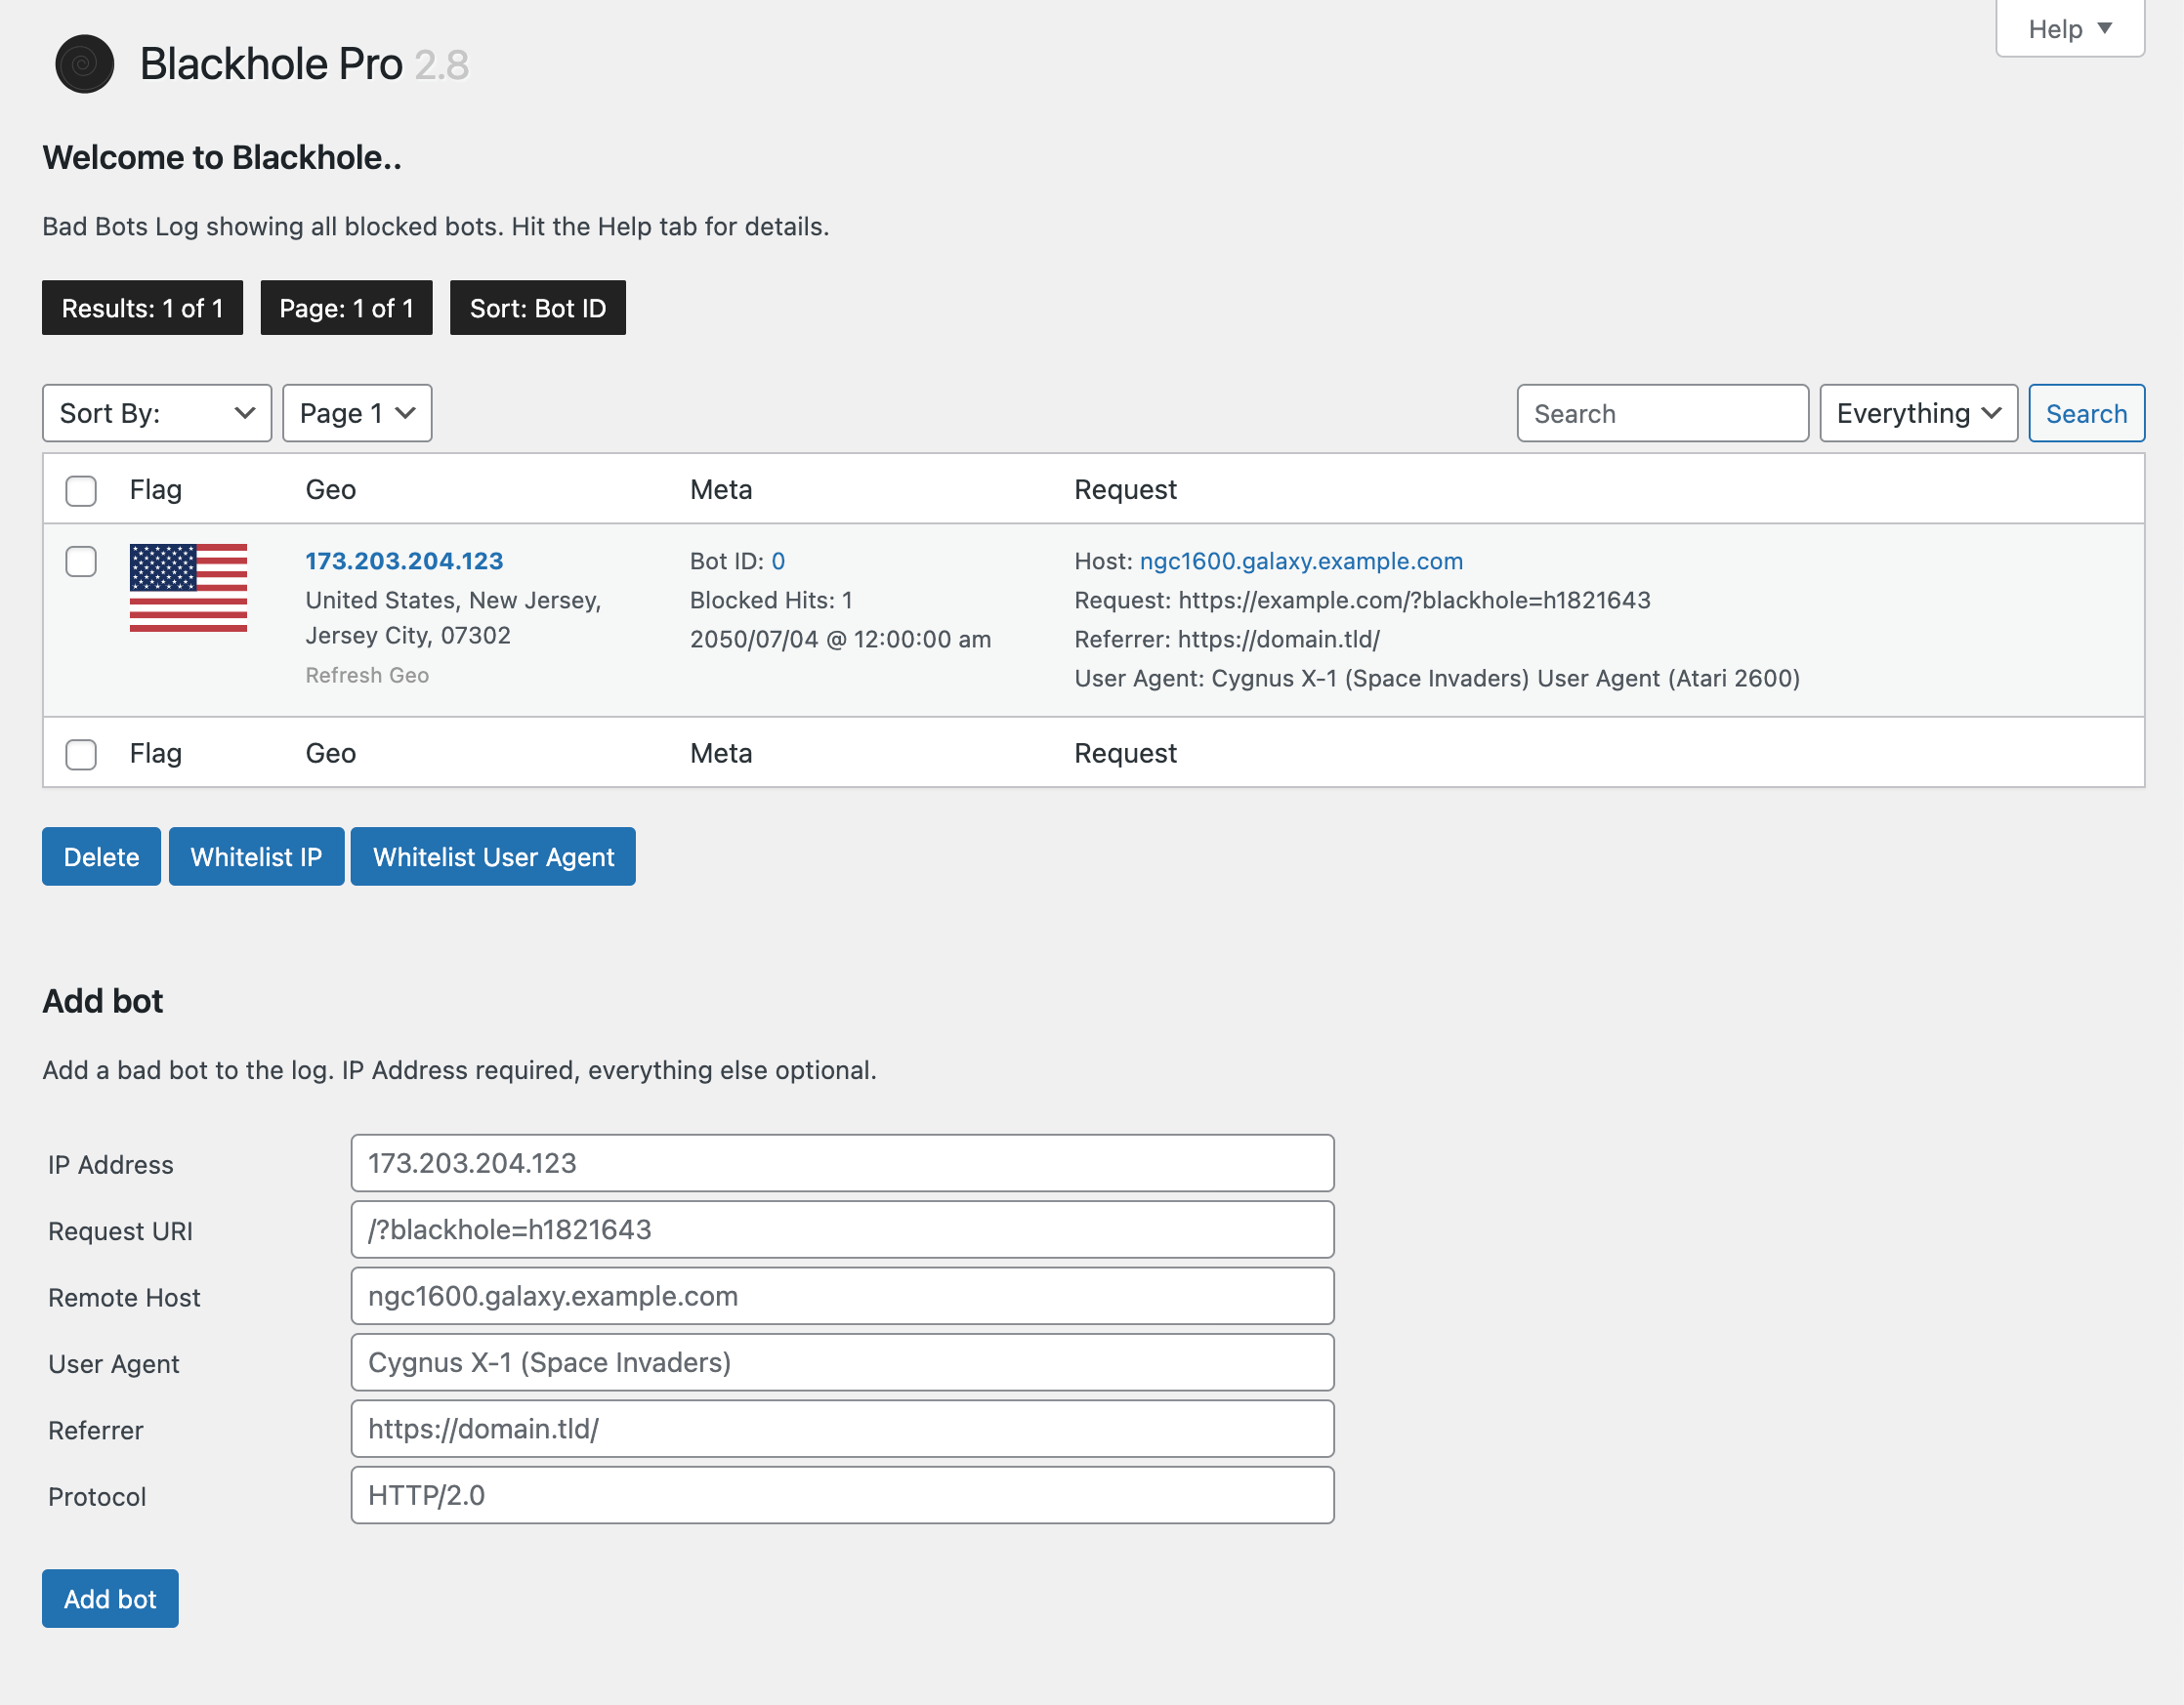
Bad Bots Log
On this screen you will find a complete log of all blocked bots. Everything should be self-explanatory, here are some key points:
- The plugin provides an example/fake bad bot that may be deleted
- Use the “Sort by” menu to sort the bots by any field
- Use the “Page” menu to jump to any page
- Use the “Next” and “Previous” buttons to navigate thru results
- Use the “Search” menu to refine your search
- To delete any bot(s), check the box and click the button to “Delete selected bots”
- Hover your cursor over the logged date to view the latest-hit date
- Hover your cursor over the Request info to view the reported HTTP Protocol
- You can change the number of bots per page via Settings ▸ “Number of Bots”
- You can clear all bots AND restore the default bot via Settings ▸ “Reset Bot Log”
Note: any unavailable bot data will be specified with [n/a]. This is perfectly normal, as many bad bots hide their information. Also, unknown Geo/IP lookups will be identified with a circled question mark “?” icon (instead of a country flag).
Add bot
Here you can manually add a bot to the virtual blackhole. Some things to keep in mind:
- The IP address is required, everything else is optional
- All fields not provided in the form will be added automatically (e.g., ID, Date, Geo)
- IPs must be unique, you cannot add a bot that already exists in the log
After entering the bot’s IP into the “IP Address” field, enter any other infos and then click the “Add bot” button.
Whois Lookup
For each entry in the Bad Bots Log, there are three links for Whois lookups:
- Whois Lookup via IP address — click the bot’s IP
- Forward/Reverse Whois Lookup — click the bot’s ID
- Whois Lookup via Hostname — click the reported Hostname
Clicking on any of these links will take you to a free Whois Lookup for that bot.
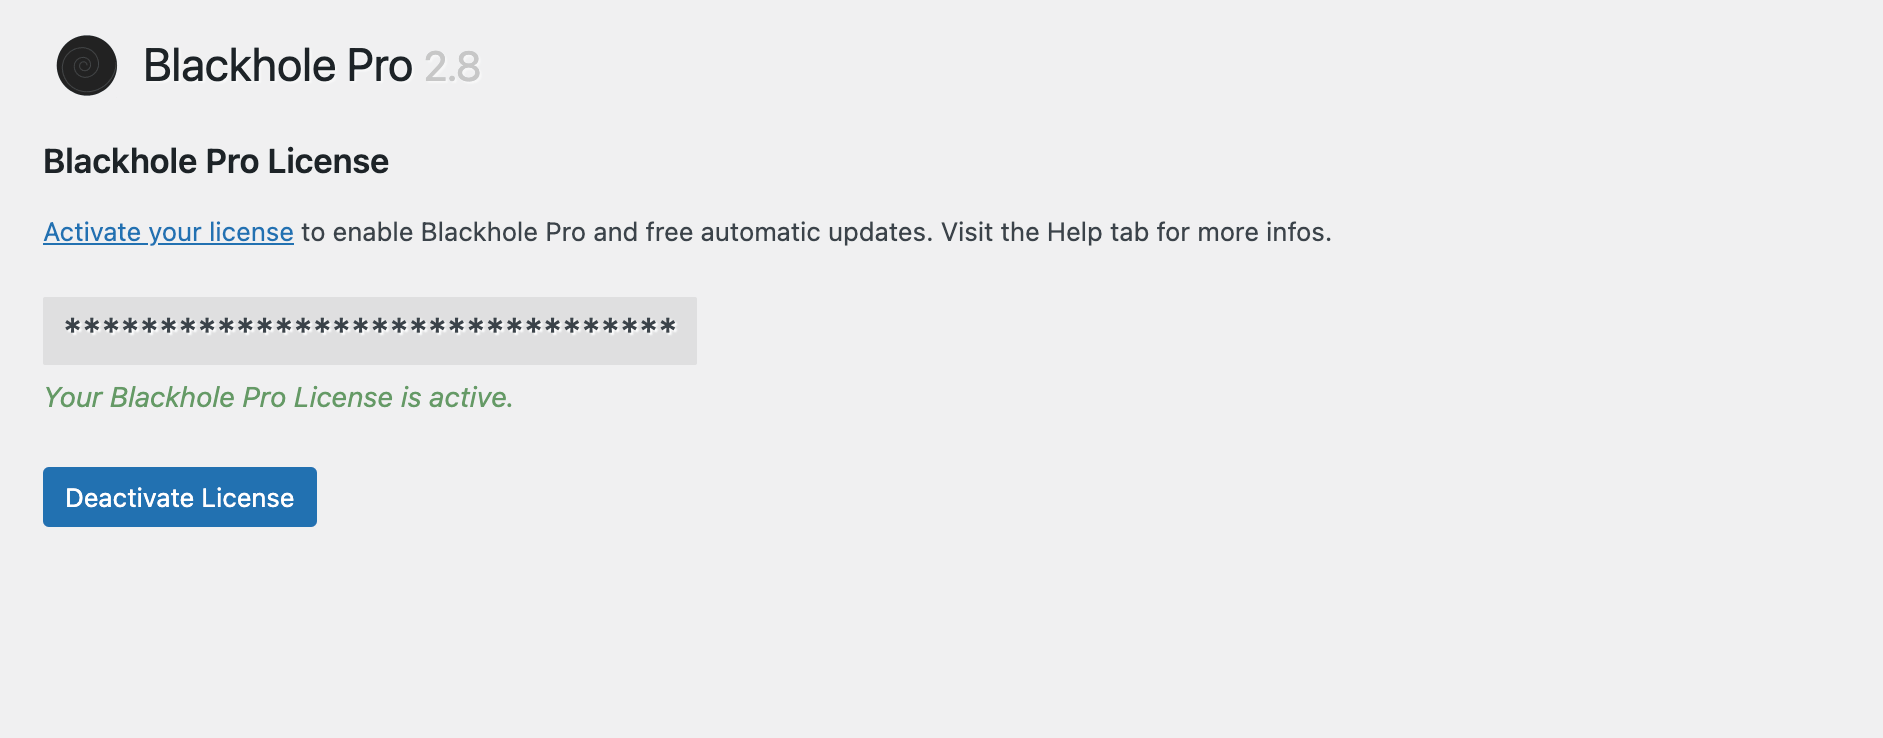
License
Available in the WP Admin Menu ▸ Blackhole Pro ▸ License.
Here you can enter your license and enable the plugin. Follow these steps:
- Enter your license in the field and click “Save License”
- Click the “Activate License” button
- Done! Blackhole Pro is now enabled and ready to use
Important: remember to deactivate your license before uninstalling (deleting) the plugin.
For more information, visit the activation guide at Plugin Planet.