Simple Ajax Chat Pro (SAC Pro) is equipped with complete inline documentation available via the Help tab on the plugin settings page. The Help tab always will be current with the latest version of SAC Pro, while the settings information below may not be as current (due to the update cycle). Further, the information provided below covers the basic settings and features that are included with SAC Pro, and doesn’t go into as much depth as the inline documentation (Help tab), which also includes important notes, tips, and info. Just FYI.
Table of Contents
Screenshots
General
Available via the WP Admin Menu ▸ Settings ▸ SAC Pro. On the SAC Pro page, visit the “General” tab.
Here you will find descriptions and tips for options available under the “General” tab. Most of the General settings should be self-explanatory, especially if you’re familiar with the free version of SAC. Note that most of these options may be overridden by adding attributes to the form shortcode.
- Welcome Name — Default username for the welcome message
- Welcome Message — Default welcome message (i.e., the first chat message)
- Email Alerts — Enter at least one email address to enable alerts (leave blank to disable)
- User URL — URL to use for linked chat names, options include:
- User Defined — lets the user enter their own URL
- User Profile Website — use the “Website” URL from the user’s Profile (requires user to be logged in)
- Edit User Profile — link to the user’s Profile page (requires user to be logged in)
- User Post Archive — link to the user’s Post Archive on the front end (requires user to be logged in)
- Disable — do not link any chat names (names displayed as plain text)
- User Name — Name to use for chat names, options include:
- User Defined — lets the user enter their own name
- Auto-Generated — automatically generates a random name
- Login Username — use the registered user’s login username (requires user to be logged in)
- Nice Name — use the registered user’s Nice Name (requires user to be logged in)
- First & Last — use the registered user’s First & Last name (requires user to be logged in)
- Nickname — use the registered user’s Nickname (requires user to be logged in)
- Display Name — use the registered user’s Display Name (requires user to be logged in)
- Guest Name Prefix — Prefix for auto-generated guest names (applicable when “Auto-Generated” is enabled for the “User Name” setting)
- Emoji Picker — Enable the emoji picker in chat messages (requires jQuery)
- Display Avatars — Display user avatar next to each chat message
- Display User Role — Display registered user role next to chat name
- Max Displayed Chats — Maximum number of displayed chats (on front end)
- Max Saved Chats — Maximum number of saved chats (saved in the database)
- Max Chat Length — Maximum number of characters for chat messages
- Max Name Length — Maximum number of characters for chat names
- Require Logged In — Require users to be logged in to view and add chats
- Require Login Message — Message displayed to non-logged users1 (when “Require Logged In” is enabled)
- Display Mode — Display chats as read-only for non-logged users
- Display Mode Message — Message displayed when in read-only mode1 (when “Display Mode” is enabled)
- Dashboard Chat — Minimum user role required for dashboard chat (or choose to disable)
- Reset Options — Click to restore default plugin options
- Reset Users — Click to reset the chat user-name cache
Notes
1 Note: For the settings “Require Login Message” and “Display Mode Message”, you can use %%login_url%% to display the URL of your site’s Login Page. To make it a link (instead of just plain text), add the following code:
{a href='%%login_url%%'}Log in{/a}When that code is output on the front end, the curly brackets { } will be replaced by angle brackets < >. You can use this technique to include other HTML tags as needed. Important: make sure to use only single (straight) quotes for any tag attributes (do not include any double quotes).
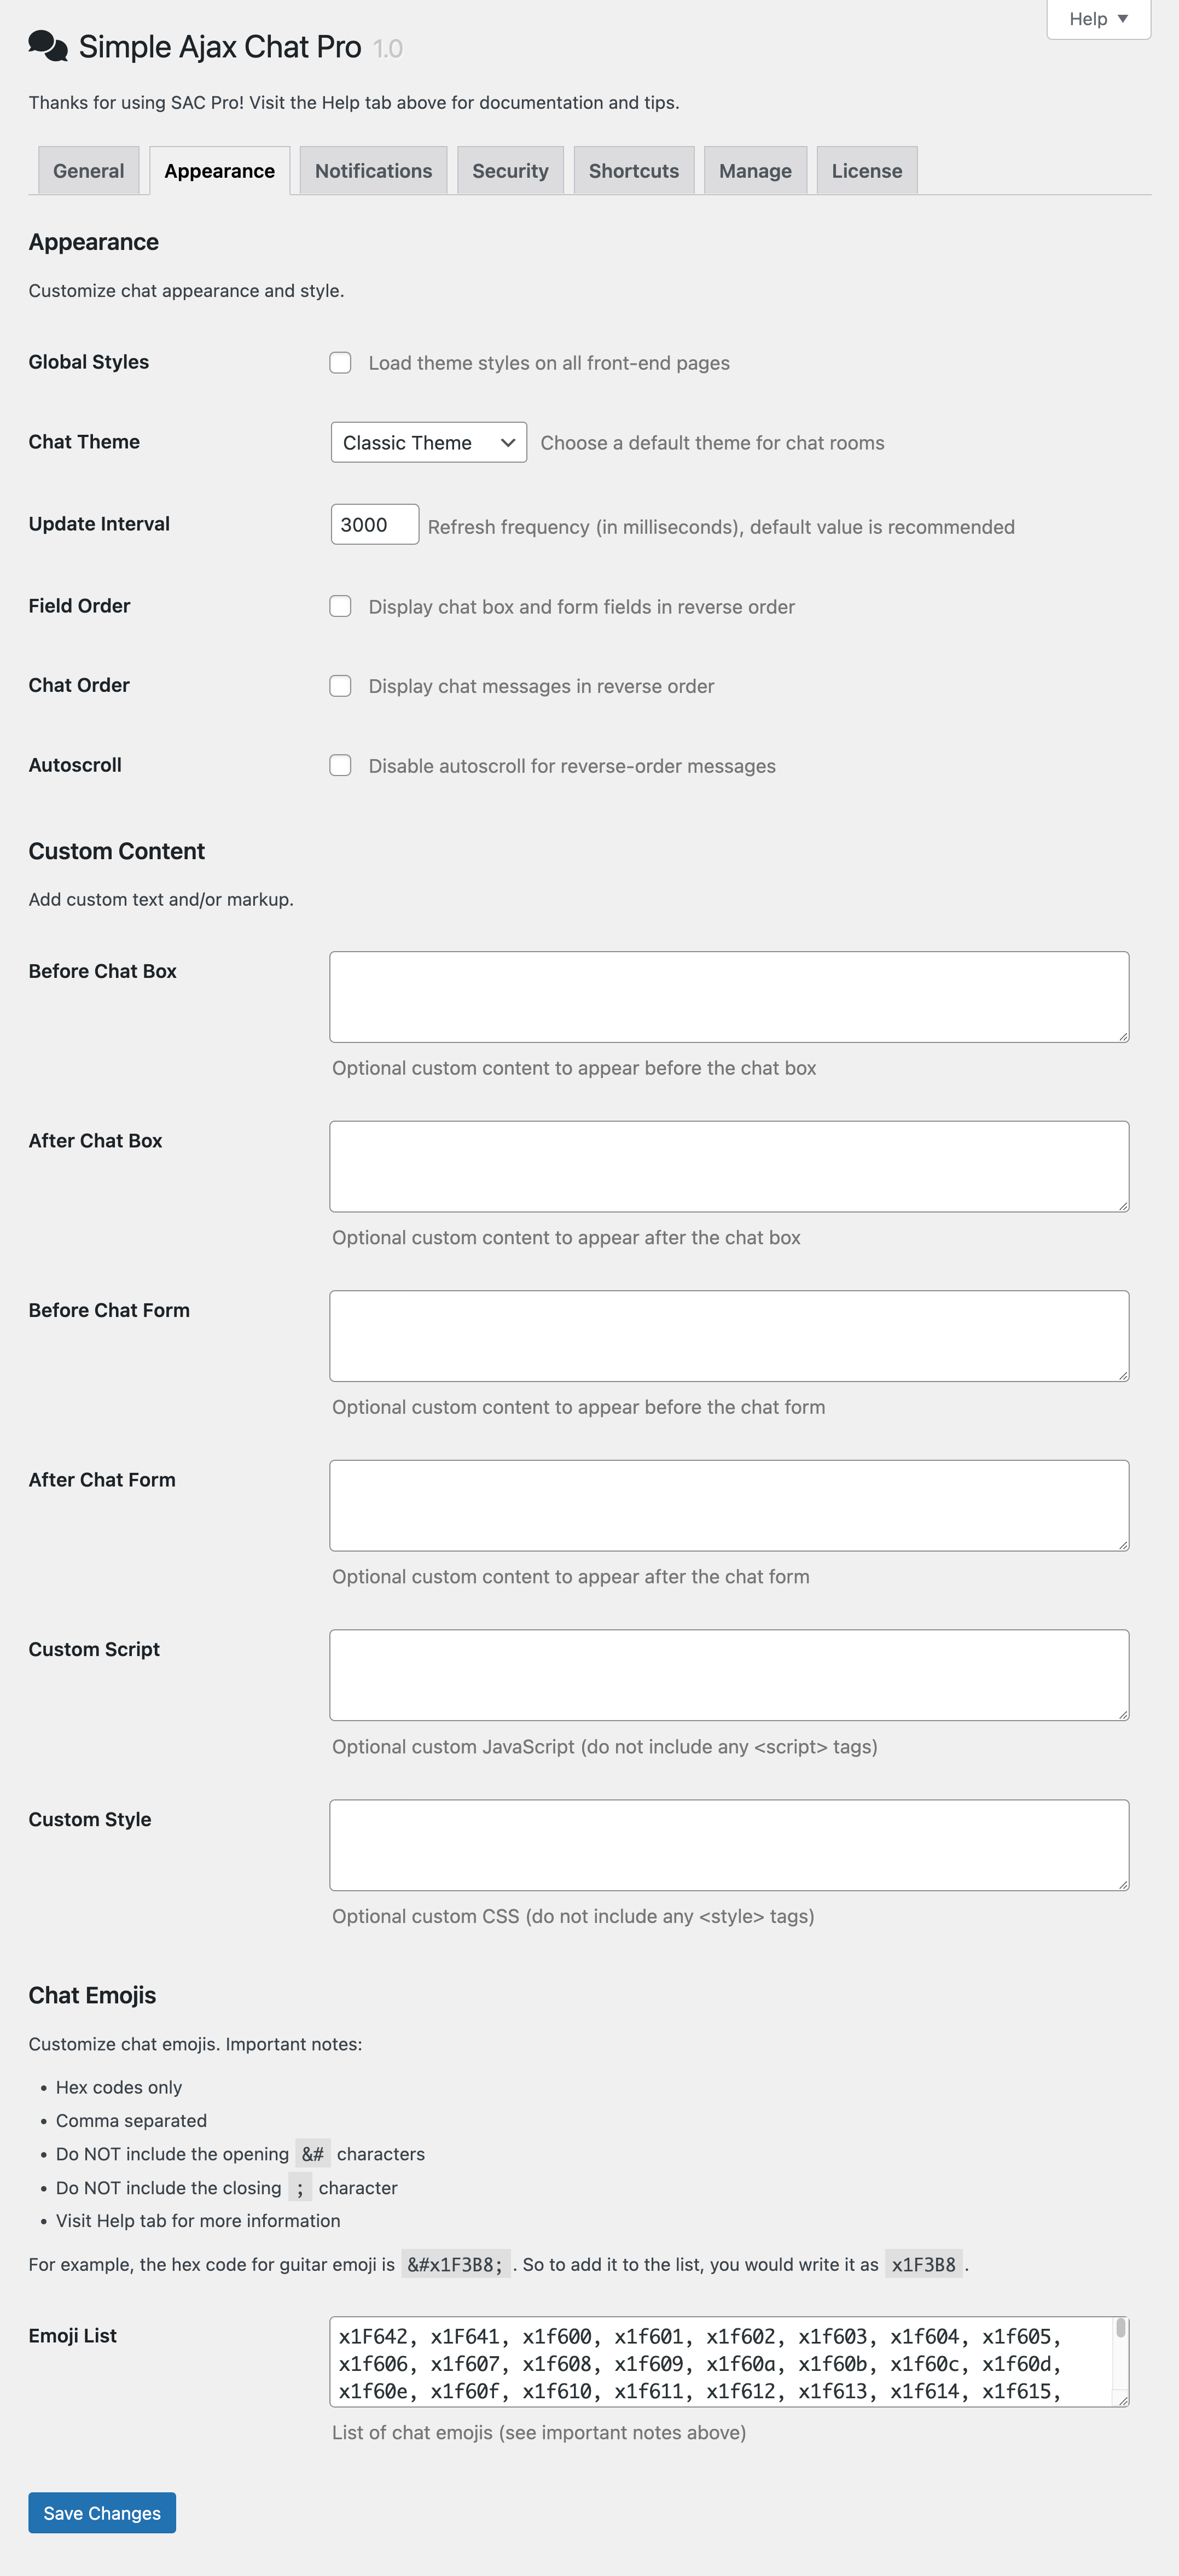
Appearance
Available via the WP Admin Menu ▸ Settings ▸ SAC Pro. On the SAC Pro page, visit the “Appearance” tab.
Here you will find descriptions and tips for options available under the “Appearance” tab. Most of the Appearance settings should be self-explanatory, especially if you’re familiar with the free version of SAC. Note that some of these options may be overridden by adding attributes to the form shortcode.
- Global Styles — Load theme styles on all front-end pages (recommend to leave disabled)
- Chat Theme — Choose a default theme for chat rooms, options include:
- Classic — like the chat form in the free version of SAC
- Dark — designed for themes with dark backgrounds and such
- Micro — displays small chat form optimized for tight places
- Giant — displays large chat form optimized for big spaces
- Hero — displays chat messages as speech balloons
- Synthetic — gets funky with custom fonts and styles (uses Google Fonts)
- Custom — lets you add your own form styles (see note below)
- Disable — displays the form markup only with no added styles
- Update Interval — Refresh frequency (in milliseconds), default value (3000) is recommended
- Small Input — Display single-line input for chat messages
- Field Order — Display chat box and form fields in reverse order
- Chat Order — Display chat messages in reverse order
- Autoscroll — Disable autoscroll for reverse-order messages (applicable when “Chat Order” is enabled)
- Before Chat Box — Optional custom content to appear before the chat box (basic HTML allowed)
- After Chat Box — Optional custom content to appear after the chat box (basic HTML allowed)
- Before Chat Form — Optional custom content to appear before the chat form (basic HTML allowed)
- After Chat Form — Optional custom content to appear after the chat form (basic HTML allowed)
- Custom Script — Optional custom JavaScript (do not include any <script> tags)
- Custom Style — Optional custom CSS (do not include any <style> tags)
- Emoji List — List of chat emojis (important notes provided in the settings below, under “Chat Emojis”)
Notes
Note: If you decide to change the “Update Interval” setting, you may need to clear the browser cache and reload the chat page(s) in order for the change to take effect.
Note: When “Custom” is enabled for the “Chat Theme” option, you can add custom styles via your theme template. Inside of your theme, create a folder named /sacpro/. Then copy the CSS file, sacpro-custom.css from the SAC Pro /css/ directory. Paste that file into your theme’s /sacpro/ folder and customize the CSS/styles however you would like.
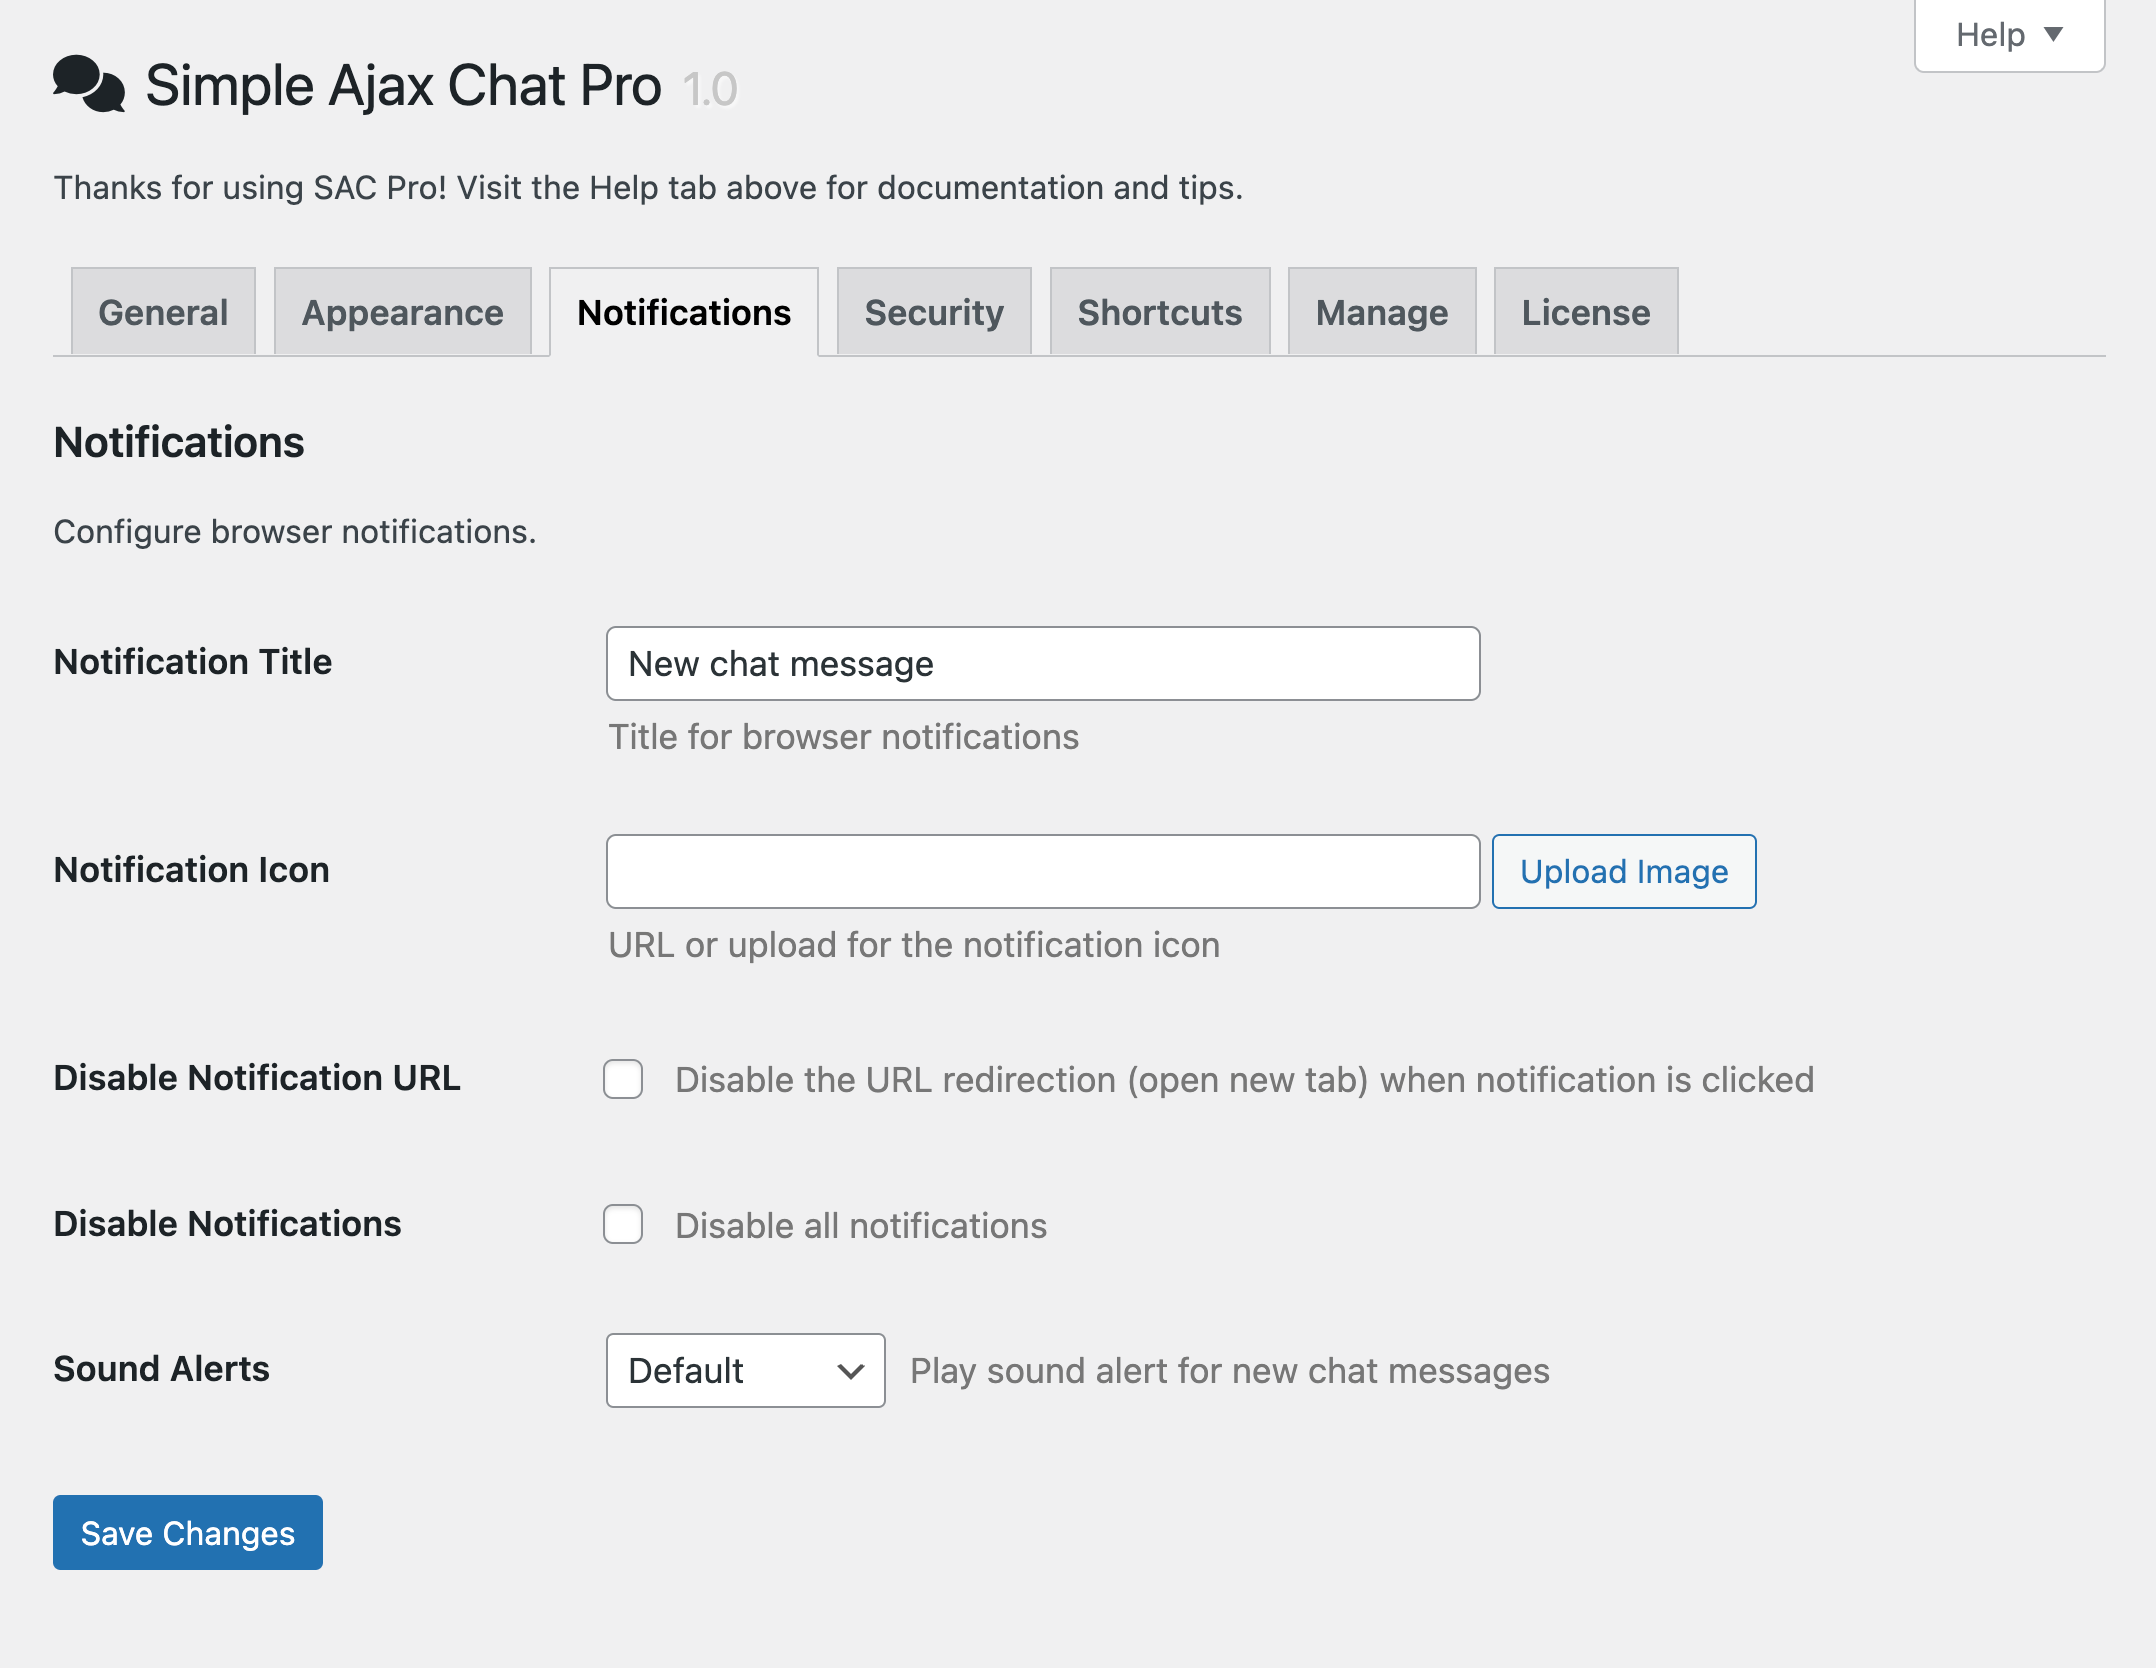
Notifications
Available via the WP Admin Menu ▸ Settings ▸ SAC Pro. On the SAC Pro page, visit the “Notifications” tab.
Here you will find descriptions and tips for options available under the “Notifications” tab. When enabled, browser notifications pop up a small dialog for any new chat messages. Most of the Notifications settings should be self-explanatory, especially if you’re familiar with the free version of SAC. Note that some of these options may be overridden by adding attributes to the form shortcode.
- Notification Title — Title for browser notifications
- Notification Icon — URL or upload for the notification icon
- Disable Notification URL — Disable the URL redirection (open new tab) when notification is clicked
- Disable Notifications — Disable all notifications
- Sound Alerts — Play sound alert for new chat messages (or choose to disable)
Notes
Note: notifications depend on browser support for full functionality. Some browsers display robust notifications with all features, others not so much, or even not at all. Most major browsers (e.g., Chrome, Firefox, Opera) do provide full support for notifications. Just FYI.
Security
Available via the WP Admin Menu ▸ Settings ▸ SAC Pro. On the SAC Pro page, visit the “Security” tab.
Here you will find descriptions and tips for options available under the “Security” tab. Most of the Security settings should be self-explanatory, especially if you’re familiar with the free version of SAC. Note that the Security settings apply globally to all chat forms.
- User Data — Disable collection of sensitive user information (e.g., IP address)
- Allow Links — Allow users to include links (URLs) in chat messages
- Allow Markup — Allow basic markup (em, strong, del, ins, code) in chat messages
- Allow Images — Allow image URLs in chat messages (e.g., user shares URL for some online image)
- Show Thumbnails — Display thumbnails of images in chat messages (when “Allow Images” is enabled)
- Banned Names — Reserved chat names, not available to guest users (comma separated)
- Banned Phrases — Words or phrases not allowed in chat names or messages (comma separated)
- Banned Scope — When banned words are found in messages: remove words or block message
- Public Key — reCaptcha Public Key (enter both Public & Private keys to enable Google reCaptcha)
- Private Key — reCaptcha Private Key (enter both Public & Private keys to enable Google reCaptcha)
- Emoji in Names — Do not allow emoji characters in user names
- Emoji in Messages — Do not allow emoji characters in chat messages
- Chars in Names — Do not allow special characters in user names (when enabled, this option allows only alphanumeric, underscores, dashes, at symbol @, plus sign +, periods, commas, and spaces)
- Chars in Messages — Do not allow special characters in chat messages (when enabled, this option removes backslashes \ and angle brackets < > from all chat messages)
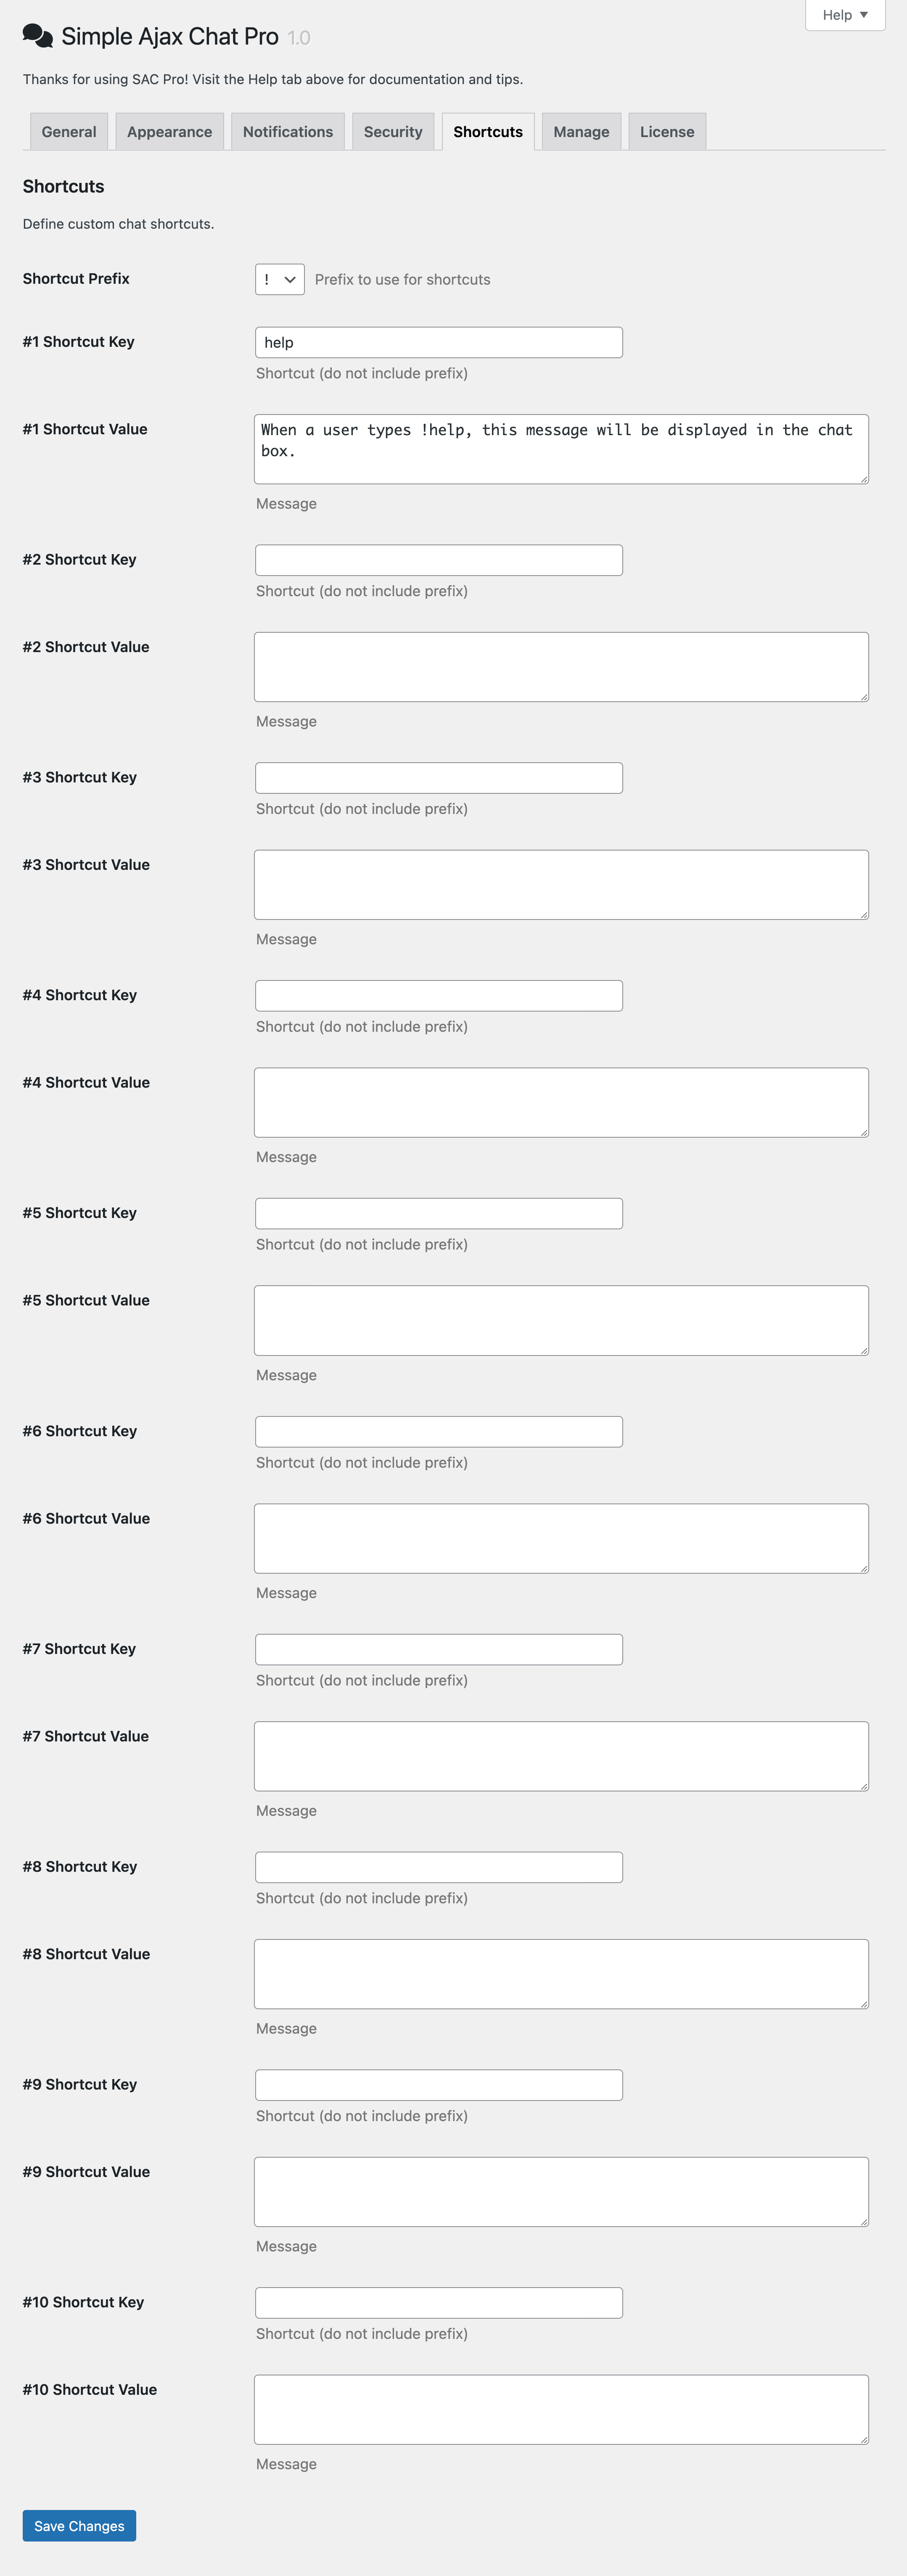
Shortcuts
Available via the WP Admin Menu ▸ Settings ▸ SAC Pro. On the SAC Pro page, visit the “Shortcuts” tab.
Here you will find descriptions and tips for options available under the “Shortcuts” tab. Shortcuts or “Bang Shortcuts” are bits of text that users can enter to get an automatic, predefined chat response. For example, if a user enters !help they will get a quick message reply. Try it for yourself to get a better idea of how it works. The Shortcuts settings should be self-explanatory, and they apply globally to all chat forms.
- Shortcut Prefix — Each bang shortcut will begin with this character(s)
- Shortcut Keys 1–10 — You can define up to 10 custom shortcut keys
- Shortcut Values 1–10 — You can define up to 10 custom shortcut values
Notes
Tip: for happy users, limit the shortcut prefix to one single character, and keep the shortcut keys as simple as humanly possible.
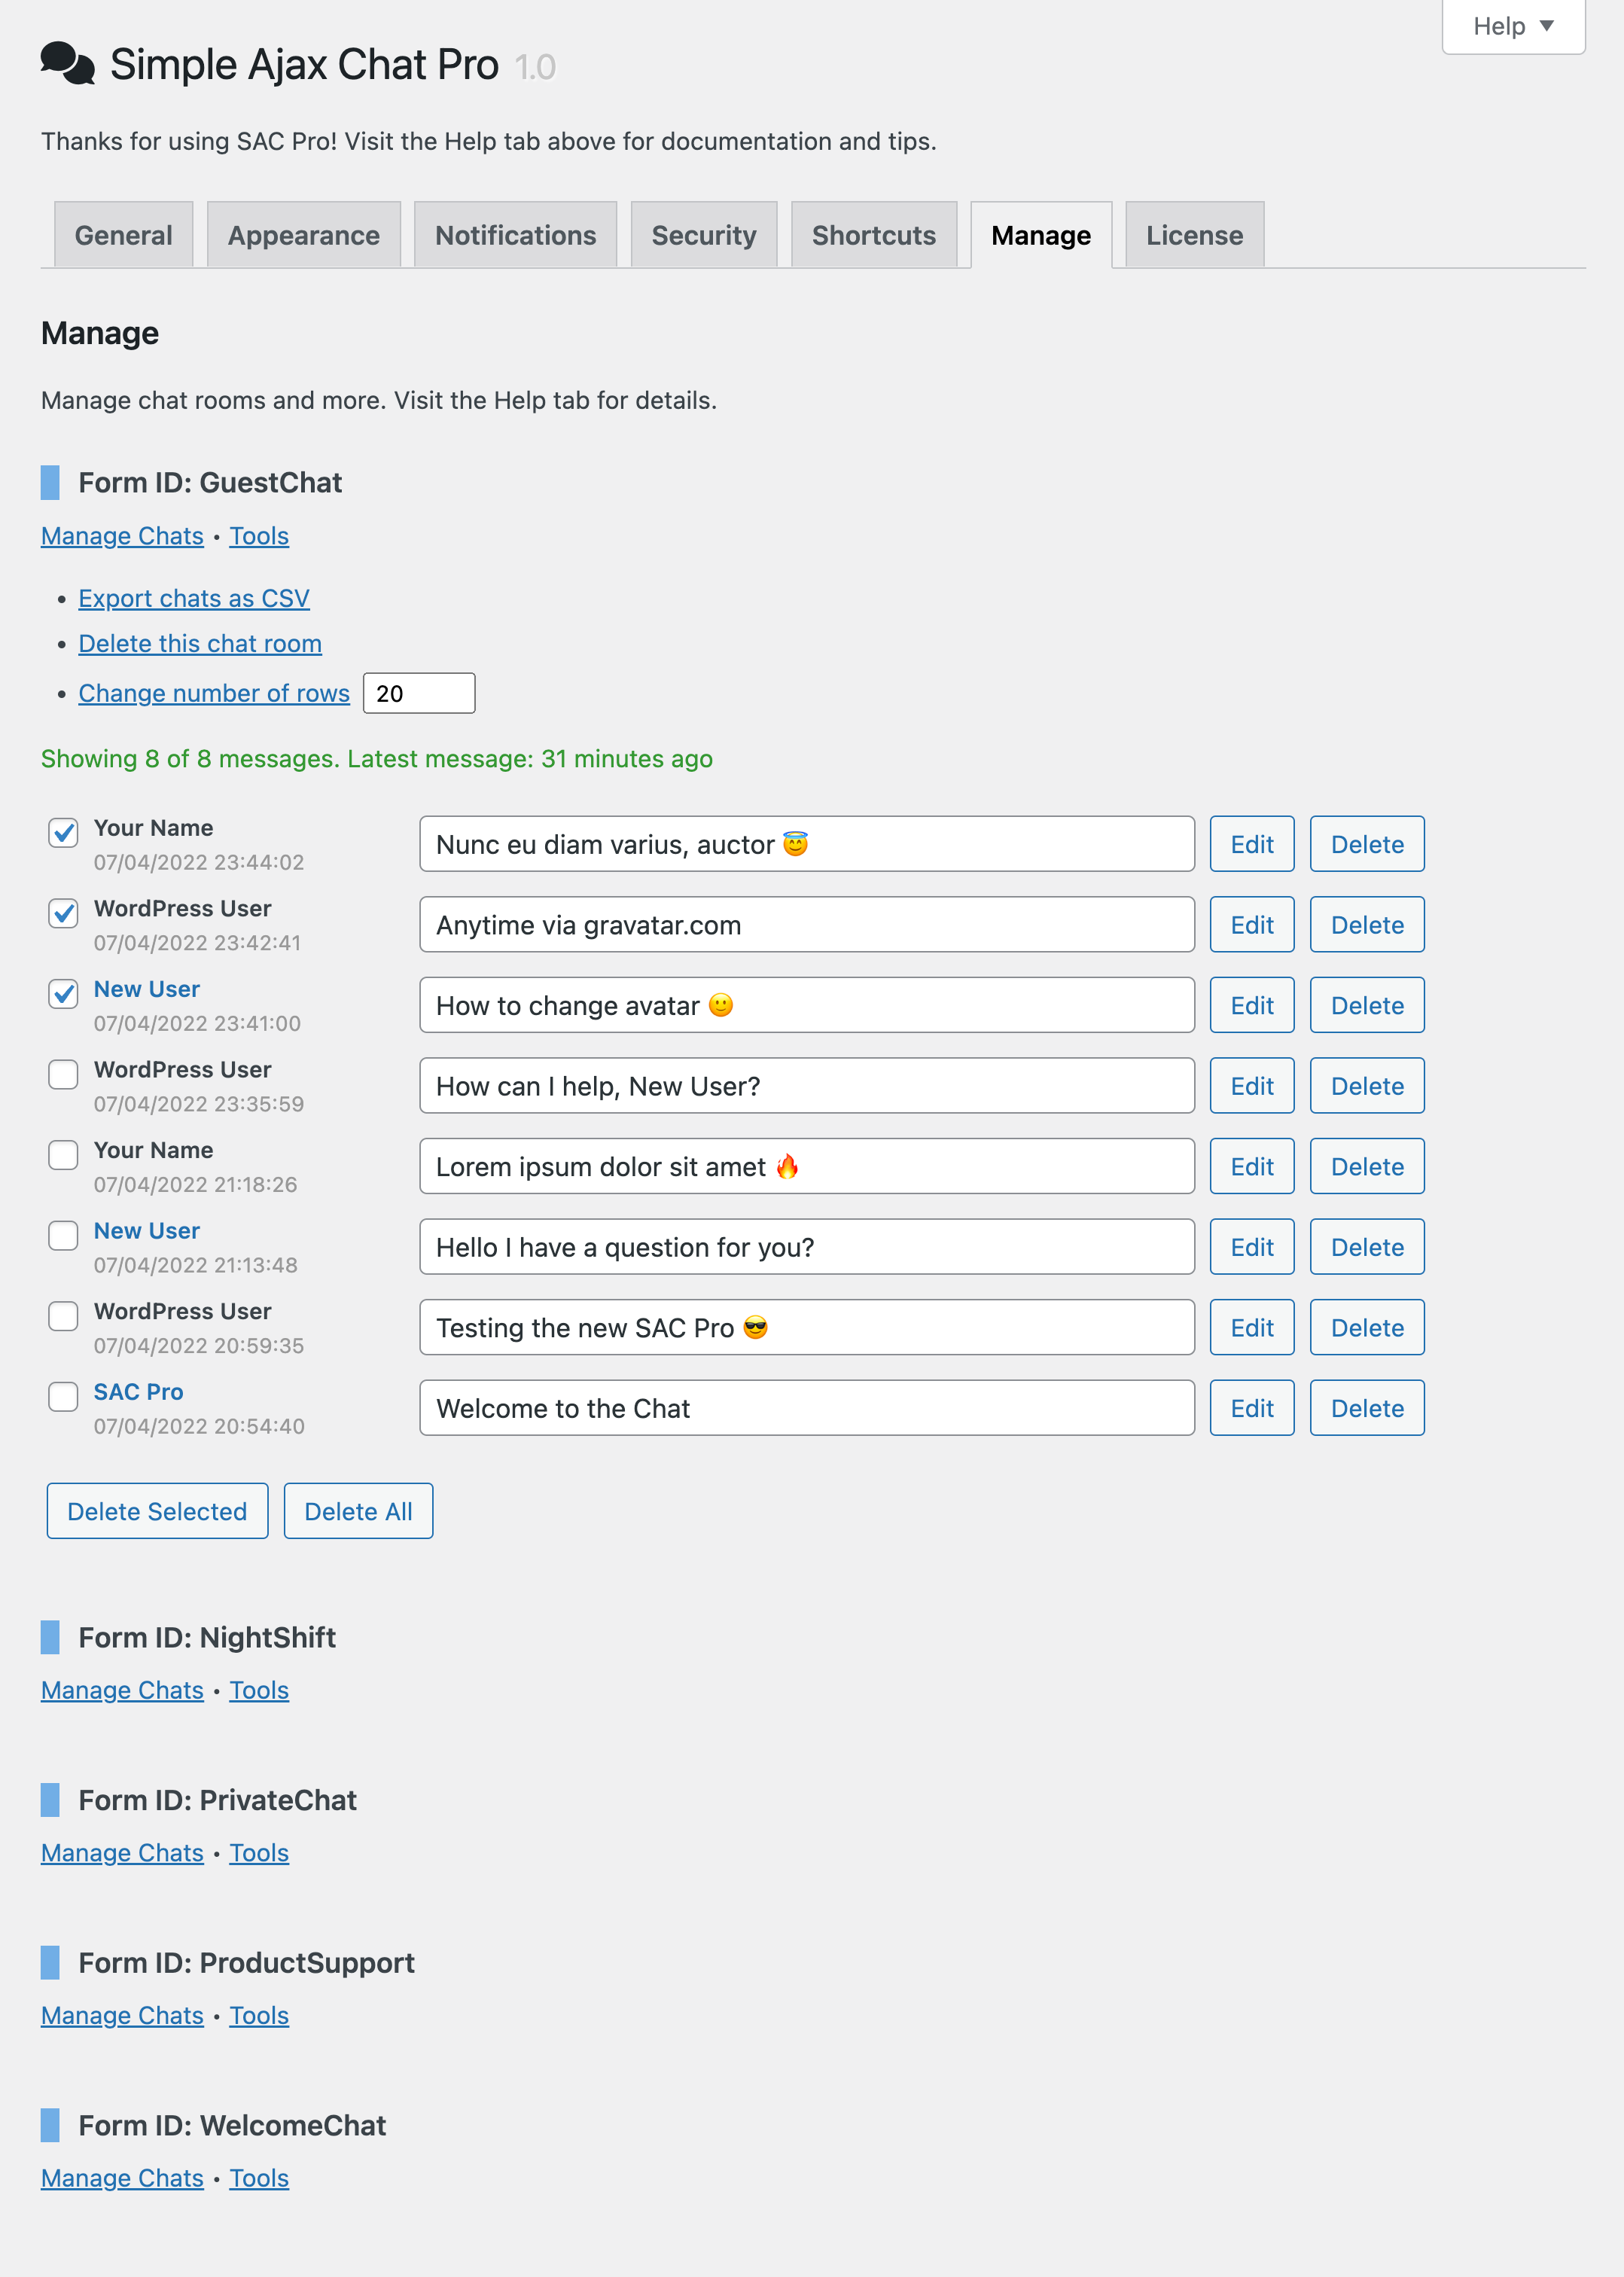
Manage
Available via the WP Admin Menu ▸ Settings ▸ SAC Pro. On the SAC Pro page, visit the “Manage” tab.
You can manage all chat forms and messages under the Manage tab. Below we cover how to perform various tasks, like edit, delete, and export chats. It is similar to the manage-chats panel provided in the free version of SAC, so everything should feel familiar. Of course you get way more functionality and greater control with the pro version :)
- View chat messages — click the “Manage Chats” link for any chat form
- View management tools — click the “Tools” link for any chat form
- Export chat messages — under Tools, click “Export chats as CSV”
- Delete a chat room — under Tools, click “Delete this chat room”
- Display number of chats — under Tools, enter the number and click “Change number of rows”
- View chat message details — click the date link to view chat details (like IP address and host name)
- Mute/Un-mute any user — toggle open chat details and click “Mute user” or “Un-mute user”
- Ban/Un-ban any user — toggle open chat details and click “Ban user” or “Un-ban user”
- Edit any chat message — modify the chat message as desired and then click the “Edit” button
- Delete any chat messages — click the “Delete” button next to any chat message
- Bulk delete chat messages — check boxes next to any chats and click the “Delete Selected” button
- Delete all chat messages — click the “Delete All” button for any form
Notes
- If you have a chat room with very many messages, and your server does not have enough resources. Instead of trying to display all chats on the Manage screen, it may be easier to just export all the chats in a CSV file. The CSV file contains all the same information, and can be easier to read in such cases.
- After exporting a CSV file, make sure to click the “Delete” link to remove the file from the server.
- Deleting a chat room (via the Tools menu) deletes the chat table from the WordPress database.
- Deleting all chat messages (via the “Delete All” button) removes messages only (the chat table is NOT removed from the database).
- Every chat box displays a welcome message. You can customize the welcome message via the plugin settings or shortcode attribute.
- You can mute any user, but only non-Administrators can be banned.
- Muted users may view chats only, not add their own.
- Banned users may not view or add any new chats.
License
Available via the WP Admin Menu ▸ Settings ▸ SAC Pro. On the SAC Pro page, visit the “License” tab.
Your purchase of SAC Pro entitles you to free updates and support according to the license terms. To view your License Key at any time, follow this guide at Plugin Planet.
To activate your license, follow these steps:
- Enter your license key and click “Save License”
- Click the “Activate License” button
- Done! SAC Pro is now enabled and ready to use
For more information, visit the activation guide at Plugin Planet.
Notes
Important: remember to deactivate your license before uninstalling (deleting) the plugin, and/or transferring to a new domain. Learn more.
Note: to deactivate the license at any time, click the “Deactivate License” button. To clear the license field, deactivate the license and click the small “x” button.