USP Pro provides an abundance of settings to help you dial-in the perfect forms. In this Doc, we explore the primary plugin settings, which are all available via Settings ▸ USP Pro. Further, secondary settings are available via shortcode attributes and other methods, as explained elsewhere in the USP Docs.
Video: Settings Tour
Check out more video tutorials for USP Pro »
Settings Documentation
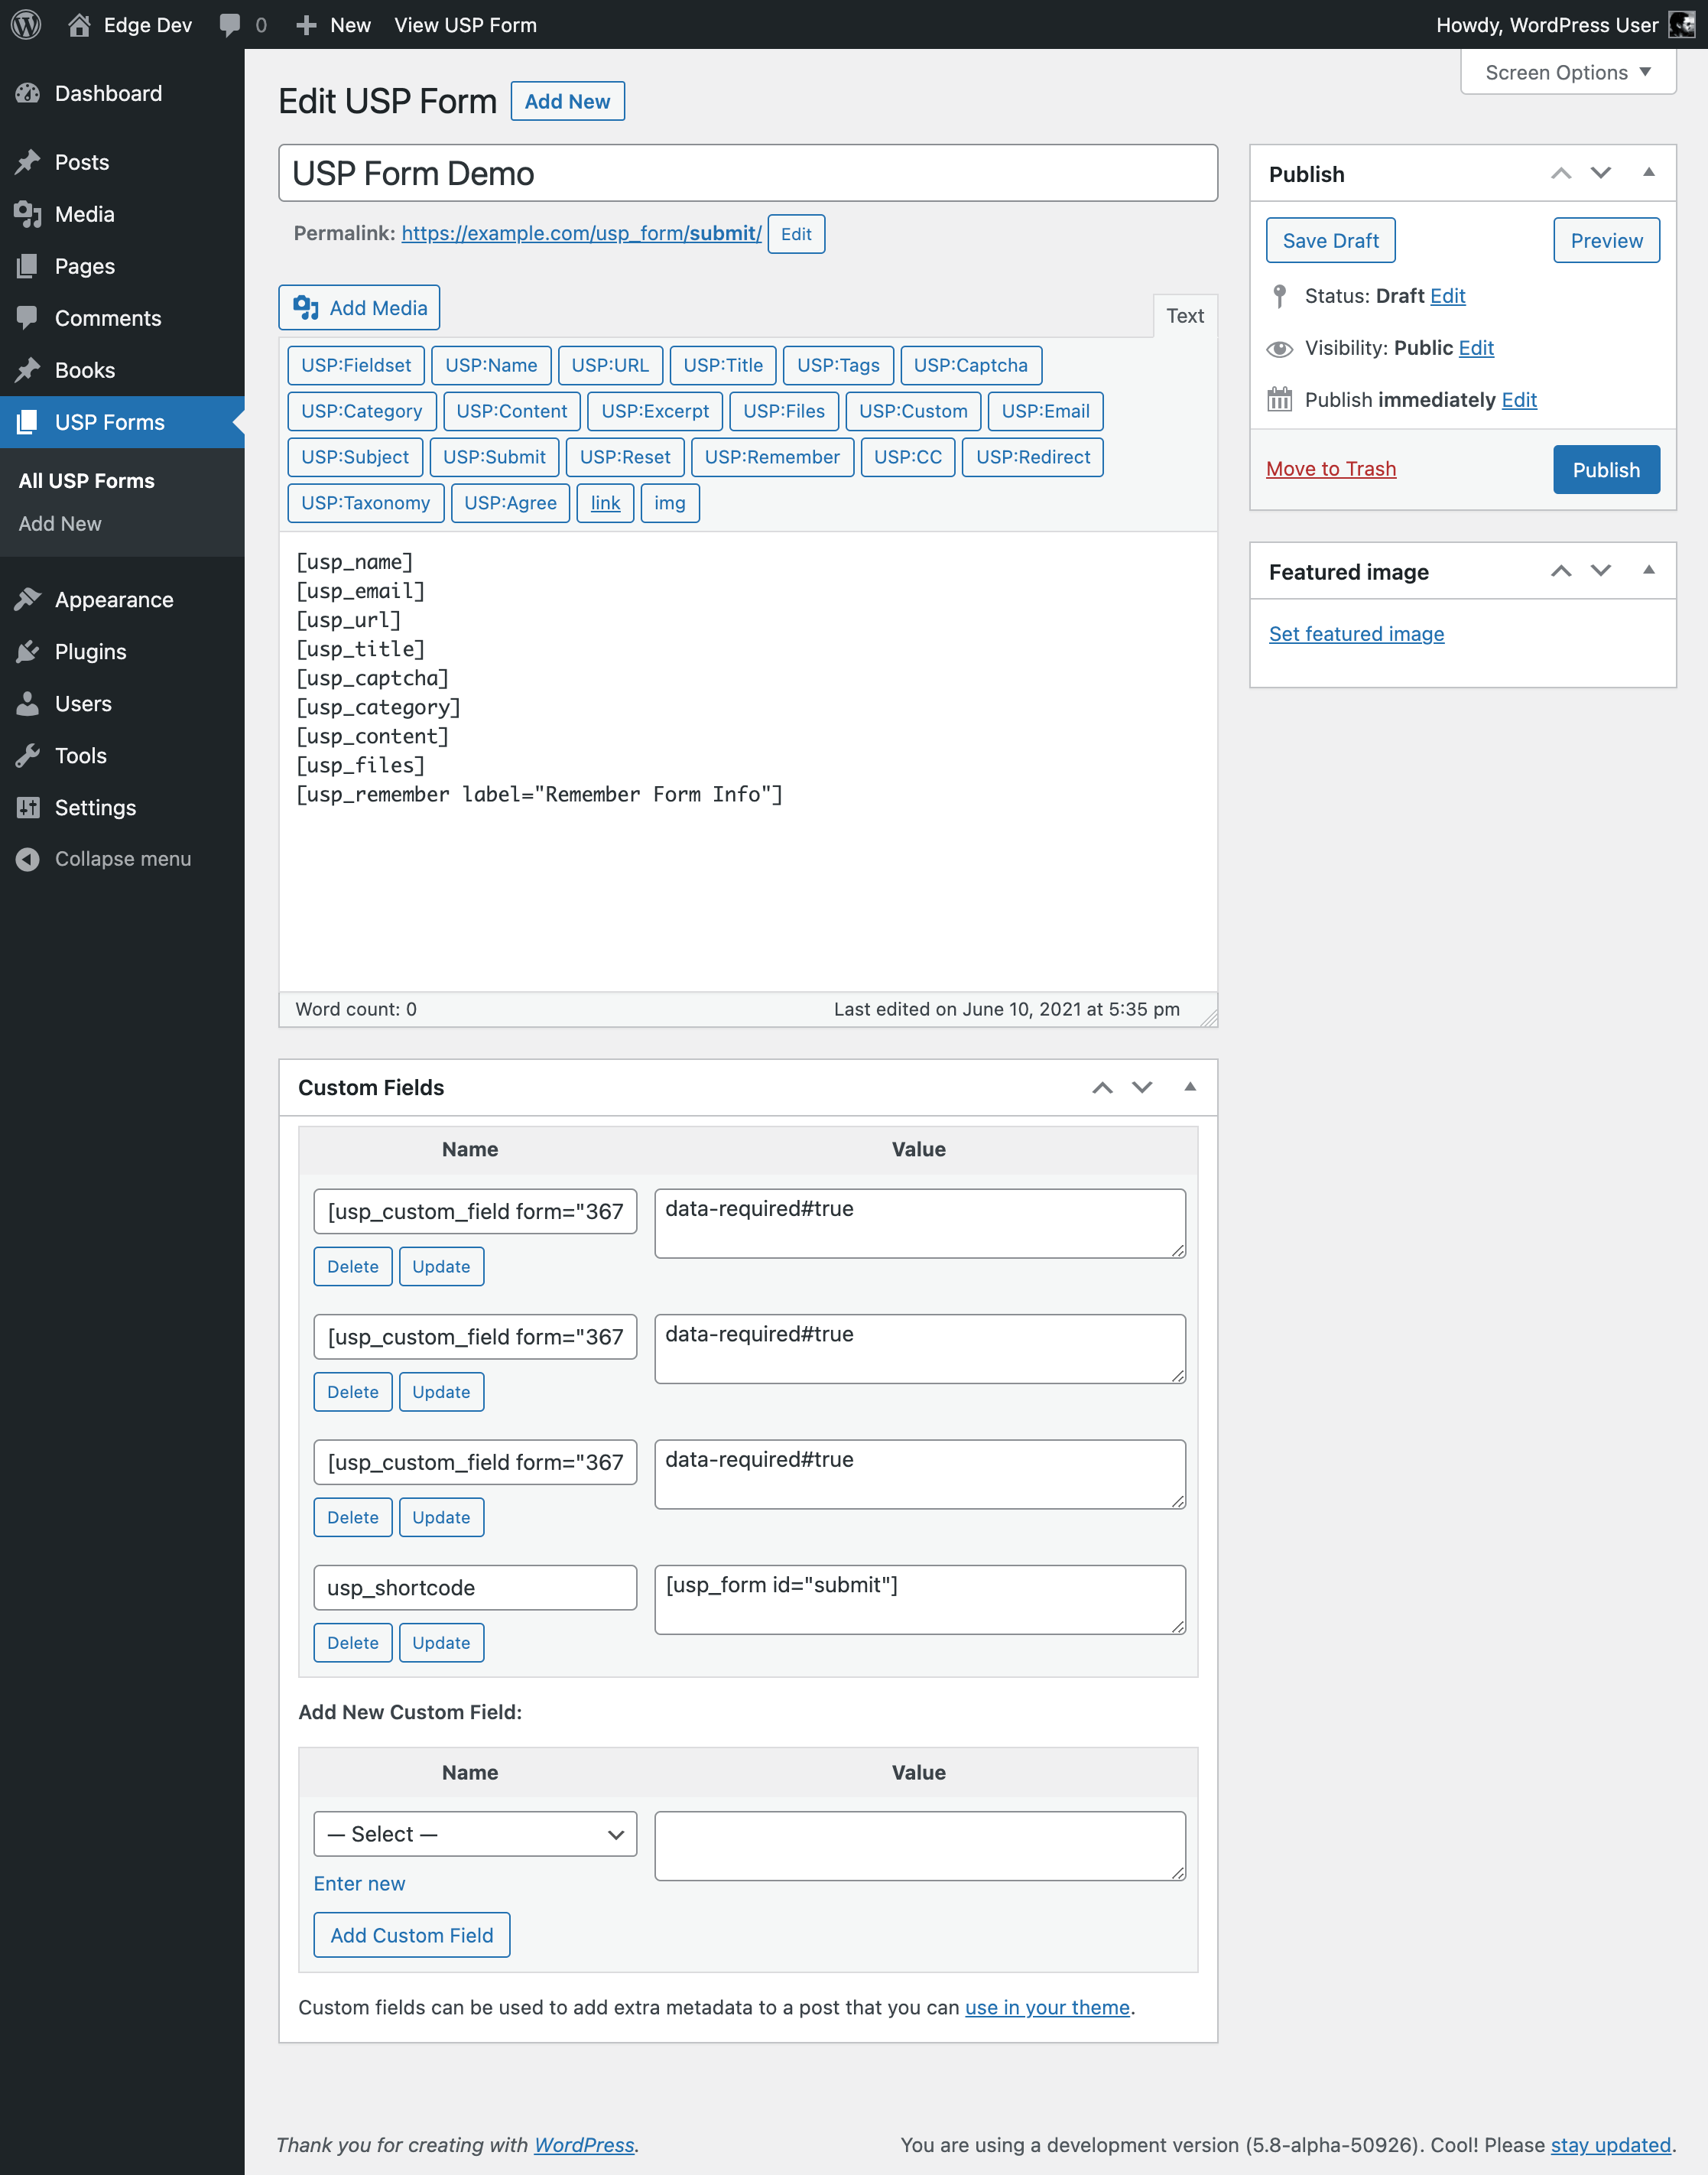
Note: In addition to the settings outlined on this page, USP Pro provides a USP Forms screen for creating and customizing forms.
Table of Contents
General Settings
Welcome to USP Pro! Before diving in, check out the Quick Start guide. View a screenshot of the USP Pro General Settings »
Basic Settings
These settings control basic form functionality.
- Default Post Status:
- Moderate via Draft (default)
- Moderate via Pending
- Moderate via Custom
- Publish Immediately
- Publish via Password
- Publish via Private
- Publish after some number of approved posts (1 – 20)
Note: this setting can be overridden per form »
- Custom Post Status – Name to use for Custom Post Status (valid only when “Auto Publish Posts” is set to “Always moderate via Custom Status”). Default setting: “Custom”
- Redirect to Post – Redirect users to their submitted/published post. Requires that the option for “Auto Publish Posts” set to “Always publish immediately”. Default: unchecked/disabled
- Enable Basic Statistics – Enable basic tracking of user data (e.g., IP, Referrer, Request, et al). When enabled, user stats will attached to submitted posts as custom fields. Default: unchecked/disabled
- Minimum Character Limit – Specify the minimum number of characters allowed for the Post Content field. Leave set at
0for no minimum. Default: 0 (no minimum) - Maximum Character Limit – Specify the maximum number of characters allowed for the Post Content field. Leave set at
0for no maximum. Default: 0 (no maximum) - Unique Post Titles – Check this box to require Post Titles to be unique for submitted posts. When enabled, users must choose a unique post title, so that it is different from any other submitted post. If the post title is not unique, an error message will let the user know to choose a unique title (the message may be customized). Otherwise, if this setting is disabled, users will be able so submit posts with titles that are not unique (in which case WP will append a dash-number to each post URL/permalink, like postname-2, postname-3, etc.). Default: checked/enabled
- Unique Post Content – Check this box to require Post Content to be unique for submitted posts. When enabled, this setting works just like “Unique Post Titles”, only applied to post content. Default: checked/enabled
Memory Settings
These settings control how forms behave if returned with an error. Learn more »
- Remember Form Values – Enable “remembering” of form-field values. This option enables use of a “remember me” checkbox field in USP Forms. Default: checked/enabled
- Memory Strength – When “Remember Form Values” is enabled, how long should the data be preserved? Check the box to remember indefinitely (until the user clears the browser), or leave unchecked to remember form values only until successful submission. Default: unchecked/disabled
- Memory Default – Default state of the “remember me” checkbox field (checked or unchecked). Default: checked/enabled
User Settings
These settings determine how users and handled when submitting form content.
- Default Assigned Author – Default author for user-submitted posts. Select from any registered user with any role. Default: primary admin
- Default Assigned Role – Role that should be assigned when registering users. Default: subscriber
- Use Registered Author – Use the registered username as the Post Author. Default: unchecked/disabled. Learn more »
- Replace Author – Use submitted name as Post Author, and submitted URL as Author URL. Default: unchecked/disabled. Learn more »
Anti-spam/Captcha
Here you may configure the Google reCAPTCHA and antispam/challenge question.
- Captcha Question – To prevent spam, enter a question that users must answer before submitting the form. This question is displayed when
[usp_captcha]is added to any form. Default: “1 + 1 =” - Captcha Response – Enter the only correct answer to the challenge question. Default: “2”
- Case-sensitivity – Check this box if you want the challenge response to be case-sensitive. Default: unchecked/disabled
- reCAPTCHA Public – Use Google reCAPTCHA instead of challenge question. To enable, enter your Public Key and Private Key, or leave both fields blank to use the default challenge question. Default: blank/disabled
- reCAPTCHA Private – Use Google reCAPTCHA instead of challenge question. To enable, enter your Public Key and Private Key, or leave both fields blank to use the default challenge question. Default: blank/disabled
- reCAPTCHA Version – reCAPTCHA version to display via
[usp_captcha]:- Version 1 (Original reCAPTCHA)
- Version 2 (noCAPTCHA reCAPTCHA)
Category Settings
These settings determine how categories are handled with submitted content.
- Category Menu – On the front-end, select how categories should be displayed: as a dropdown menu or checkboxes (always allows users to select multiple categories). Default: dropdown menu
- Multiple Categories – Allow users to select multiple categories when using the dropdown menu. Default: unchecked/disabled
- Nested Categories – Check this box to display nested/hierarchical categories for subcategories. Default: checked/enabled
- Hide Category Field – Hide the Category input field when using
[usp_category](useful when assigning specific categories for submissions). Default: unchecked/disabled - Required Categories – Use a hidden field to assign categories (see next option). Useful for assigning categories to all submitted posts. To assign form-specific categories, use the category shortcode. Default: unchecked/disabled
- Required Category IDs – Category IDs (comma-separated) to include automatically with all submitted posts (when “Required Categories” setting is enabled). Default: empty/blank
- Post Categories – Select which categories may be assigned to submitted posts (toggle show/hide category list). Default: Uncategorized
Tag Settings
These settings determine how tags are handled with submitted content.
- Tag Menu – Select how tags should be displayed on the front-end: as dropdown menu, checkboxes, or text input. Default: dropdown menu
- Allow Multiple Tags – Allow users to select multiple tags when using the dropdown menu. Default: unchecked/disabled
- Hide Tags Field – Hide the Tags input field (useful when assigning specific tags for submissions). Default: unchecked/disabled
- Tag Order – Select the order in which tags should be displayed: name, tag ID, or count (also ascending/descending). Default: name, ascending
- Post Tags – Select which tags may be assigned to submitted posts (toggle show/hide category list). Default: none
- Number of Tags – Enter the number of tags that should be displayed above (does not affect front-end display): Enter “all” or “-1” (without quotes) to display all. Note: any tags not shown will be deselected. Default: “-1”
- Hide Empty Tags – Hide empty tags (i.e., tags with no associated posts) from the above list of tags (does not affect front-end display). Note: any tags not shown will be deselected. Default: unchecked/disabled
Extra Form Security
Optional security measure. After publishing each form, enter its Form ID in the appropriate field(s) below. See this post for more information.
- Enable this feature – Check this box to enable the following three options Default: unchecked/disabled
- Post-Submission Forms – Form IDs of any post-submission forms (include any combo forms) Default: none
- User-Registration Forms – Form IDs of any user-registration forms (include any combo forms) Default: none
- Contact Forms – Form IDs of any contact forms (include any combo forms) Default: none
CSS & JavaScript
Customize the appearance (CSS) and behavior (JavaScript) of USP Forms. Note that these options apply to all USP Forms. To define per-form CSS and JS, use the usp-css and usp-js Custom Fields (learn more via the “Tips & Tricks” section under the Tools tab). View a screenshot of the USP Pro JS/CSS Settings »
CSS/Styles
Here you may customize CSS/styles for your USP Forms.
- Select Form Style – Include the following styles with all USP Forms (included via inline CSS):
- Super simple style (default)
- Clean minimal style
- Smaller form style
- Larger form style
- Define custom style
- Disable style
- Simple Style – CSS for Simple form style (edit as needed to fit your theme). Default: see setting for complete default code
- Minimal Style – CSS for Minimal form style (edit as needed to fit your theme). Default: see setting for complete default code
- Smaller Form – CSS for Small form style (edit as needed to fit your theme). Default: see setting for complete default code
- Larger Form – CSS for Large form style (edit as needed to fit your theme). Default: see setting for complete default code
- Custom Style – CSS for Custom form style (edit as needed to fit your theme). Default: blank/none
- External Stylesheet – Include external CSS file (optional). Includes Parsley.js. Note: this file will be overwritten with each plugin upgrade; so if you need to customize or add any CSS, use the previous option or some other method. Default: unchecked/disabled
JavaScript/jQuery
Here you may customize JavaScript for your USP Forms.
- Include USP JavaScript – Include external USP JavaScript file (required for multiple file uploads and thumbnail previews). Note: this file will be overwritten with each plugin upgrade, so if you need to customize or add any JavaScript, use the previous option or some other method. Default: checked/enabled
- Include Parsley.js – Include Parsley.js (required for front-end form validation). Note: this file will be overwritten with each plugin upgrade, so if you need to customize or add any JavaScript, use the previous option or some other method. Default: unchecked/disabled
- Custom JavaScript – Custom JavaScript, included inline via
<script>tag. Default: bank/disabled
Optimization
By default, external CSS & JavaScript files are loaded on every page. Here you can optimize performance by loading resources only on specific URLs.
- Targeted Loading – When enabled, external CSS & JavaScript files are loaded on every page. Here you may specify URL(s) for targeted loading of resources. Separate multiple URLs with a comma. Note: leave blank to load on all pages. Default: blank/disabled
Uploads
Configure file uploads. Advanced configuration is possible via the [usp_files] shortcode and Custom Fields. View a screenshot of the USP Pro Uploads Settings »
File Uploads
Here are the main settings for file uploads. If in doubt on anything, go with the default option.
- Auto-Display Images – Automatically display images in submitted posts:
- Before post content
- After post content
- Do not auto-display images
- Auto-Display Size – Specify the size at which auto-displayed images should be displayed (see previous option). Choose from Thumbnail, Medium, Large, Full Default: Thumbnail
- Minimum number of files – Specify the minimum number of files that may be uploaded. This default value can be overridden via the
files_minshortcode attribute. Default: 0 (no minimum) - Maximum number of files – Specify the maximum number of files that may be uploaded. This default value can be overridden via the
files_maxshortcode attribute. Default: 3 - Allowed File Types – Allowed file types (comma-separated) for any USP Form. Default: bmp, gif, ico, jpe, jpeg, jpg, png, tif, tiff. Learn more »
- Minimum file size – Minimum size (in bytes) for uploaded files (applies to all file types). Default: 25600 (25 KB)
- Maximum file size – Maximum size (in bytes) for uploaded files (applies to all file types). Default: 5242880 (5 MB)
- Min width for images – Specify a minimum width (in pixels) for uploaded images. Default: 0 (no minimum)
- Max width for images – Specify a maximum width (in pixels) for uploaded images. Default: 1500
- Min height for images – Specify a minimum height (in pixels) for uploaded images. Default: 0 (no minimum)
- Max height for images – Specify a maximum height (in pixels) for uploaded images. Default: 1500
- Featured Images – Auto-display submitted images as Featured Images (theme support required). Default: checked/enabled
- Featured Image Key – Image to use as the Featured Image (when “Featured Images” setting is enabled). Default: 1. Learn more »
- Unique File Names – Make submitted file names unique by prepending a date-based/random string. Default: enabled/unique-filenames
- User Shortcodes – Check this box to enable User Shortcodes in submitted post content. Default: unchecked/disabled. Learn more »
- Non-Admin Media – Enable non-admin users to upload media via the “Add Media” button Default: unchecked/disabled. Learn more »
- Require Square Images – Require each submitted image to have an equal width and height Default: unchecked/disabled
- Auto-Rotate Images – Auto-rotate JPG images if necessary (requires PHP memory_limit > 128M) Default: unchecked/disabled
Admin Settings
Customize email alerts and contact forms. View a screenshot of the USP Pro Admin Settings »
Email Settings
Here are you may specify your email settings, which are used for email alerts and contact forms.
- Admin Mail To – Messages from contact forms and email alerts will be sent to this address. Default: admin’s email address
- Admin Mail From – Email alerts will use this address as the “From” header. Default: admin’s email address
- Admin Email Name – Email alerts will be addressed to this name. Default admin’s username
Email Alerts
Here are you may customize email alerts. Note: user-registration email is sent automatically by WordPress and can’t be disabled via USP Pro.
- Email Alerts – Send email alerts using:
- WP’s
wp_mail()function (default) - PHP’s
mail()function - Disable all email alerts
- WP’s
- Email Format – Format for all email (contact form and email alerts). Note: to allow HTML in contact-form messages, the option “Post Formatting” must be enabled in Advanced settings. Default: plain-text
Email Alerts for Admin
Here are you may customize email alerts that are sent to the admin. You may use shortcut variables in your alert messages to display dynamic bits of information. Learn more »
- Submission Alerts – Send post-submission alert to the admin. Default: checked/enabled
- Approval Alerts – Send post-approval alert to the admin (published post). Default: checked/enabled
- Denied Alerts – Send post-denied alert to the admin (trashed post). Default: checked/enabled
- Scheduled Alerts – Send alert to the admin when a submitted post is scheduled. Default: checked/enabled
- Submission Alert Subject – Subject line for submission alerts sent to the admin. Default: “New User Submitted Post!”
- Submission Alert Message – Message for submission alerts sent to the admin. Default: “New user-submitted post at <your site name>! URL: <your site URL>”
- Approval Alert Subject – Subject line for approval alerts sent to the admin. Default: “Submitted Post Approved!”
- Approval Alert Message – Message for approval alerts sent to the admin. Default: “Congratulations, a submitted post has been approved at <your site name>! Visit your post @ <your site URL>”
- Denied Alert Subject – Subject line for denied alerts sent to the admin. Default: “Submitted Post Denied”
- Denied Alert Message – Message for denied alerts sent to the admin. Default: “A submitted post has been denied at <your site name>”
- Scheduled Alert Subject – Subject line for scheduled alerts sent to the admin. Default: “Submitted Post Scheduled”
- Scheduled Alert Message – Message for scheduled alerts sent to the admin. Default: “A submitted post has been scheduled for publishing at <your site name>”
- CC Submission Alerts – Additional addresses for submission alerts (comma-separated). Default: none (blank)
- CC Approval Alerts – Additional addresses for approval alerts (comma-separated). Default: none (blank)
- CC Denied Alerts – Additional addresses for denied alerts (comma-separated). Default: none (blank)
- CC Scheduled Alerts – Additional addresses for scheduled alerts (comma-separated). Default: none (blank)
Email Alerts for User
Here are you may customize email alerts that are sent to the user. You may use shortcut variables in your alert messages to display dynamic bits of information. Learn more »
- Submission Alerts – Send post-submission alert to the user. Default: checked/disabled
- Approval Alerts – Send post-approval alert to the user (published post). Default: checked/disabled
- Denied Alerts – Send post-denied alert to the user (trashed post). Default: checked/disabled
- Scheduled Alerts – Send alert to the user when a submitted post is scheduled. Default: checked/enabled
- Submission Alert Subject – Subject line for submission alerts sent to the user. Default: “Thank you for your submitted post!”
- Submission Alert Message – Message for submission alerts sent to the user. Default: “Thank you for your submission at <your site name>! If submissions require approval, you’ll receive an email once it’s approved.”
- Approval Alert Subject – Subject line for approval alerts sent to the user. Default: “Submitted Post Approved!”
- Approval Alert Message – Message for approval alerts sent to the user. Default: “Congratulations your submitted post has been approved at <your site name>!”
- Denied Alert Subject – Subject line for denied alerts sent to the user. Default: “Submitted Post Denied”
- Denied Alert Message – Message for denied alerts sent to the user. Default: “Sorry, but your submission has been denied.”
- Scheduled Alert Subject – Subject line for scheduled alerts sent to the user. Default: “Submitted Post Scheduled”
- Scheduled Alert Message – Message for scheduled alerts sent to the user. Default: “Your submitted post has been scheduled for publishing at <your site name>”
Contact Form
Here you may customize default contact form functionality. For Contact/Post Combo Forms, you can use any of the shortcut variables for the “Custom Content” setting. Note that post-formatting must be enabled to send HTML-formatted email.
- Subject Line Prefix – Custom text to prepend to the Subject line. Default: “Message sent from <your site name>: ”
- Subject Line – Default Subject line (when not using
[usp_subject]shortcode). Default: “Email Subject” - Email From – Default “From” address (when not using
[usp_email]shortcode). Default: admin email - Custom Content – Custom content that should be appended to messages sent via contact form. Tip: you can use shortcut variables as described above. Default: none (blank)
- CC Emails – Email addresses that should be carbon copied (comma-separated). Default: admin email
- CC User – Send a copy of the message to the sender (via CC). Default: unchecked/disabled
- CC User Message – Message displayed on the contact form (when the setting “CC User” is enabled). Default: “A copy of this message will be sent to the specified email address.”
- Include User Stats – Append user data to messages (e.g., IP address, referrer, request, et al). Default: unchecked/disabled
- Include Custom Fields – Append any Custom Field data to messages. Default: checked/enabled. Learn more »
Custom Recipients
Here you may specify custom recipients for any contact form. Learn more »
- Custom Recipient 1 – Email address for Custom Recipient 1. Default: none (blank)
- Custom Recipient 2 – Email address for Custom Recipient 2. Default: none (blank)
- Custom Recipient 3 – Email address for Custom Recipient 3. Default: none (blank)
- Custom Recipient 4 – Email address for Custom Recipient 4. Default: none (blank)
- Custom Recipient 5 – Email address for Custom Recipient 5. Default: none (blank)
Advanced Settings
Customize form configuration, post types, custom fields, and more. View a screenshot of the USP Pro Advanced Settings »
Form Configuration
Here you may customize formatting, form demos, custom redirects, content filter, and other automatic functionality.
- Enable Auto-Formatting – Apply WP’s auto-formatting to form content. Default: unchecked/disabled
- Auto-Include Fieldsets – Automatically wrap form inputs with
<fieldset>tags. Default: checked/enabled - Auto-Generate Form Demos – Automatically regenerate the USP Form Demos. Default: unchecked/disabled
- Auto-Generate Post Demos – Automatically regenerate the USP Post Demos. Default: checked/enabled
- Auto-Include Submit Button – Automatically include a submit button to all USP Forms. Default: checked/enabled
- Text for Submit Button – Text for submit button when “Auto-include submit button” option is enabled. Default: Submit Post
- Post Formatting – Specify any HTML tags that should be allowed in submitted post content (comma-separated list, do not include brackets). Default: blank/disable all tags. Learn more »
- Custom Form Attributes – Specify any custom attributes that should be added to the
<form>tag. Default:data-validate="parsley" data-persist="garlic" novalidate - Redirect URL for Success – Where should visitors go after successful form submission? Enter any complete URL (e.g.,
http://example.com) or leave blank to redirect to the current page. Note that you can override this setting on any form. Important: this option is for advanced users; recommended to leave blank. See this post for more info. Default: blank (current page) - Redirect URL for Failure – Where should visitors go after failed form submission? Enter any complete URL (e.g.,
http://example.com) or leave blank to redirect to the current page. Important: this option is for advanced users; recommended to leave blank. See this post for more info. Default: blank (current page) - Content Filter – Words that are not allowed in any submitted post content (put each word on its own line). Default: blank/disabled
Custom Post Type
Here you may customize the post types used by USP Pro. The option “USP Posts” uses a Custom Post Type provided by USP Pro. The option “Existing Post Type” uses a Custom Post Type that is provided by your theme. If in doubt, use the default option, “Regular WP Posts”.
- Submitted Post Type – Submitted content should be posted as:
- Regular WP Posts (default)
- Regular WP Pages
- USP Posts (see related setting, “Slug for USP Post”)
- Existing Post Type (see related setting, “Slug for Existing Post Type”)
- Slug for USP Post – Slug to use when “USP Posts” is selected for the setting, “Submitted Post Type”. Note: this setting is for advanced users. Recommended to use the default value,
usp_post. - Slug for Existing Post Type – Slug to use when “Existing Post Type” is selected for the setting, “Submitted Post Type”. Note: the Custom Post Type specified here must be provided by your theme. Default: none. Learn more »
- Roles for USP Posts – Which user roles should have access to USP Posts:
- Admin (default)
- Editor
- Author
- Contributor
- Roles for USP Form Types – Which user roles should have access to USP Forms:
- Admin (default)
- Editor
- Author
- Contributor
Default Form Fields
Here you may specify default values for submitted Post Title and Post Content. This enables you to exclude title and content fields on forms and use these values instead. Note that default fields also may be specified on a per-form basis by setting values with hidden fields.
- Default Post Title – Default Post Title for submitted posts. Default: “Post Title”
- Default Post Content – Default Post Content for submitted posts (basic HTML allowed). Default: “Post Content”
Before/After USP Forms
Here you may specify any custom text and/or markup to appear before and after all USP Forms.
- Custom Before Forms – Enter some text/markup to be included before all USP Forms. Default:
<div class="usp-pro-form"> - Custom After Forms – Enter some text/markup to be included after all USP Forms. Default:
</div>
Customize Success Message
Here you may customize the various success messages. Basic markup allowed.
- Register User – Message displayed when a user is registered successfully. Default: “Congratulations, you have been registered with the site.”
- Submit Post – Message displayed when a post has been submitted successfully. Default: “Success! You have successfully submitted a post.”
- Register and Submit – Message displayed when user is registered and post is submitted. Default: “Registration successful! Post Submission successful! You’re golden.”
- Contact Form – Message to display when messages are sent successfully. Default: “Email sent! We’ll get back to you as soon as possible.”
- Contact Form and Register – Message displayed when email is sent and user is registered. Default: “Registration successful! Email sent! We’ll get back to you as soon as possible.”
- Contact Form and Post – Message displayed when email is sent and post is submitted. Default: “Post Submitted! Email sent! We’ll get back to you as soon as possible.”
- Contact, Register, and Post – Message displayed when email is sent, user is registered, and post is submitted. Default: “Post Submitted! Registration successful! Email sent! We’ll get back to you as soon as possible.”
- Custom Before Message – Custom text/markup to appear before the success message. Default:
<div class="usp-success"> - Custom After Message – Custom text/markup to appear after the success message. Default:
</div> - Display Form on Success – Display the submission form with the success message Default: unchecked/disabled
Primary Form Fields
Here you may customize default names/labels for primary fields. These values may be customized on a per-form basis via the label attribute. Learn more »
- Primary Fields 1 thru 19 – Here you may customize input labels for primary form fields (i.e., those that have their own quicktag in the USP Form Editor). These names are used for contact-form custom-fields and elsewhere. Defaults (in order): Your Name, Post URL, Post Title, Post Tags, Challenge Question, Post Category, Post Content, File(s), Email Address, Email Subject, Alt Text, Caption, Description, Taxonomy, Post Format, Media Title, File Name, Agree to Terms, Post Excerpt
User-Registration Fields
Here you may customize default names/labels for user-registration fields. These values may be customized on a per-form basis via the label attribute. Learn more »
- Nicename – Name for the “User Nicename” field. Default: “User Nicename”
- Display Name – Name for the “User Display Name” field. Default: “User Display Name”
- Nickname – Name for the “User Nickname” field. Default: “User Nickname”
- First Name – Name for the “User First Name” field. Default: “User First Name”
- Last Name – Name for the “User Last Name” field. Default: “User Last Name”
- Description – Name for the “User Description” field. Default: “User Description”
- Password – Name for the “User Password” field (deprecated). Default: “User Password”
Custom Fields
Number of Custom Fields to auto-generate for each USP Form. The number specified below is used for two things: 1) it determines how many Custom Fields are added to newly created forms, and 2) it determines how many options to generate for the next group of settings, “Custom Field Names”. So for example, if 3 is selected for this setting, all new USP Forms will include three Custom Fields, each with its own option in the following setting, “Custom Field Names”. Note that unused Custom Fields are fine; the idea is to have them readily available for each form.
- Custom Fields – Number of Custom Fields to auto-generate for each USP Form. Default: 3
Custom Field Names
Here you may define names for Custom Fields (see previous setting). The names defined in this setting are used for Custom Fields displayed in error messages, contact-form messages, and elsewhere. They apply only to Custom Fields that are named numerically. For example, the “Name for Custom Field #1” applies to any custom field that uses name#1 as its name attribute.
- Custom Fields 1 thru “n” – Here “n” is the number of custom fields specified in the previous setting, “Custom Fields”. Default: blank
Custom Field Prefix
Here you may specify a unique prefix to use for Custom Field names. For example, if you specify foo_ for this setting, you can create unique Custom Fields by including the parameter name#foo_whatever in your custom-field definition. Note that the custom prefix may contain lowercase/uppercase alphanumeric characters, plus underscores and dashes. Important: do not use usp- or usp_ for the custom prefix (these are reserved for default Custom Fields).
- Custom Prefix – Unique prefix to use for custom field names (leave blank to disable). Default: “prefix_”
Custom Custom Fields
Here you may specify any of your own Custom Custom Field names (separated by commas). For this setting, there are two types of fields, Optional and Required. Required fields will trigger an error if left empty when the form is submitted; whereas Optional fields will not trigger an error if left empty. Note that Custom Field names may contain lowercase/uppercase alphanumeric characters, plus underscores and dashes. Important: your Custom Field names must NOT begin with usp- or usp_ (these are reserved for default Custom Fields).
- Optional Fields – Optional custom field names (leave blank to disable). Default: blank/none
- Required Fields – Required custom field names (leave blank to disable). Default: blank/none
Custom Custom Field Names
Here you may define names for any Custom Custom Fields (see previous setting). The names defined in this setting are used for Custom Custom Fields displayed in error messages, contact-form messages, and elsewhere. Note: in order to define any names, you first must specify some Custom Fields in the previous setting; then after clicking “Save Changes”, corresponding name fields automatically will be generated below.
- Custom Field:
name– Name for Custom Field:nameDefault: blank/none
Error/More Settings
Here you may customize error messages for USP Pro. View a screenshot of the USP Pro Errors/More Settings »
Note: the “More” tab was renamed to “Errors” in USP Pro version 2.6.
Default Error Message
Here you may customize the default error message. You may use text and/or basic markup.
- Custom Before Errors – Custom text/markup to appear before the listed errors. Default:
<div class="usp-errors"><div class="usp-errors-heading"><strong>Important!</strong> Please fix the following issues:</div> - Custom After Errors – Custom text/markup to appear after the listed errors. Default:
</div>
Primary Field Errors
Here you may customize primary field errors. You may use text and/or basic markup.
- Name – Text/markup for Name errors – when using shortcode [usp_name]. Default:
<div class="usp-error">Required field: Your Name</div> - URL – Text/markup for URL errors – when using shortcode [usp_url]. Default:
<div class="usp-error">Required field: Post URL</div> - Title – Text/markup for Title errors – when using shortcode [usp_title]. Default:
<div class="usp-error">Required field: Post Title</div> - Tags – Text/markup for Tags errors – when using shortcode [usp_tags]. Default:
<div class="usp-error">Required field: Post Tags</div> - Captcha – Text/markup for Captcha errors – when using shortcode [usp_captcha]. Default:
<div class="usp-error">Required field: Challenge Question</div> - Category – Text/markup for Category errors – when using shortcode [usp_category]. Default:
<div class="usp-error">Required field: Post Category</div> - Content – Text/markup for Content errors – when using shortcode [usp_content]. Default:
<div class="usp-error">Required field: Post Content</div> - Files – Text/markup for File(s) errors – when using shortcode [usp_files]. Default:
<div class="usp-error">Required field: File(s)</div> - Email Address – Text/markup for Email Address errors – when using shortcode [usp_email]. Default:
<div class="usp-error">Required field: Email Address</div> - Email Subject – Text/markup for Email Subject errors – when using shortcode [usp_subject]. Default:
<div class="usp-error">Required field: Email Subject</div> - Alt Text – Text/markup for Alt Text errors, when using shortcode [usp_custom_field] with attribute
name#alt-{id}. Default:<div class="usp-error">Required field: Alt text</div> - Caption – Text/markup for Caption errors, when using shortcode [usp_custom_field] with attribute
name#caption-{id}. Default:<div class="usp-error">Required field: Caption</div> - Description – Text/markup for Description errors, when using shortcode [usp_custom_field] with attribute
name#desc-{id}. Default:<div class="usp-error">Required field: Description</div> - Taxonomy – Text/markup for Taxonomy errors, when using shortcode [usp_taxonomy]. Default:
<div class="usp-error">Required field: Taxonomy</div> - Post Format – Text/markup for Post-Format errors (via custom field or hidden field). Default:
<div class="usp-error">Required field: Post Format</div> - Media Title – Text/markup for Media Title errors, when using shortcode
[usp_custom_field]with attributename#mediatitle-{id}. Default:<div class="usp-error">Required field: Media Title</div> - File Name – Text/markup for File Name errors, when using shortcode
[usp_custom_field]with attributename#filename-{id}. Default:<div class="usp-error">Required field: File Name</div> - Agree to Terms – Text/markup for “Agree to Terms” errors, when using shortcode
[usp_agree]. Default:<div class="usp-error">Required field: Agree to Terms</div> - Post Excerpt – Text/markup for “Post Excerpt” errors, when using shortcode
[usp_excerpt]. Default:<div class="usp-error">Required field: Post Excerpt</div>
Form Submission Errors
Here you may customize form-submission errors. You may use text and/or basic markup.
- Username Error – Text/markup for Username errors (when using a form that registers users). Default:
<div class="usp-error">Username already registered. If that is your username, please log in to submit posts. Otherwise, please choose a different username.</div> - User Email Error – Text/markup for User Email errors (when using a form that registers users). Default:
<div class="usp-error">Email already registered. If that is your address, please log in to submit content. Otherwise, please choose a different email address.</div> - User Exists – Text/markup for User Exists errors (when using a form that registers users). Default:
<div class="usp-error">You are already registered with this site, please log in to submit content.</div> - Registration Disabled – Text/markup for Registration Disabled errors (when using a form that registers users). Default:
<div class="usp-error">User-registration is currently disabled. Please contact the admin for help.</div> - Post Required – Text/markup for Post Required errors (when using a form that submits posts). Default:
<div class="usp-error">Post-submission required for user registration. Please try again.</div> - Duplicate Post – Text/markup for Duplicate Post errors (when using a form that submits posts). Default:
<div class="usp-error">Duplicate post title detected. Please enter a unique post title.</div> - Name Restriction – Text/markup for illegal characters in the Name field. Default:
<div class="usp-error">Restricted characters found in Name field. Please try again.</div> - Incorrect Captcha – Text/markup for incorrect response for the anti-spam captcha/challenge question. Default:
<div class="usp-error">Incorrect response for the spam check. Please try again.</div> - Content Minimum – Text/markup for the Content field when the minimum number of characters is not met. Default:
<div class="usp-error">Minimum number of characters not met in content field. Please try again.</div> - Content Maximum – Text/markup for the Content field when the maximum number of characters is exceeded. Default:
<div class="usp-error">Number of characters in content field exceeds maximum allowed. Please try again.</div> - Excerpt Minimum – Text/markup for the Excerpt field when the minimum number of characters is not met. Default:
<div class="usp-error">Minimum number of characters not met in excerpt field. Please try again.</div> - Excerpt Maximum – Text/markup for the Excerpt field when the maximum number of characters is exceeded. Default:
<div class="usp-error">Number of characters in excerpt field exceeds maximum allowed. Please try again.</div> - Address Restriction – Text/markup for illegal characters in the Email Address field. Default:
<div class="usp-error">Restricted characters found in Email address. Please try again.</div> - Subject Restriction – Text/markup for illegal characters in the Email Subject field. Default:
<div class="usp-error">Restricted characters found in Subject field. Please try again.</div> - Incorrect Form Type – Text/markup for incorrect form type (applies when “Form Security” is enabled in General settings). Default:
<div class="usp-error">Incorrect form type. Please notify the administrator.</div> - Content Filter – Text/markup when forbidden words are found in Post Content (when “Content Filter” is enabled in Advanced settings). Default:
<div class="usp-error">Restricted terms found in Content field. Please try again.</div>
File Submission Errors
Here you may customize file-submission errors. You may use text and/or basic markup.
- Files Required – Text/markup for required files (multiple selected files). Default:
<div class="usp-error">File(s) required. Please check any required file(s) and try again.</div> - File Required – Text/markup for required file (single selected files). Default:
<div class="usp-error">File(s) required. Please check any required file(s) and try again.</div> - File Type Not Allowed – Text/markup for disallowed file types. Default:
<div class="usp-error">File type not allowed. Please check the allowed file types and try again.</div> - File Dimensions – Text/markup for file width and height. Default:
<div class="usp-error">Image dimensions (width/height) exceed set limits. Please check the requirements and try again.</div> - Maximum File Size – Text/markup for maximum file size. Default:
<div class="usp-error">Maximum file-size limit exceeded. Please check the file requirements and try again.</div> - Minimum File Size – Text/markup for minimum file size. Default:
<div class="usp-error">Minimum file-size not met. Please check the file requirements and try again.</div> - File Name Length – Text/markup for length of file name. Default:
<div class="usp-error">Length of filename exceeds allowed limit. Please check the requirements and try again.</div> - Minimum Number of Files – Text/markup for minimum number of files. Default:
<div class="usp-error">Please ensure that you have met the minimum number of required files, and that any specific requirements have been met (e.g., size, dimensions).</div> - Maximum Number of Files – Text/markup for maximum number of files. Default:
<div class="usp-error">Please ensure that you have not exceeded the maximum number of files, and that any specific requirements have been met (e.g., size, dimensions).</div> - Require Square Images – Text/markup for square-image requirement (image width must equal image height). Default:
<div class="usp-error">A square image is required. Please check the requirements and try again.</div>
User Registration Errors
Here you may customize user-registration errors. You may use text and/or basic markup.
- Nicename – Text/markup for the “User Nicename” field. Default:
<div class="usp-error">Required field: User Nicename</div> - Display Name – Text/markup for the “User Display Name” field. Default:
<div class="usp-error">Required field: User Display Name</div> - Nickname – Text/markup for the “User Nickname” field. Default:
<div class="usp-error">Required field: User Nickname</div> - First Name – Text/markup for the “User First Name” field. Default:
<div class="usp-error">Required field: User First Name</div> - Last Name – Text/markup for the “User Last Name” field. Default:
<div class="usp-error">Required field: User Last Name</div> - Description – Text/markup for the “User Description” field. Default:
<div class="usp-error">Required field: User Description</div> - Password – Text/markup for the “User Password” field (deprecated). Default:
<div class="usp-error">Required field: User Password</div>
Miscellaneous Errors
Here you may customize various aspects of miscellaneous errors. You may use text and/or basic markup.
- Error Separator – Text/markup to appear between each error (e.g.,
,or<span class="usp-error-sep">, </span>). Default: none (blank) - Before Taxonomy – Text/markup to appear before each taxonomy error. Default:
<div class="usp-error">Required field: - After Taxonomy – Text/markup to appear after each taxonomy error. Default:
</div> - Before Custom Field – Text/markup to appear before each custom field error. Default:
<div class="usp-error">Required field: - After Custom Field – Text/markup to appear after each custom field error. Default:
</div>
Additional Tabs
In addition to the primary settings tabs, there are several additional tabs: Tools, About, and License.
Tools
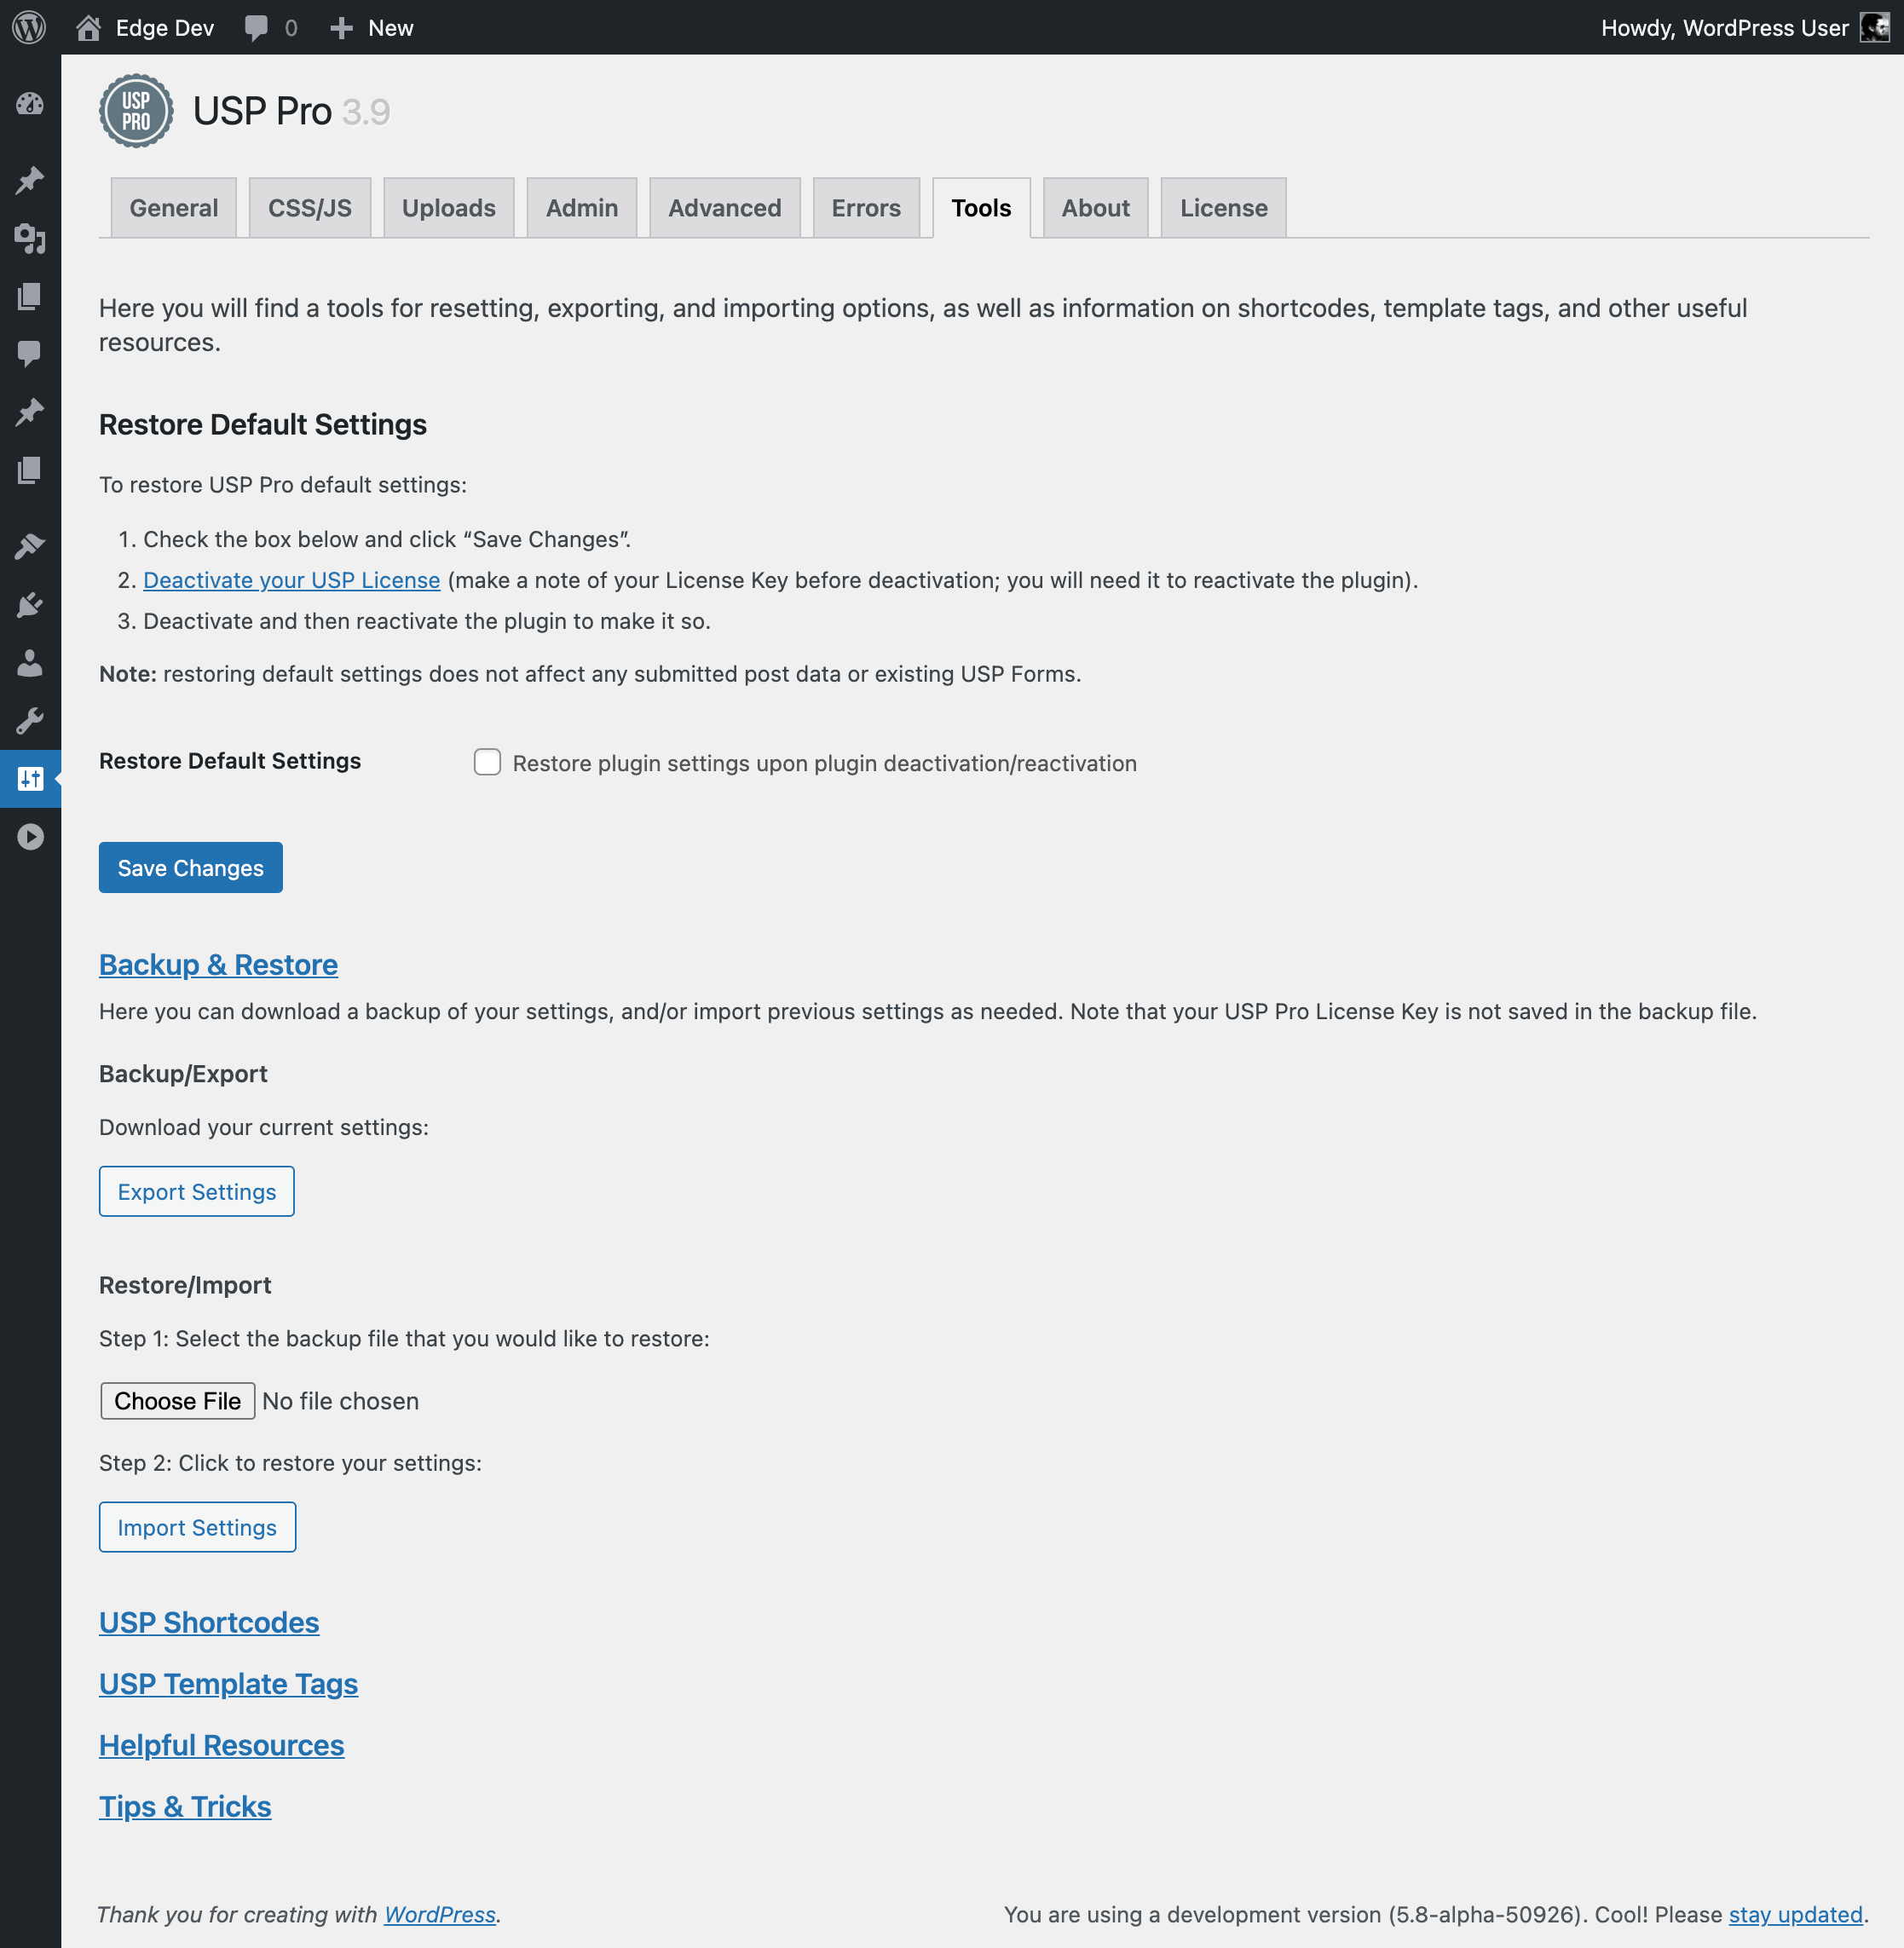
Here you will find a tools for resetting, exporting, and importing options, as well as information on shortcodes, template tags, and other useful resources. View Tools Screen »
- Restore Default Settings – Restore default plugin settings.
- Backup & Restore – Here you can download a backup of your settings, and/or import previous settings as needed. Note that your USP Pro License Key is not saved in the backup file.
- USP Shortcodes – Complete shortcode library at your service.
- USP Template Tags – Descriptions of the most useful of USP Pro’s template tags.
- Helpful Resources – Growing list of useful resources for working with USP Pro and WordPress.
- Tips & Tricks – Growing collection of miscellaneous tips and tricks.
About
About USP Pro, WordPress, the server and current user.
- Plugin Information – summary of current plugin infos
- WordPress Information – summary of vital WordPress infos
- WordPress Constants – list of key WordPress constants
- Server Information – summary of vital server infos
- User Information – snapshot of current user infos
License
Activate your license to unlock USP Pro and enable free automatic updates. Get your License Key »
- License Status – Displays current license status, either Active or Inactive.