USP Pro version 2.2 makes it possible to display any Custom Fields via Meta Box on the Edit Post screen. This new method is easier and more flexible than the previous meta-box technique. This article explains how it works and how to display any Custom Fields that are required.
Video Tutorial
Check out more video tutorials for USP Pro »
tl;dr (Summary)
USP Pro can display any Custom Fields via Meta Box on the “Edit Post” screen for any post, even if it is not submitted via USP Pro. As a quick example, you can display the same Meta Box that is included in the free version of USP by adding the following Custom Field to your Form:
name#metabox-display|type#hidden|label#null|fieldset#null|placeholder#null|value#usp-author,usp-email,usp-urlWith that Custom Field added, all posts that are submitted via your form will display the Author, Email, and URL in a Meta Box:
That’s a quick summary of how it works, continue reading to learn more..
Feature Highlights
Here are the highlights of the new Meta Box feature:
- Can be used to display any Custom Field
- Can be added to any post, not just those submitted via USP
- Can be added to any Post Type
- Can be added automatically via USP Form
- Works out of the box with the previous meta-box technique
So it’s super-flexible, let’s look at how to set it up..
Meta Boxes for Submitted Posts
Here are the steps to automatically display Custom Fields via Meta Box for submitted posts. Here we are assuming the following:
- Your Form ID is
10 - Your Custom Field ID is
1 - Your form includes the following fields:
[usp_name],[usp_url],[usp_email]
Step 1
Create the following Custom Field for your USP Form:
- Custom Field Name:
[usp_custom_field form="10" id="1"] - Custom Field Value:
name#metabox-display|type#hidden|label#null|fieldset#null|placeholder#null|value#usp-author,usp-email,usp-url
This Custom Field can be added via the “Custom Fields” panel located beneath your USP Form. Here is a screenshot:
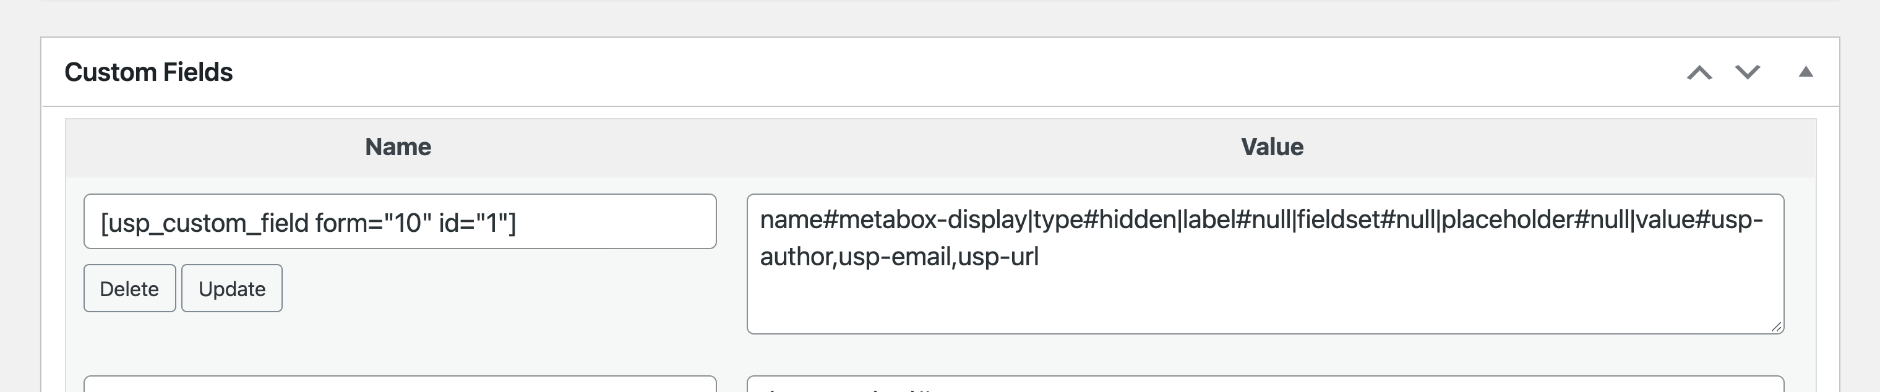
[usp_custom_field form="10" id="1"], is just an example. Specifically, the form="10" and id="1" will vary with each form. So you want to make sure the numbers match up. The easiest way to do this is to use the custom-field shortcodes that are included automatically with each form.Step 2
Once you’ve got the Custom Field in place, copy its Shortcode and add it to the form:
[usp_custom_field form="10" id="1"]This Shortcode will include a hidden field in your form that tells USP to create the Meta Box for any posts submitted via the form. Note that form="10" and id="1" are examples; your Custom Field may have different values. Make sure they are accurate.
At this point, your form should include the following fields:
[usp_name]
[usp_url]
[usp_email]

[usp_custom_field form="10" id="1"]
..as well as any other fields that you would like to include (e.g., [usp_title], [usp_content], et al). Remember to save your changes both for the Custom Field (click the grey “Update” button), and for the form itself (click the blue “Update” or “Publish” button).
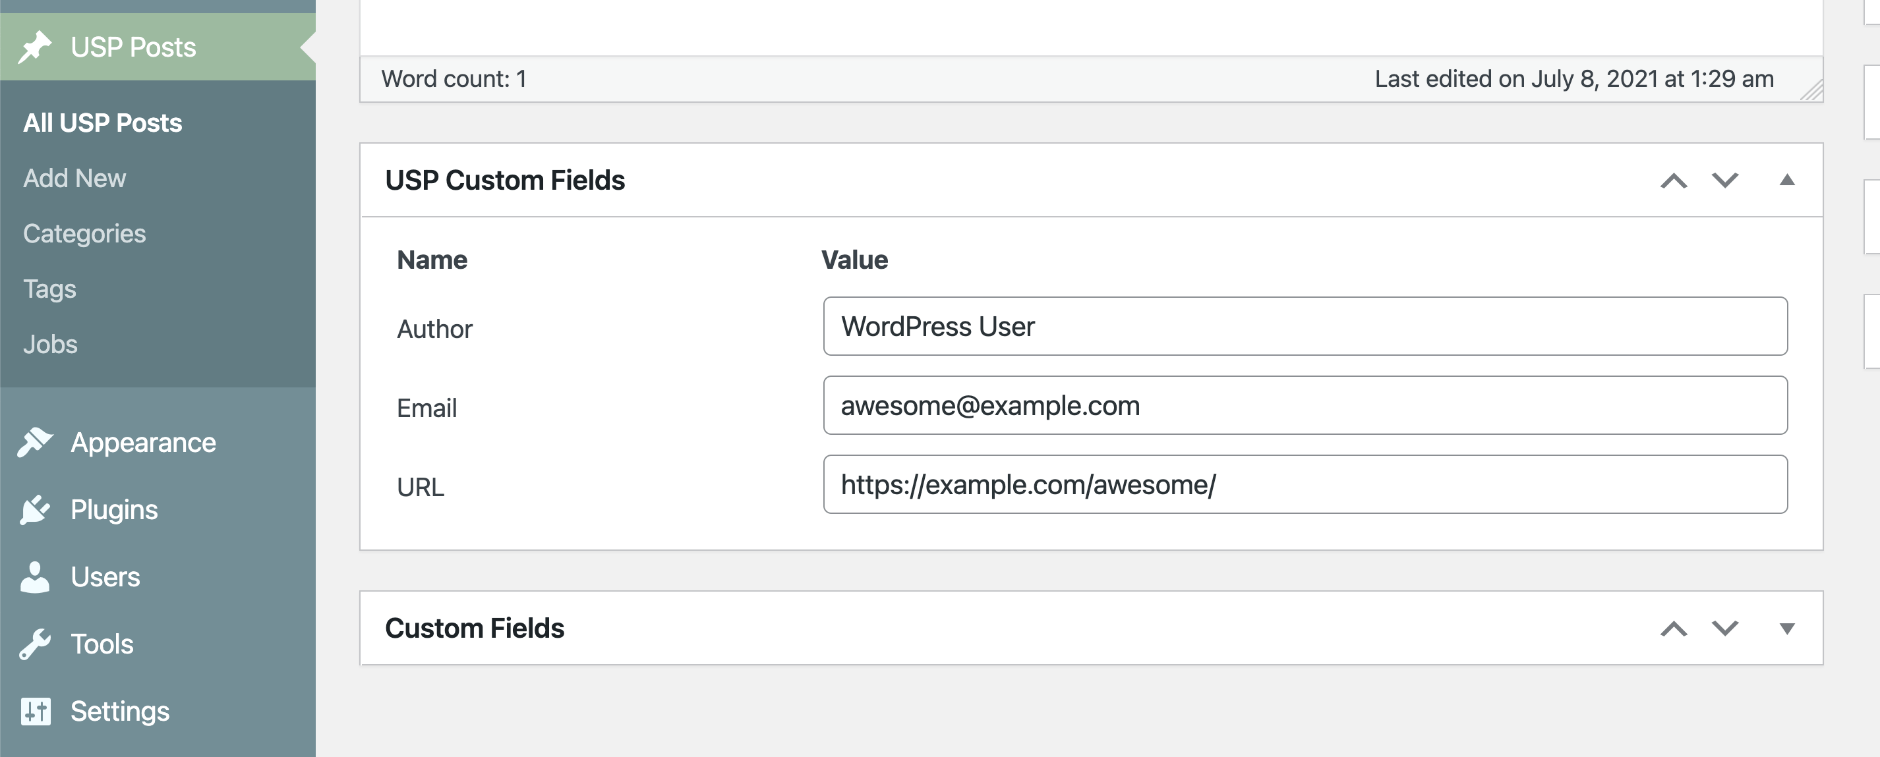
Step 3
All done. Try submitting a test post via your form. Then visit the submitted post in the WP Admin Area (“Edit Post” screen) to view the Meta Box. It should look like this:
This is the same Meta Box that is included with the free version of USP. Every post that is submitted via your form will display this Meta Box.
Adding More Custom Fields
Now that we’ve seen how to add a basic Meta Box, let’s look at how to add more Custom Fields. For example, if your form displays three custom fields, they also will be included in the Meta Box. To do that, we define four custom fields. The first one is the meta-box definition, as prescribed above. Then after that we add three more fields to get something like this:
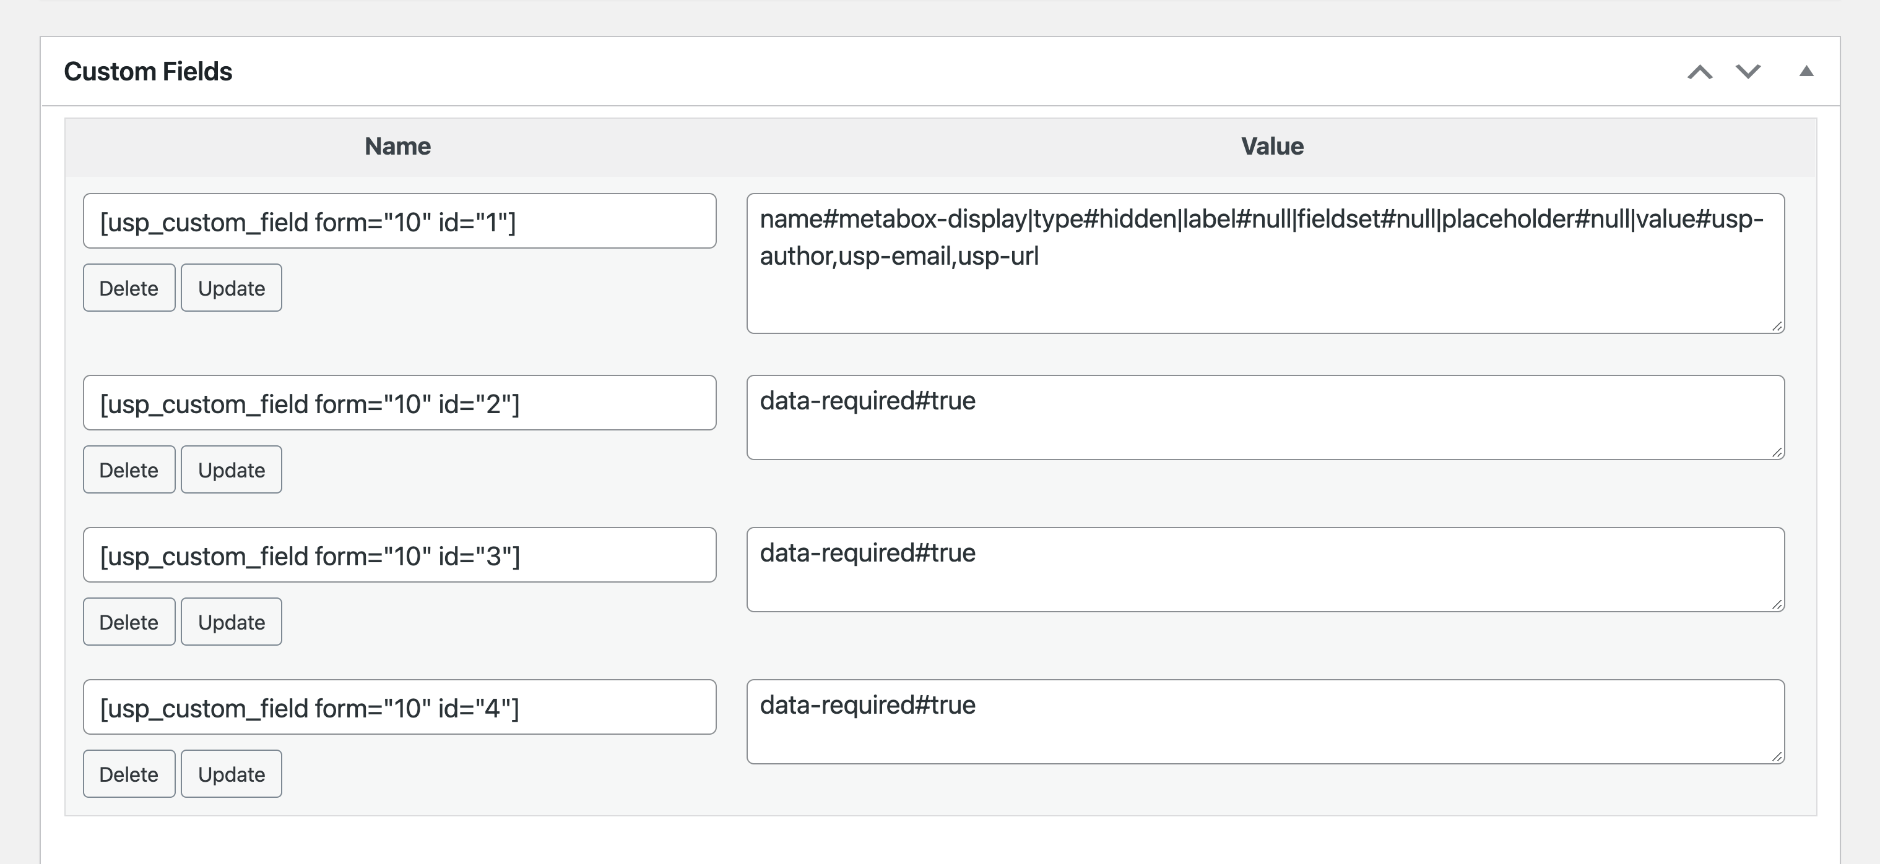
After the four custom fields are defined, add them to the form content like so:
// add the meta-box custom field
[usp_custom_field form="10" id="1"]
// add the three custom fields
[usp_custom_field form="10" id="2"]
[usp_custom_field form="10" id="3"]
[usp_custom_field form="10" id="4"]
// other form fields, can be anything
[usp_name]
[usp_url]
[usp_email]
.
.
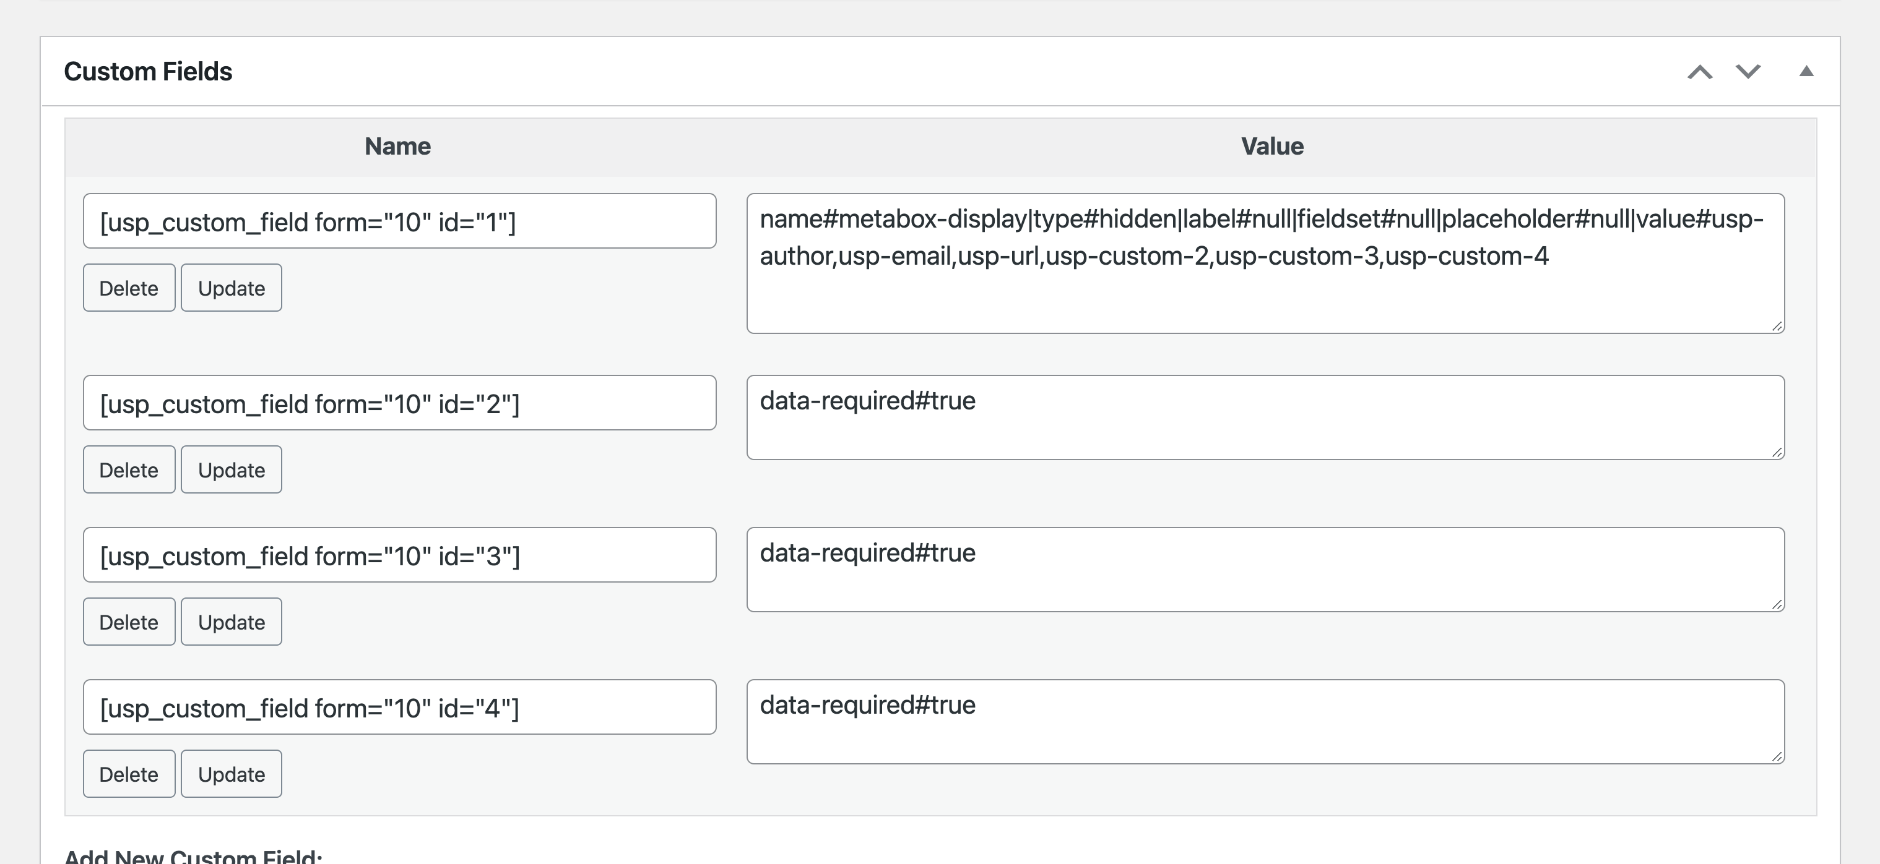
.Once the Custom Fields are added to the form, modify the first custom field definition — the one that defines the meta box — by appending the names of our three custom fields:
usp-custom-2,usp-custom-3,usp-custom-4So now the meta-box definition should look like this:
name#metabox-display|type#hidden|label#null|fieldset#null|placeholder#null|value#usp-author,usp-email,usp-url,usp-custom-2,usp-custom-3,usp-custom-4What just happened? We added the names of our three custom fields to the meta-box definition. That instructs USP to include those fields in the meta box. To include other fields, simply add their names to the definition. Here is a screenshot showing the final configuration:
Remember to save your changes, both for the Custom Field (grey button) and the Form itself (blue button). Then try submitting a test post and viewing it in the WP Admin Area. You should see a Meta Box similar to this:

Once you get this set up, you’re good to go: all future posts submitted via the form will display their own meta boxes on the Edit Post screen.
More Examples
In the previous example, we add three basic/default Custom Fields. The names of these Custom Fields are usp-custom-1, usp-custom-2, and usp-custom-3. This is fine for most cases, but there are situations where you need to customize the names of your Custom Fields. For example, let’s say that your form needs Custom Fields that use the following names:
favorite-colorfavorite-moviefavorite-song
To display these Custom Fields via Meta Box, we would modify our example as follows:
- Custom Field Name:
[usp_custom_field form="10" id="1"] - Custom Field Value:
name#metabox-display|type#hidden|label#null|fieldset#null|placeholder#null|value#favorite-color,favorite-movie,favorite-song
Notice that the value attribute now includes the names of our desired Custom Fields. Assuming that these Custom Fields have been defined and included in the form, they will be displayed in the USP Meta Box in the WP Admin Area.
You can display any Custom Fields via the USP Meta Box, including Default Custom Fields, Custom Prefix Fields, and Custom Custom Fields.
Notes
1) You can customize the name of the Meta Box itself, as well as the “Name” and “Value” column headers using the following filter hooks:
usp_meta_box_titleusp_meta_box_nameusp_meta_box_value
2) If you want to change the value of a Custom Field that is displayed via the USP Meta Box, you must make the changes directly via the USP Meta Box (and click Update Post). Note that changes made to custom fields via the USP Meta Box will be reflected in the regular Custom Fields panel. Conversely, to make changes to any Custom Field that is not displayed via the USP Meta Box, you must do so directly via the Custom Fields panel.
3) You can add a Meta Box to any post (even if it is not submitted via USP) as follows:
- Visit the Edit Post screen
- Scroll down to the Custom Fields panel
- Add a new Custom Field, and give it the following name:
usp-custom-metabox-display - For the Value of the Custom Field, specify the names of whichever fields you would like to display (e.g.,
current-mood,mobile-number,current-date, etc.)
Then click to save your changes and the Meta Box will display your specified Custom Fields.